
 Reviewed by
 A shopper opens your store and narrows 400 products down to eight. They find something they like, then they leave. Not because nothing appealed to them, but because they weren’t ready to buy. There was nowhere to put what they found.
That happens on plenty of stores running WooCommerce Search & Filter. The wishlist button that shows up everywhere else in your shop doesn’t appear on filtered result grids. Your customers do the work of narrowing your catalog, then hit a dead end.
I’ve seen this trip up store owners who assumed the button was broken. It wasn’t. The button never had a place to attach itself on those pages.
SaveTo Wishlist handles this automatically from version 1.1.0 onward. Below, we’ll cover what the integration does, how to switch it on, and how to use the saves it unlocks.
Jump to:
- Why Wishlist Buttons Matter On Filtered Results
- What The Search & Filter Integration Actually Does
- What You'll Need Before You Start
- How To Set Up SaveTo Wishlist With Search & Filter
- Ways To Get More Out Of Filtered Wishlist Saves
- Troubleshooting Common Problems
- FAQs: WooCommerce Search & Filter Wishlist Buttons
- Turn Filtered Browsing Into Saved Sales
Why Wishlist Buttons Matter On Filtered Results
Filtering is one of the strongest buying signals a shopper will give you. It’s also a common point of drop-off. According to Baymard Institute, the average documented cart abandonment rate is 70.22% across 50 separate studies.
The biggest reason people give isn’t price or shipping. In that same research, 42% say they were just browsing and not ready to buy. However, those shoppers aren’t lost causes. They need somewhere to park an item while they think it over.
Filtered grids are where a save button earns its keep. A filtered result is a customer telling you what they’re after. For example, someone who narrows to “blue, size 10, under $80” has given you a far clearer signal than a homepage browser. We go deeper on that in our guide to using wishlist data to uncover customer intent.
It’s also worth knowing how rare a good filtering experience is. Baymard’s product list benchmark rates 58% of desktop and 78% of mobile ecommerce sites as “poor” to “mediocre”. That’s their verdict on product list UX.
On top of that, 51% don’t offer all five filter types shoppers expect. Running WooCommerce Search & Filter already puts you ahead of many stores.
What The Search & Filter Integration Actually Does

The integration makes the wishlist button render on Search & Filter result grids, which doesn’t happen on its own.
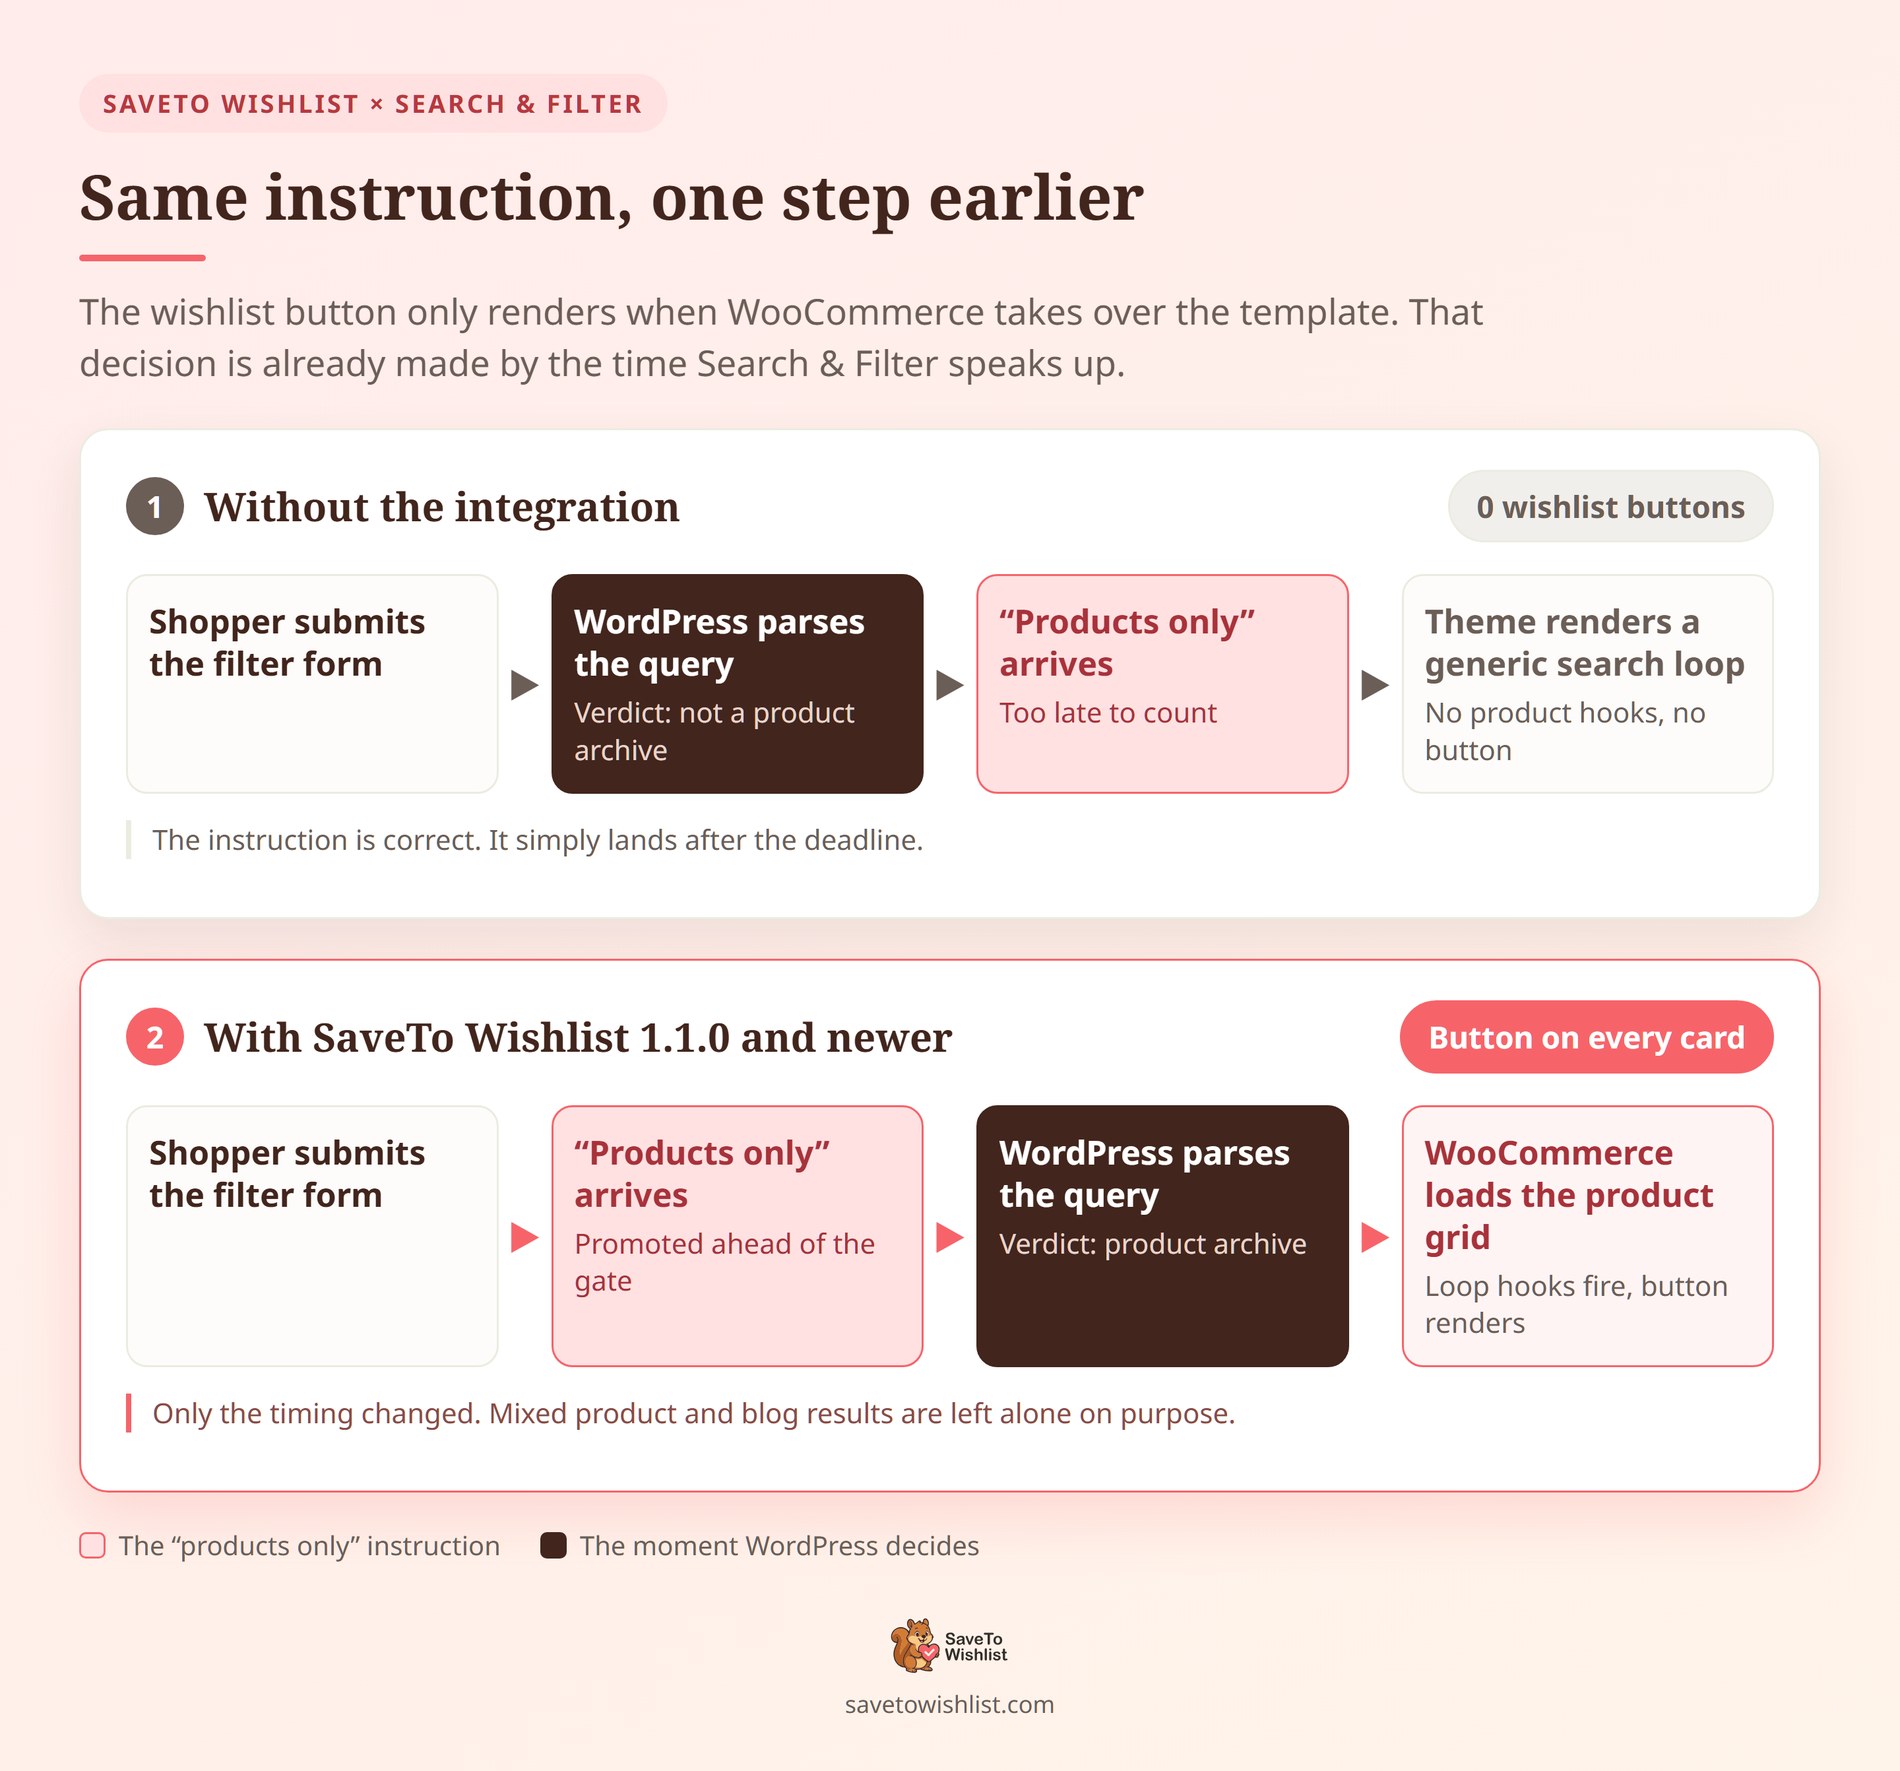
Here’s the plain-English version. When someone submits a WooCommerce Search & Filter form, the plugin tells WordPress “only show products.” However, it says so slightly too late in the page load. By then WordPress has already decided the page isn’t a product archive.
As a result, WooCommerce never loads its product grid template. Your theme renders its ordinary search layout instead. None of the WooCommerce product hooks fire, so the wishlist button has nothing to attach to.
SaveTo Wishlist passes that same “products only” instruction one step earlier. WordPress then treats the page as a product archive. WooCommerce takes over the template, the product grid hooks fire, and your button appears on every card. In practice, it’s the identical path a standard WooCommerce product search already takes.
What to know before you set it up
A few things are worth knowing before you switch it on:
- It’s free. The integration ships in the free SaveTo Wishlist plugin from version 1.1.0. You don’t need a paid license.
- It targets the free Search & Filter plugin. Search & Filter Pro runs on a separate codebase, so it isn’t affected either way.
- It only fires on product-only results. If your form returns products mixed with blog posts, the integration stands down on purpose.
- There’s nothing to configure. No SaveTo Wishlist shortcodes, no template overrides, and no settings page for the integration itself.
That third point is a real limitation, and it’s worth planning around. The integration leaves mixed result sets alone, so WooCommerce templates don’t hide your non-product results. In short, a products-only form is the trade you make for the button. You can read the technical detail on our Search & Filter integration page.
Because the whole thing runs on the server, it adds no extra scripts or requests to your filtered pages.
What You’ll Need Before You Start
Four things need to be true before the button shows up on a filtered grid.
- SaveTo Wishlist version 1.1.0 or newer, installed and active.
- The free Search & Filter plugin, installed and active.
- A WooCommerce Search & Filter form set to return products only.
- A visible wishlist button placement on your shop pages, which is on by default.
How To Set Up SaveTo Wishlist With Search & Filter
Setup runs to four short steps in the order below. None of them involve code beyond pasting a shortcode.
Install the free Search & Filter plugin
- Go to Plugins, then Add New Plugin.
- Search for Search & Filter.
- Install and activate it.
Already running WooCommerce Search & Filter? Skip ahead. Do check that SaveTo Wishlist is on 1.1.0 or newer, since older versions don’t include the integration.
Create a search form that returns products only
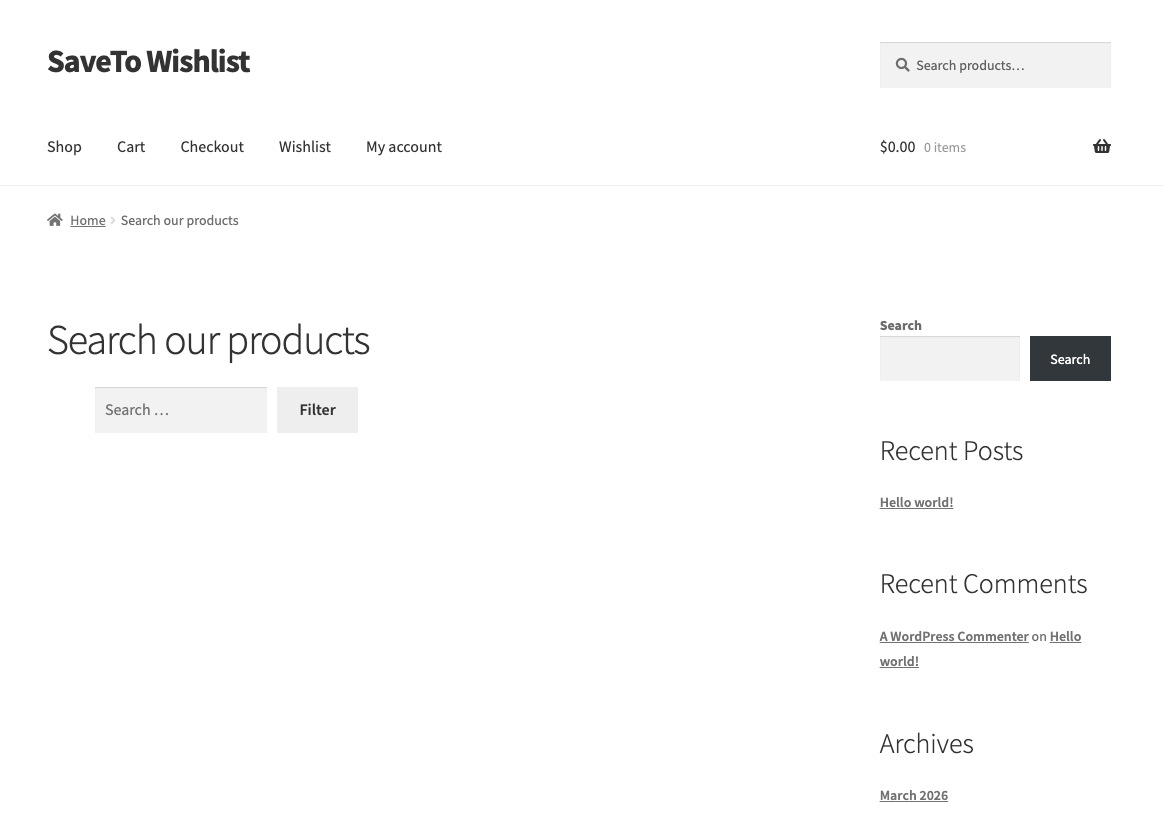
This step matters more than any other, so it’s worth getting right. Build a Search & Filter form that filters your WooCommerce products and nothing else. The quickest route is to drop this shortcode onto any page:
[searchandfilter fields="search" post_types="product"]The post_types="product" part does the work. It tells Search & Filter to look at your products alone. Set it to search products alongside blog posts and the wishlist button won’t appear, by design. Wholesale Suite has a guide on adding search and filter to order forms if you sell B2B too.
Check your shop page button placement
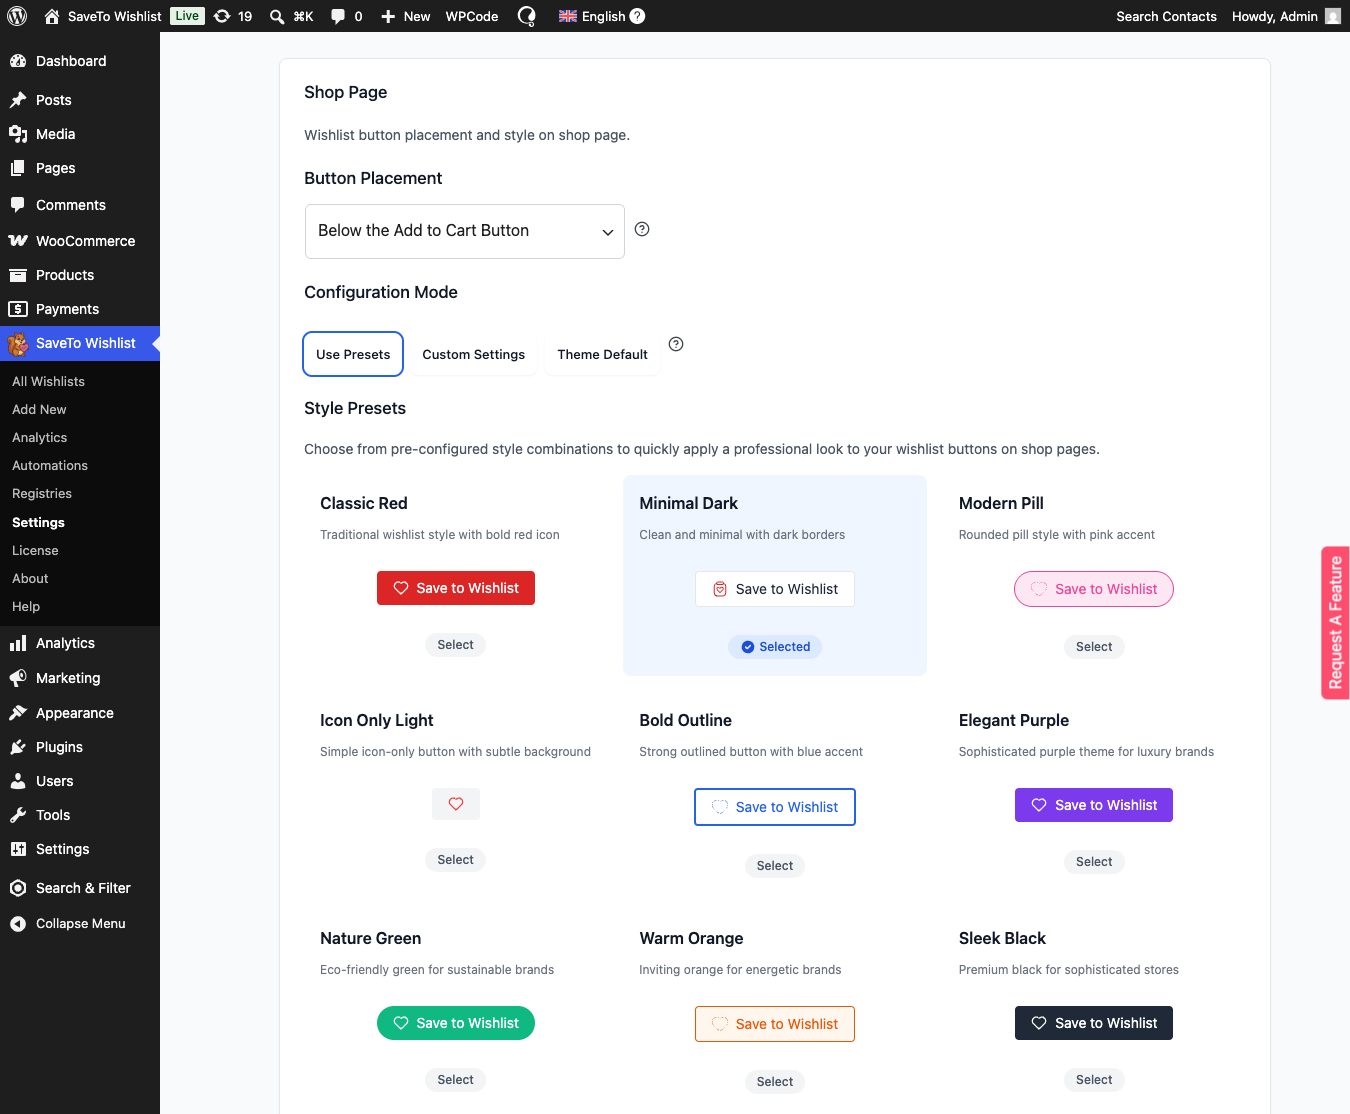
Filtered grids use the same button settings as your shop and category pages. In other words, if you switch the button off there, it won’t show on filtered results either.
- Go to SaveTo Wishlist, then Settings.
- Open the Button Placement & Styles tab.
- Open the Shop Page section.
- Set Button Placement to any visible option rather than Don’t show.
Any of the placement options work here. The example below uses Below the Add to Cart Button.
Test your filtered results
Open the page holding your form, run a filter, and look at the grid. Every product card should carry the wishlist button. SaveTo Wishlist styles it exactly as it does on your shop page.
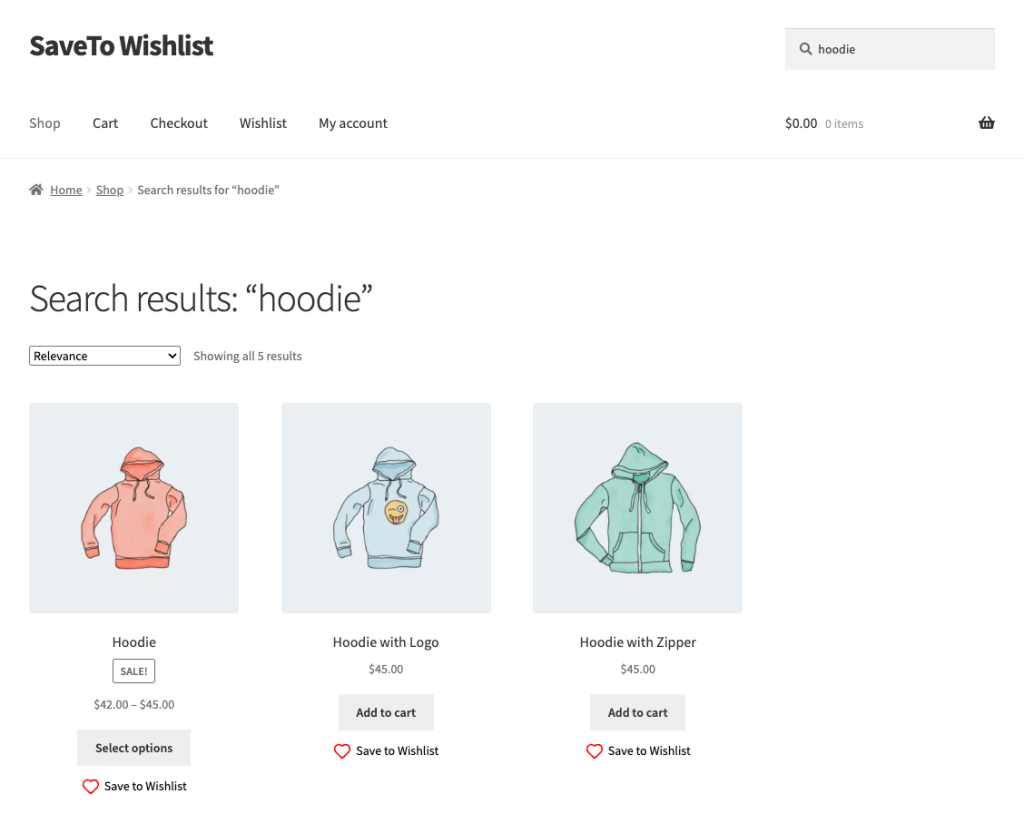
Test it logged out as well as logged in. Saves work for both, so a guest who filters and saves will find the item waiting later. That matters, because Baymard’s research also found 18% of shoppers abandon when a site asks them to create an account. Our guide to WooCommerce guest wishlists covers this in more detail.
Ways To Get More Out Of Filtered Wishlist Saves
Switching the button on is the easy part. These four moves turn those saves into something you can act on.
Build filtered landing pages for campaigns
AdTribes applies the same segmenting idea to ads in its guide to Google Shopping custom labels.
A WooCommerce Search & Filter results URL is a real, linkable page. Build one for “gifts under $50” and send your email or social traffic straight to it. Visitors land on a pre-narrowed grid where every item can be saved in one click. That gives them a shorter path than a 400-product shop page.
Follow up on what gets saved
A save is a request for a reminder. The two follow-ups that work hardest are price drop alerts and back in stock notifications. Both arrive at the moment the shopper’s original objection disappears. For the full set, see our guide to wishlist email marketing.
Let saves tell you which filters to add
Look at what shoppers save from filtered pages. You’ll spot the attributes they actually shop by. For instance, saved items might cluster around a color or price band you don’t filter by.
That’s a filter worth adding. Given that 51% of sites miss at least one expected filter type, this is often low-hanging fruit.
Keep the button visible on the card
Filtered grids are dense, so a save option below the fold gets missed. Pick a placement that stays visible on mobile, where much of your filtering traffic will be. Our notes on ecommerce shop page best practices walk through the trade-offs.
None of these need a developer, so pick the one that fits your catalog and start there.
🔍️ One thing we see repeatedly: a store owner reports the wishlist button “isn’t working” with Search & Filter. The real cause is usually a form set to search everything rather than products only. It’s a single setting, and it produces no error message. The grid looks perfectly normal apart from the missing buttons, so check the form’s post type setting first.
Troubleshooting Common Problems
Three issues account for most of the WooCommerce Search & Filter reports we get.
The button isn’t showing on filtered results
Most often, the form isn’t set to products only. The integration adds the button when every result is a WooCommerce product. Otherwise it stands down, so mixed results aren’t hidden behind WooCommerce templates. Set the form’s post type to product and try again.
Wholesale Suite also has tips on improving WooCommerce product search if results still look wrong.
The button isn’t showing on any shop page
That’s a settings issue rather than an integration one. Go to SaveTo Wishlist, then Settings, then the Button Placement & Styles tab. Open the Shop Page section and check that Button Placement isn’t set to “Don’t show.”
You’re running Search & Filter Pro
This built-in compatibility targets the free Search & Filter plugin. Pro, however, runs on a separate codebase and works differently. If buttons aren’t appearing there, our support team is the fastest route to an answer.
FAQs: WooCommerce Search & Filter Wishlist Buttons
Do I need the paid version of Search & Filter?
No. The integration is built for the free Search & Filter plugin. Search & Filter Pro is a separate product on a different codebase. It isn’t required for the wishlist button to appear.
Do I need SaveTo Wishlist Pro?
No. Search & Filter support is part of the free plugin from version 1.1.0 onward. SaveTo Wishlist Pro adds wishlist analytics and automated emails. The buttons on filtered grids work without it.
Do I have to configure anything for the integration?
No. Once both plugins are active and your form returns products only, it runs on its own. The one setting involved is your existing shop page button placement, which is on by default.
Does it still work after a customer applies a filter?
Yes. With the free Search & Filter plugin, applying a filter reloads the page with the new results. The wishlist button is drawn on each product in the fresh grid. Saved items keep their state for logged-in customers and guests alike.
Will it affect my other pages?
No. It only changes requests from a Search & Filter form that resolves to products alone. Your shop page, category archives and single product pages are untouched. Standard WooCommerce product searches and mixed search results behave exactly as before.
Turn Filtered Browsing Into Saved Sales
Filtering is your customer doing your merchandising for you. They’ve told you the color, the size and the price range they care about. Then they’ve narrowed themselves down to a handful of products. Sending them away from that screen with no way to save anything wastes the clearest signal of the session.
Better still, the fix takes a few minutes and costs nothing.
- Update SaveTo Wishlist to 1.1.0 or newer and activate the free Search & Filter plugin.
- Set your search form to return products only, the step that trips most stores up.
- Confirm your shop page Button Placement isn’t set to “Don’t show.”
- Follow up on what gets saved with price drop and back in stock alerts.
- Use your saved-item data to work out which filter you’re missing.
Already running WooCommerce Search & Filter? You’re one plugin update away from letting shoppers save products as they find them. SaveTo Wishlist Lite covers everything in this guide at no cost. If you later want wishlist analytics and automated follow-up emails, the paid plans add them.