
 Reviewed by
 A wishlist save is the clearest buying signal a shopper hands you for free. They picked the product, they picked the variation, and they said they want it later. On most stores, that signal then goes nowhere. It sits in a database table while the CRM emails everyone the same newsletter.
The cost of ignoring it is easy to see. Baymard Institute puts the average documented cart abandonment rate at 70.22%, averaged across 50 studies. A wishlist save happens one step before that. Meanwhile, Klaviyo’s 2026 benchmarks credit automated flows with 41% of all email revenue from 5.3% of sends.
Behavior-triggered email is where the return sits, and wishlist behavior is going unused. For a Groundhogg WooCommerce store, that gap closes with two tags and no code. This guide covers the setup, your first flow, and the one behavior that catches people out. It also covers five flows worth building once the tagging works.
Jump to:
- What Does The SaveTo Wishlist And Groundhogg Integration Do?
- What You Need Before You Start
- How To Set Up The Groundhogg Integration
- How To Start Groundhogg WooCommerce Wishlist Flows From Wishlist Activity
- Why Your Flow Only Fires Once
- Five Groundhogg WooCommerce Wishlist Flows Worth Building
- Who Gets Tagged, And Who Doesn't
- How To Send Product Details To Groundhogg With A Webhook
- What The Groundhogg WooCommerce Wishlist Integration Doesn't Do
- FAQs: Groundhogg WooCommerce Wishlist Flows
- Turning Saved Products Into Sent Emails
What Does The SaveTo Wishlist And Groundhogg Integration Do?

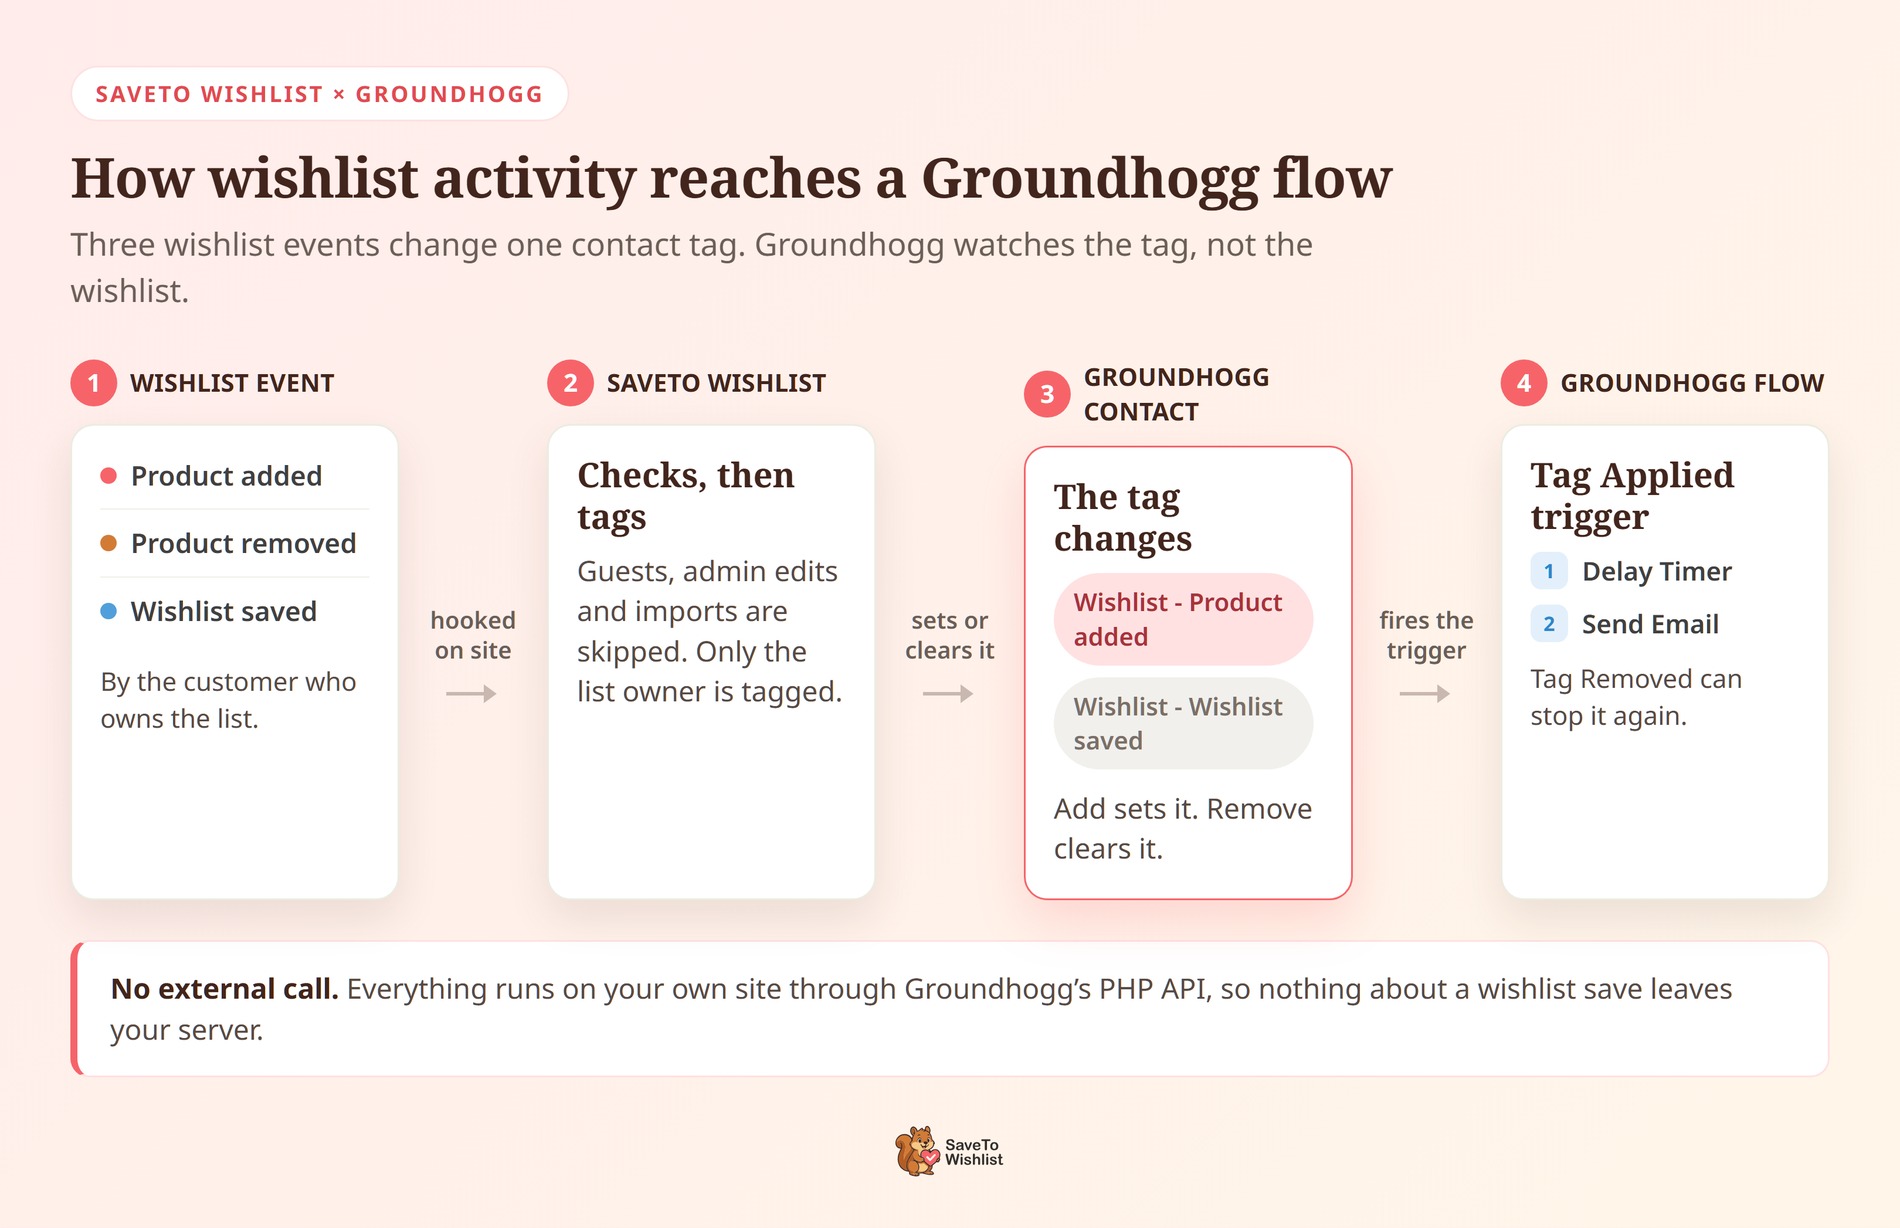
The integration watches three wishlist events and updates a tag on the customer’s Groundhogg contact record. That is the entire mechanism. Groundhogg handles the rest, because it ships a trigger that starts a flow when a tag changes.
Here is what happens when a logged-in customer acts on a wishlist:
| Wishlist event | Effect on the Groundhogg contact |
|---|---|
| Adds a product to a wishlist | Your “added to wishlist” tag is applied. |
| Removes a product from a wishlist | That same tag is removed again. |
| Saves a wishlist | Your “wishlist saved” tag is applied. |
Notice that the add and remove events share one tag. Adding sets it and removing clears it. So the tag reads as a live flag, not a growing history. That shapes how your flows behave, which the section below unpacks.
Two details are worth knowing up front. The tag sync runs entirely on your own site through Groundhogg’s PHP API. There’s no external HTTP call, so nothing about a wishlist save leaves your server. And when Groundhogg isn’t active, the integration registers nothing at all.
The integration shipped in SaveTo Wishlist Lite 1.1.2. It works with the free version of Groundhogg, so you don’t need a paid tier on either side.
What You Need Before You Start
Four things need to be true before setting up your Groundhogg WooCommerce wishlist integration:
- Groundhogg is installed and active. The free version is enough. Tags, flows and the tag triggers all ship in the free plugin.
- SaveTo Wishlist is active, on version 1.1.2 or later. Earlier versions don’t carry the Groundhogg settings section.
- At least one Groundhogg tag exists. The settings screen gives you a dropdown of existing tags rather than a text field.
- Your customers already have Groundhogg contacts. The integration only updates contacts Groundhogg already holds. It never creates one.
That last point is a design decision rather than a gap. Creating a marketing record for somebody who clicked a heart icon means storing personal data. You were never given permission to hold it. So a customer who isn’t in Groundhogg yet is skipped quietly instead.
Contacts normally arrive through checkout or a customer account signup.
A note on Groundhogg’s naming
Groundhogg 4.0 renamed two things you’ll meet constantly in this guide. Funnels became Flows, and Benchmarks became Triggers. Groundhogg’s own 4.0 release notes say the rename brings the wording closer to industry norms.
Plenty of older tutorials and legacy documentation across the web still use “funnel” and “benchmark.” They mean the same screens. This guide uses the current names, which is what you’ll see in your admin menu today.
How To Set Up The Groundhogg Integration
Setup runs in two places. First you create the tags in Groundhogg, then you map them in SaveTo Wishlist.
Step 1: Create your tags in Groundhogg
Open Groundhogg then Tags in your WordPress admin and create two tags. Name them for the event rather than the campaign, because you’ll reuse them across several flows. Something like Wishlist - Product added and Wishlist - Wishlist saved works well.
It’s tempting to name a tag after whatever promotion prompted it. That name ages quickly, though, and six months on the tag list gets hard to read. Event names stay accurate. They also double as customer segments later on.
Step 2: Map the tags in SaveTo Wishlist
Go to SaveTo Wishlist then Settings, and open the Integrations tab. You’ll find a Groundhogg section there. Set Enable Groundhogg Integration to Yes and the two tag dropdowns appear.
Added To Wishlist Tag: applied when a customer adds a product, and removed when they remove it.Wishlist Saved Tag: applied when a customer saves a wishlist.
Hit Save Changes and you’re connected.
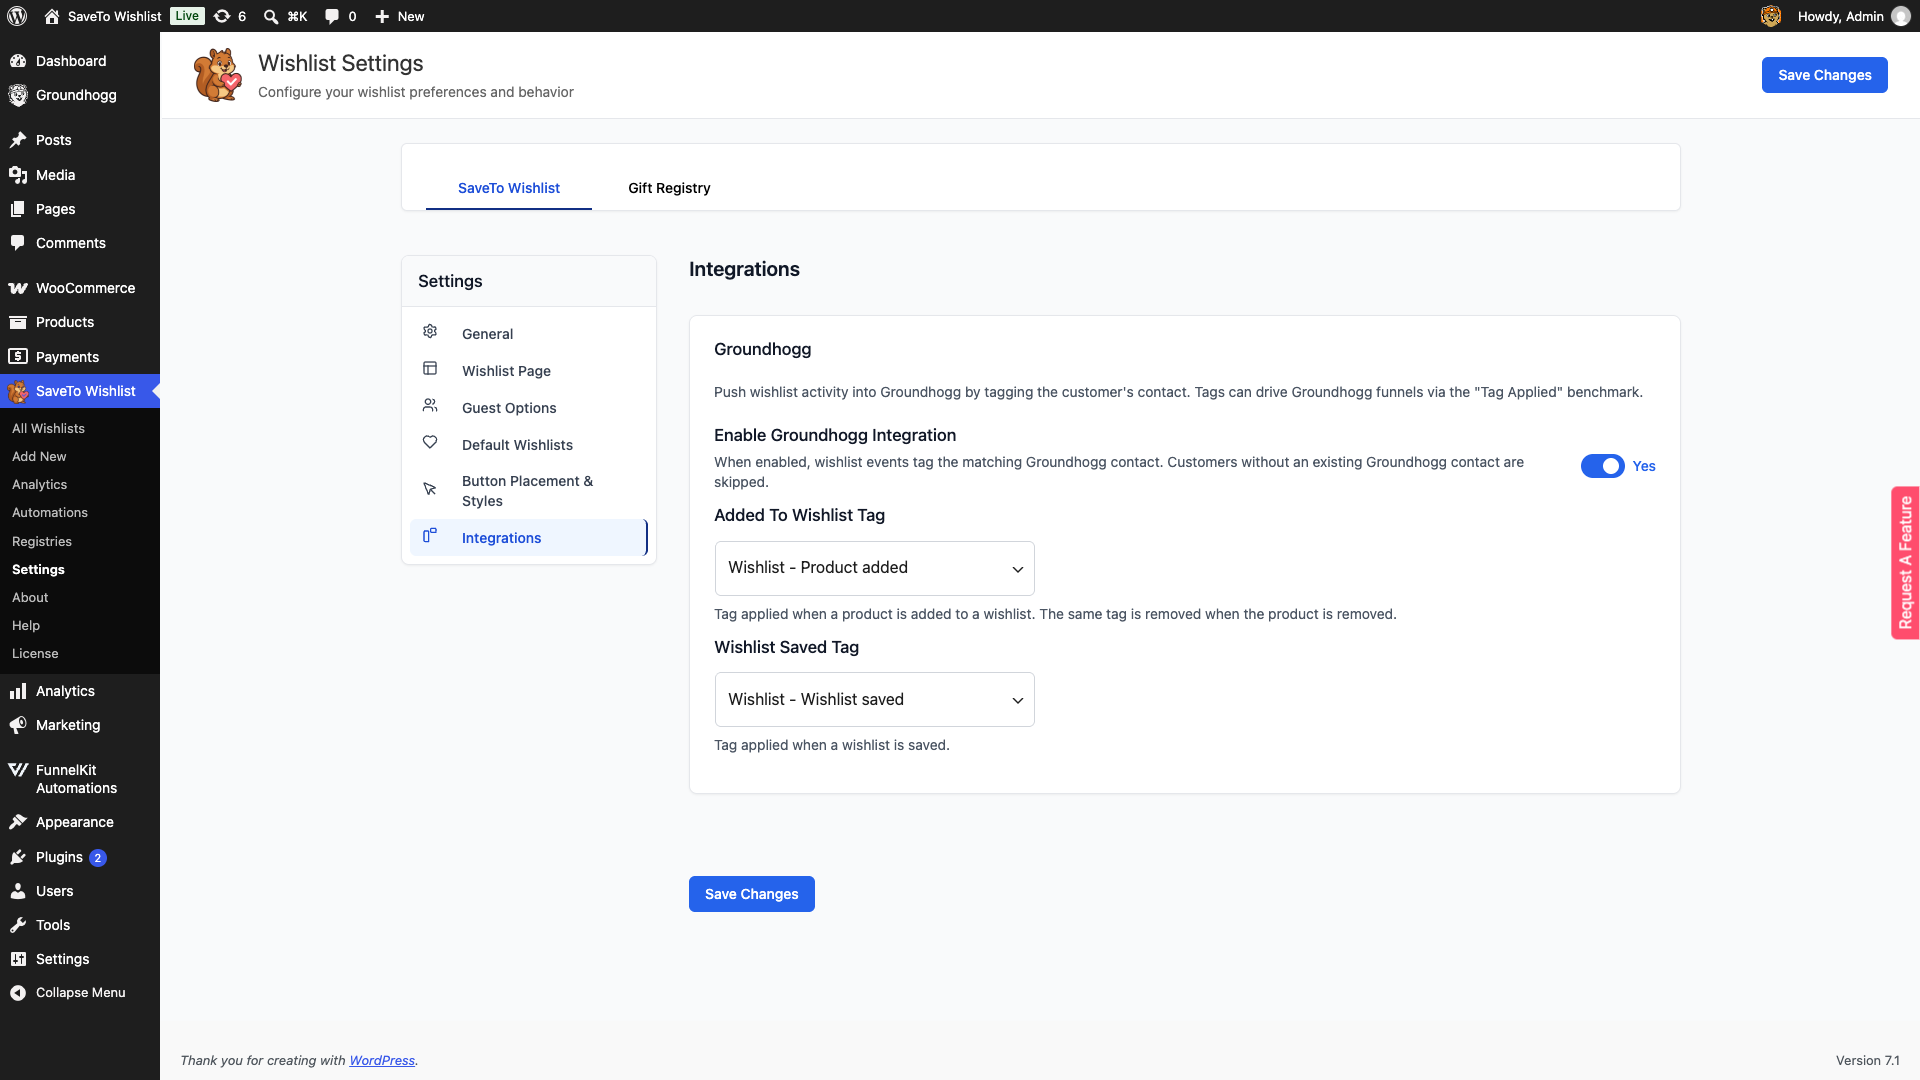
You can map one tag, both, or leave one blank. A blank mapping means that event doesn’t tag anyone. That’s a reasonable choice if you only care about saves.
🔍️ What we’ve seen: store owners often tell us their brand new Groundhogg tag isn’t in the dropdown. Nothing is broken. SaveTo Wishlist caches the Groundhogg tag list for five minutes, so the settings page stays fast. Give it a few minutes, reload the settings page, and the tag appears.
How To Start Groundhogg WooCommerce Wishlist Flows From Wishlist Activity
Tagging on its own doesn’t send anything. The tag is the signal, and a Groundhogg flow is what acts on it. Building the first one takes about as long as the setup did. Advanced Coupons has a walkthrough for planning an email sequence if you want a template.
- Go to
GroundhoggthenFlows, chooseAdd New, and pickStart From Scratch. - Drag the
Tag Appliedtrigger in as the first step. - Select the tag you mapped to
Added To Wishlist Tag. Leave the match set toAny of...when you’re watching a single tag. - Add your actions underneath. A
Delay Timerfollowed by aSend Emailis enough to start. - Click
Activate. Later edits then sit in draft until you clickPublish Changes.
There’s a matching Tag Removed trigger, and it pairs neatly with the remove event. Removing a product clears the same tag. So a flow built on Tag Removed fires when a customer changes their mind. That gives you a clean way to stop a reminder sequence the moment an item leaves the list.
Test it before you rely on it. Log in as a customer account that already has a Groundhogg contact, then add a product. Open that contact in Groundhogg and check the tag appeared. If you test while logged out, nothing will happen, because guest activity is skipped by design.
Why Your Flow Only Fires Once
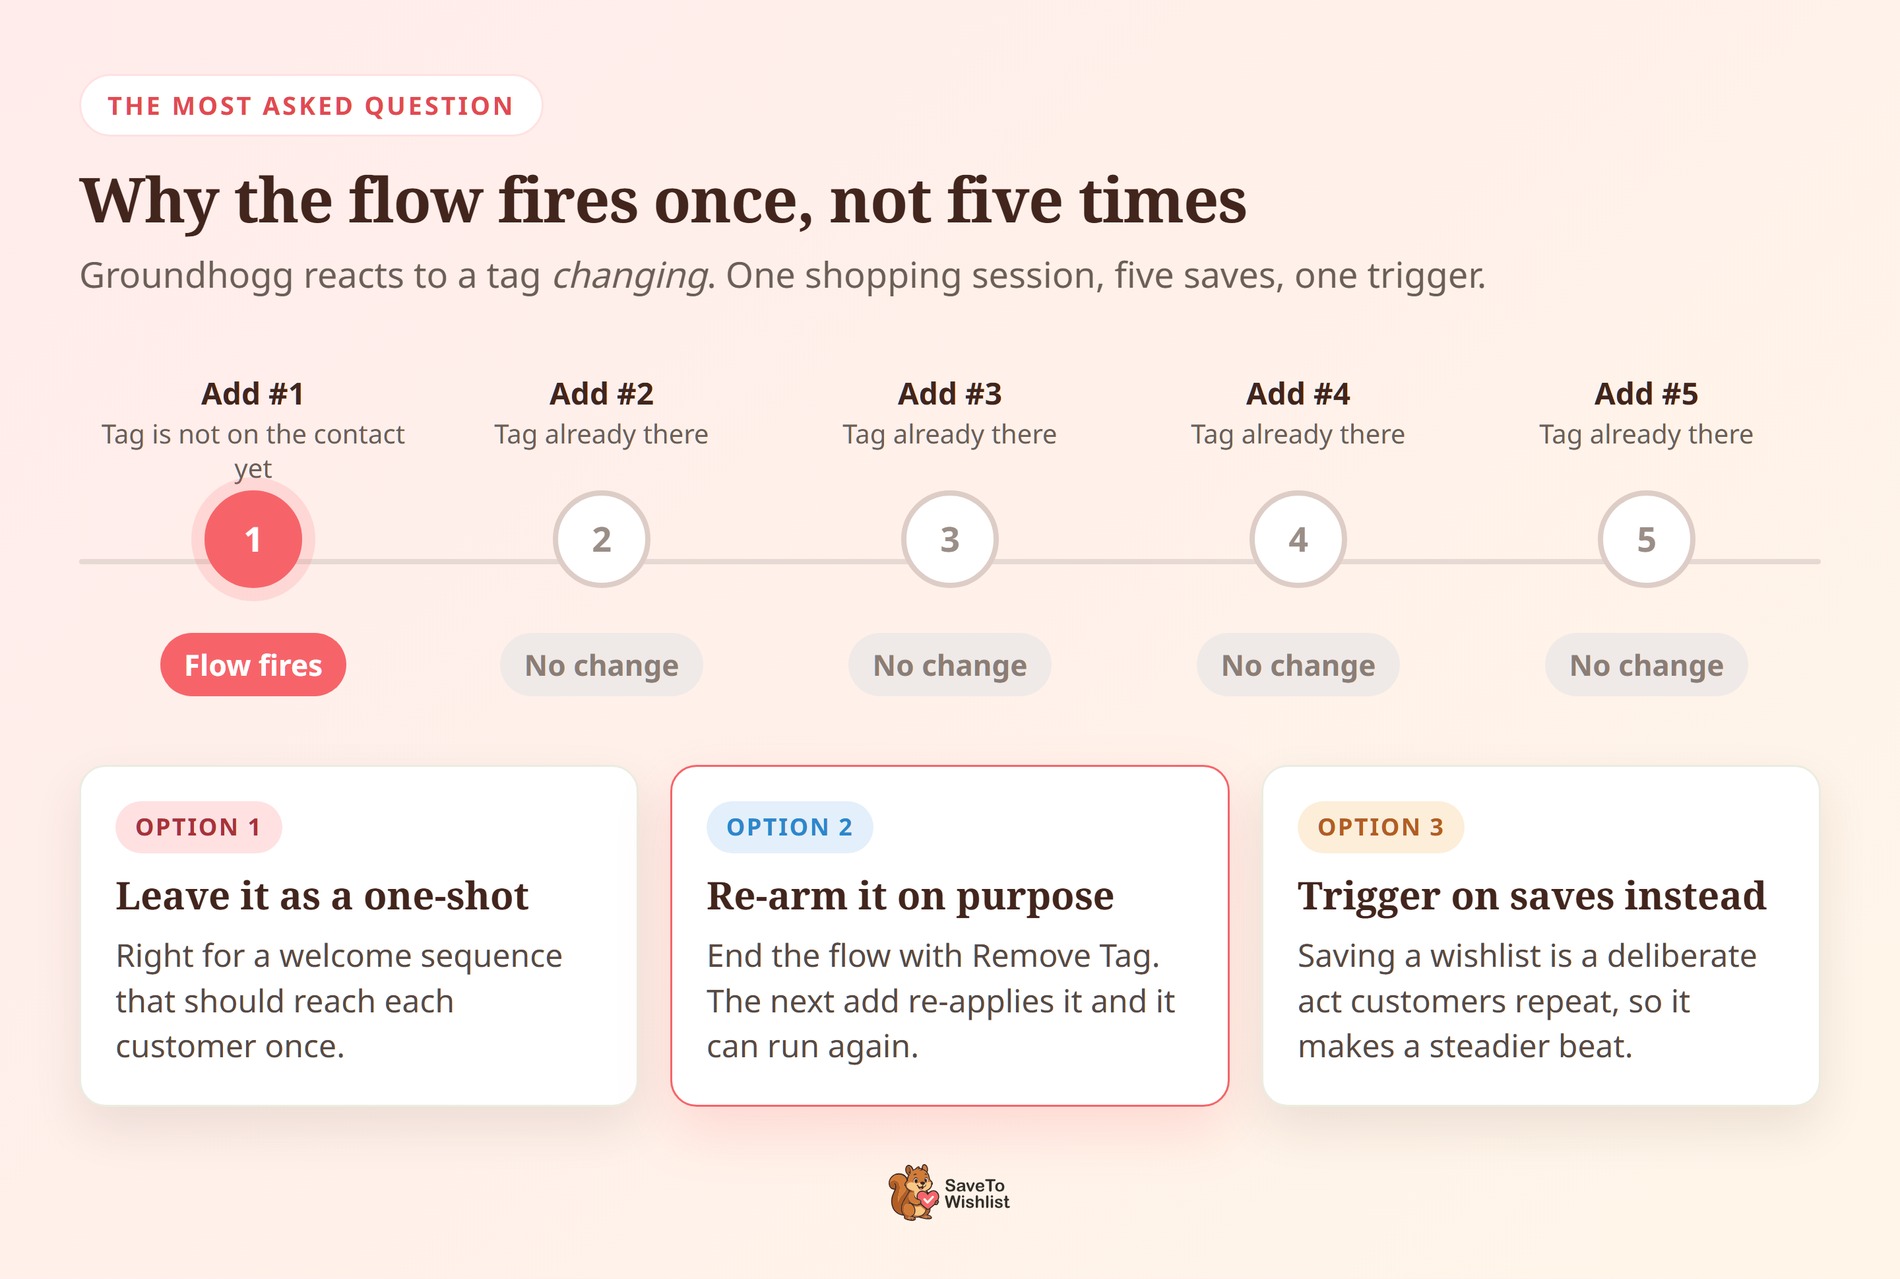
Groundhogg fires the Tag Applied trigger when the tag actually changes, not every time something tries to apply it. Its own code checks which tags the contact doesn’t already have, then stops if there are none. So a customer who adds five products gets the tag on the first add only.
On adds two through five, the tag is already sitting on the contact. Nothing changes, so nothing triggers. This is a common question from store owners, but it’s a deliberate logic feature worth keeping in mind as you plan your automation.
Treat the add tag as a “this customer has started saving things” signal, not a per-product counter. Framed that way it’s a useful guardrail: a customer can’t set off five reminder emails in ten minutes. Our guide to five wishlist email workflows is built on that same idea. You have three ways to work with it.
- Let it stay a one-shot. For a welcome-to-wishlisting sequence, firing once per customer is exactly right.
- Re-arm it deliberately. End the flow with Groundhogg’s
Remove Tagaction on the same tag. The next add re-applies it, so the flow can run again. - Use the save tag as your recurring beat. Saving a wishlist is a deliberate act customers repeat, which makes it a steadier trigger than adds.
Pick one on purpose before you write the email. The re-arm option is closest to a classic re-engagement campaign. Choosing the model up front is what keeps the flow doing what you expected.
Five Groundhogg WooCommerce Wishlist Flows Worth Building
Once the tag is landing, setting up automated Groundhogg WooCommerce wishlist flows is where the work pays off. These five cover most of what a store needs, and none of them require a paid Groundhogg tier.
The three-day nudge
Trigger on Tag Applied for the add tag, wait three days with a Delay Timer, then send one short email. Point it back at the wishlist rather than at a discount. The email arrives while the product is still a live consideration. That’s the same logic behind cart abandonment recovery, one step earlier.
The wishlist welcome
Fire this once, on a customer’s first save. Use it to say what wishlists do on your store. Lists persist across devices, you’ll flag changes, and lists can be shared. A customer who knows the list is still there next visit has a reason to come back to it.
The saver segment
This one sends nothing. Trigger on Tag Applied, then use an Apply Tag action. It stamps a second, permanent tag such as Segment - Wishlist user.
The original tag can then come and go freely. You end up with a durable segment of high-intent browsers. That segment is the foundation of wishlist-driven email marketing.
The suppression rule
Build a flow on Tag Removed that stops the nudge sequence. A customer who clears the product has already answered your question. Emailing them about an item they deliberately deleted is the kind of message that earns an unsubscribe. Suppression is the least glamorous flow here and often the most valuable.
The sale-day trigger
Before a sale, send to your saver segment first and a day early. These people have already told you what they want, so the email is relevant before you write a word. That’s ecommerce personalization using data you already collected, and it works without cutting the price any deeper. It also gives you a cleaner read on your wishlist conversion rate.
Start with one flow. Get it sending, watch it for two weeks, then add the next. Five half-built flows do less for you than one that runs. Wishlist automation compounds only when each piece is live.
Who Gets Tagged, And Who Doesn’t
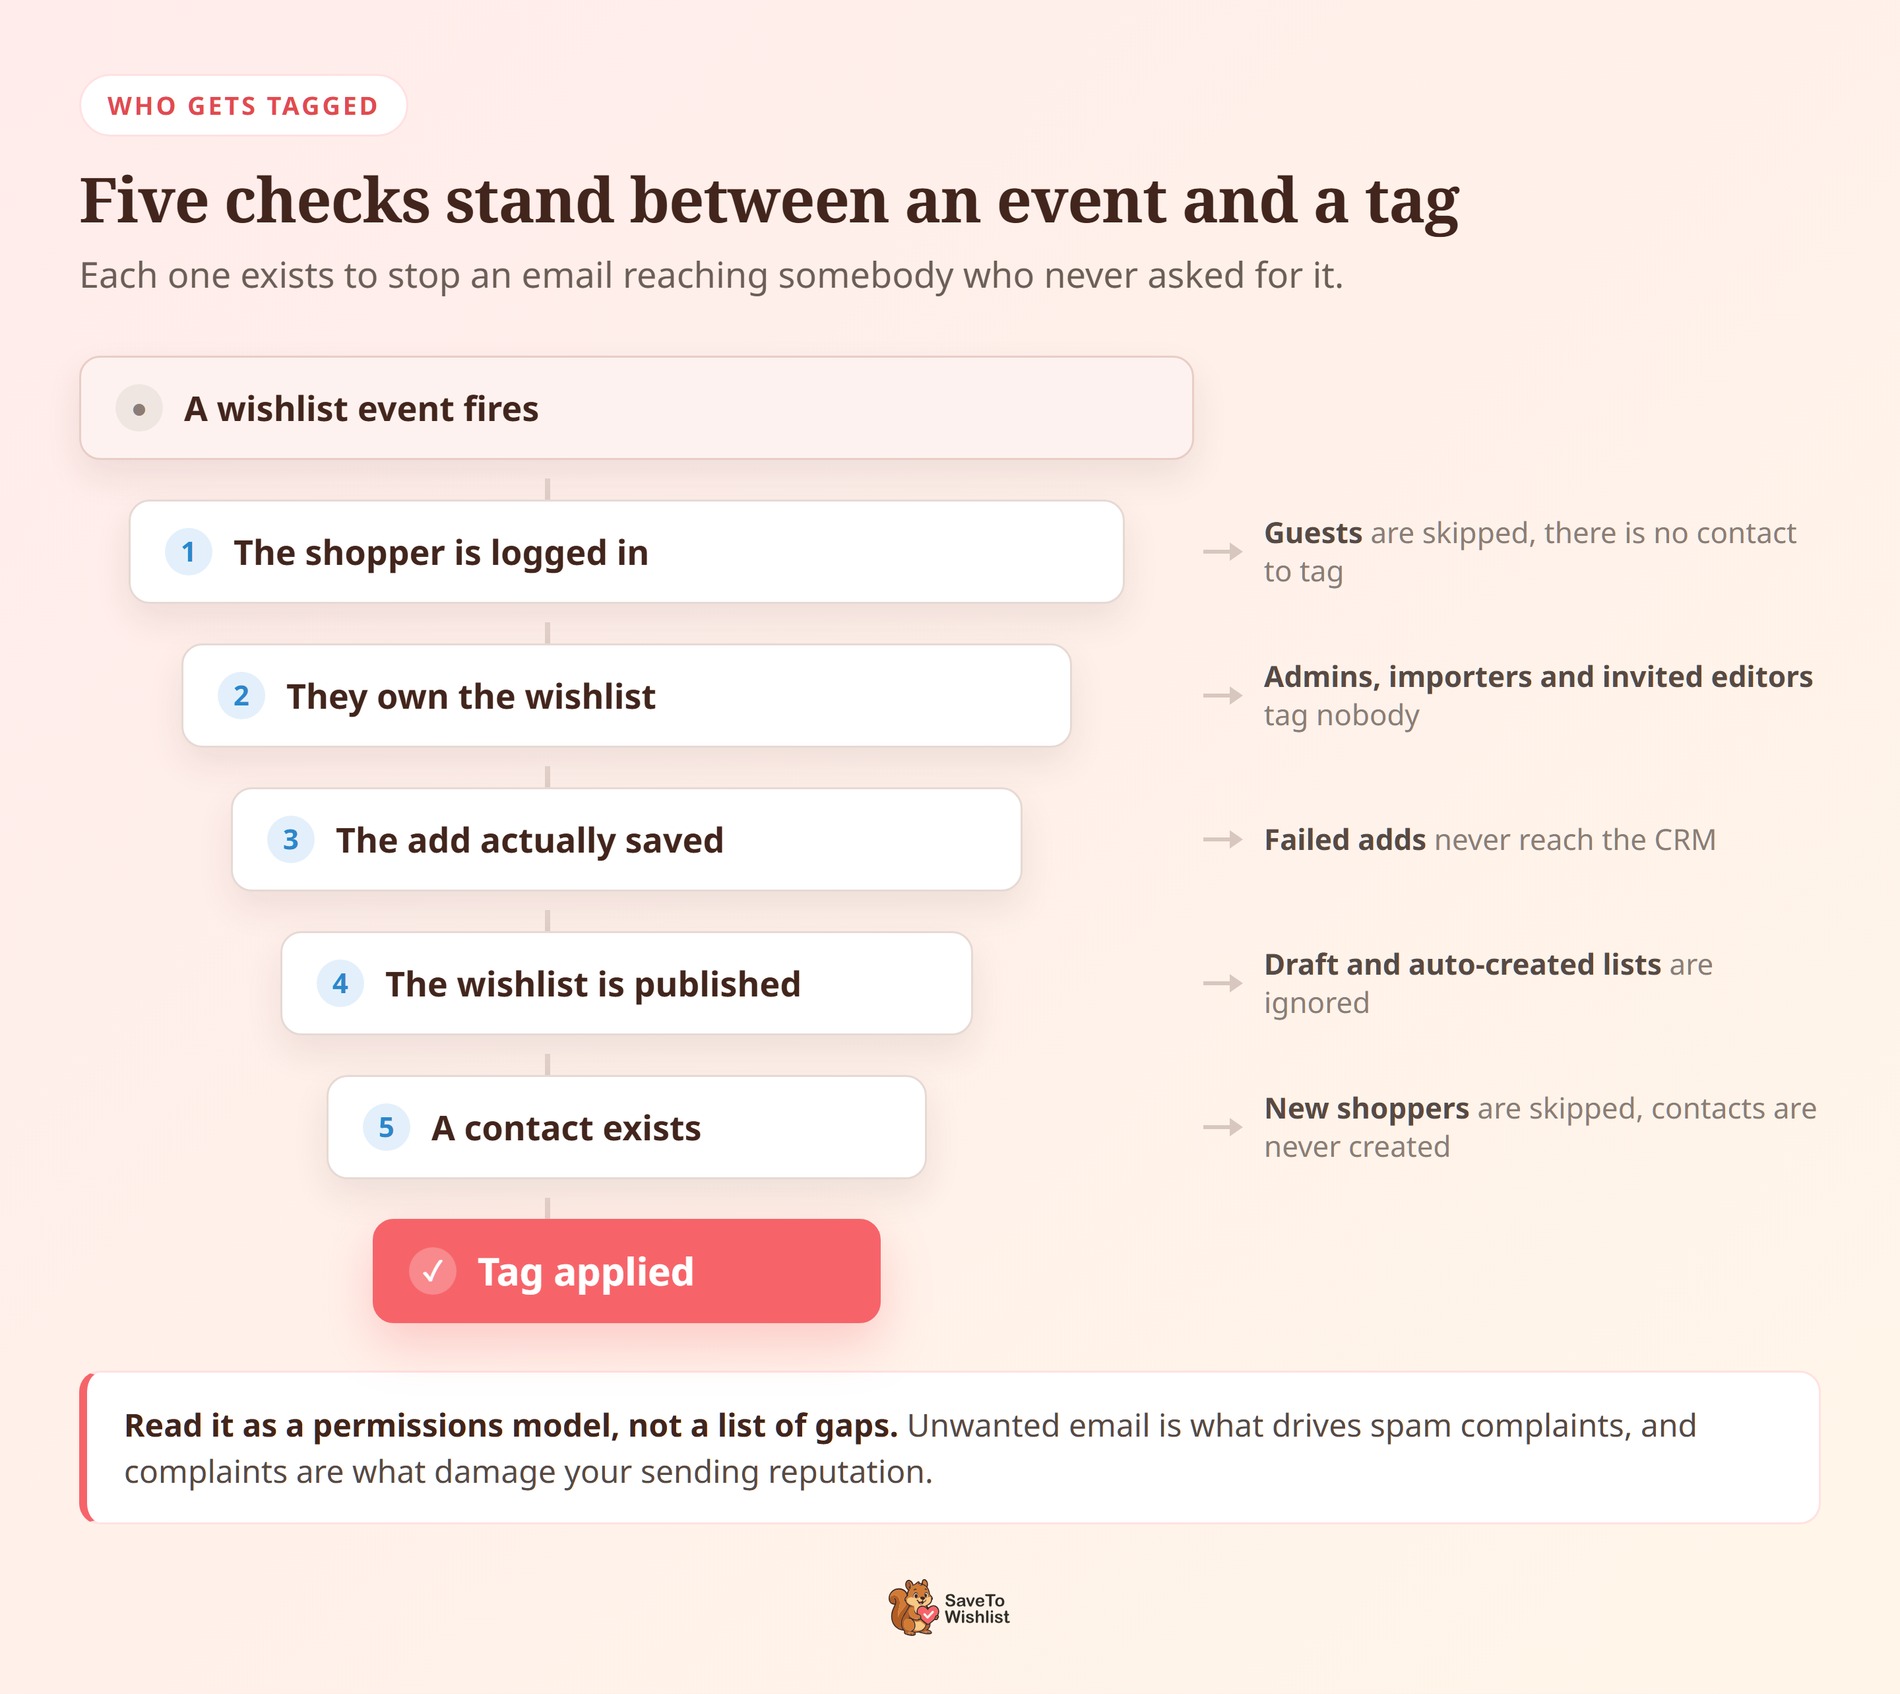
A tag is applied only when the person acting is the wishlist’s own owner. The integration is deliberately narrow about whose contact it will touch. Knowing the rules saves a lot of confused testing.
- Guests are skipped. There’s no contact to tag, and the integration won’t create one. Guest wishlists still work normally, they just don’t reach Groundhogg.
- Admin and importer actions are skipped. Importing wishlists, admin-screen edits, and an invited editor saving someone else’s list all skip the owner. Otherwise a single migration could drop every imported customer into a live flow.
- Failed adds are skipped. If the add didn’t save, no tag is applied. The tag can start an email, so it shouldn’t react to something that never happened.
- Draft wishlists are skipped. Only a published wishlist fires the save tag.
- Auto-created wishlists are skipped. SaveTo Wishlist builds a default list during page load in some setups, and that isn’t the customer saving anything.
Read that as a permissions model rather than a list of exceptions. Each rule stops an email reaching somebody who never asked for one. Unwanted email is what drives spam complaints, and complaints are what damage your sending reputation. Visser Labs covers the same consent trap when importing customers into a store.
One more detail is worth knowing. Turning the integration off stops all tagging but keeps your tag mappings saved. So you can switch it off during a migration and switch it back on without redoing the setup.
How To Send Product Details To Groundhogg With A Webhook
Everything above runs on tags, and a tag is a flat signal. It tells Groundhogg that a customer saved something. It never says what.
If you’re on SaveTo Wishlist Pro, there’s a second path that carries the product itself. It still needs no code.
Pro can post a wishlist event straight to a Groundhogg inbound webhook. Since Pro 1.0.3, a built-in Groundhogg quick start fills in the method, the headers and the payload for you. Plus, this runs separately from the tag sync rather than replacing it. You can leave both switched on.
Set up the webhook automation
Start on the Groundhogg side, because you need that URL before the quick start is any use.
- In Groundhogg, create an inbound webhook and copy its URL.
- In WordPress, go to SaveTo Wishlist then Automations, and click
Add New. - Under
When this happens (Trigger), pick the wishlist event you want to send. - Set
Do this (Action)toCall a webhook. - Set
Quick start (optional)toGroundhogg. - Paste your webhook URL into
Webhook URL. - Save the automation.
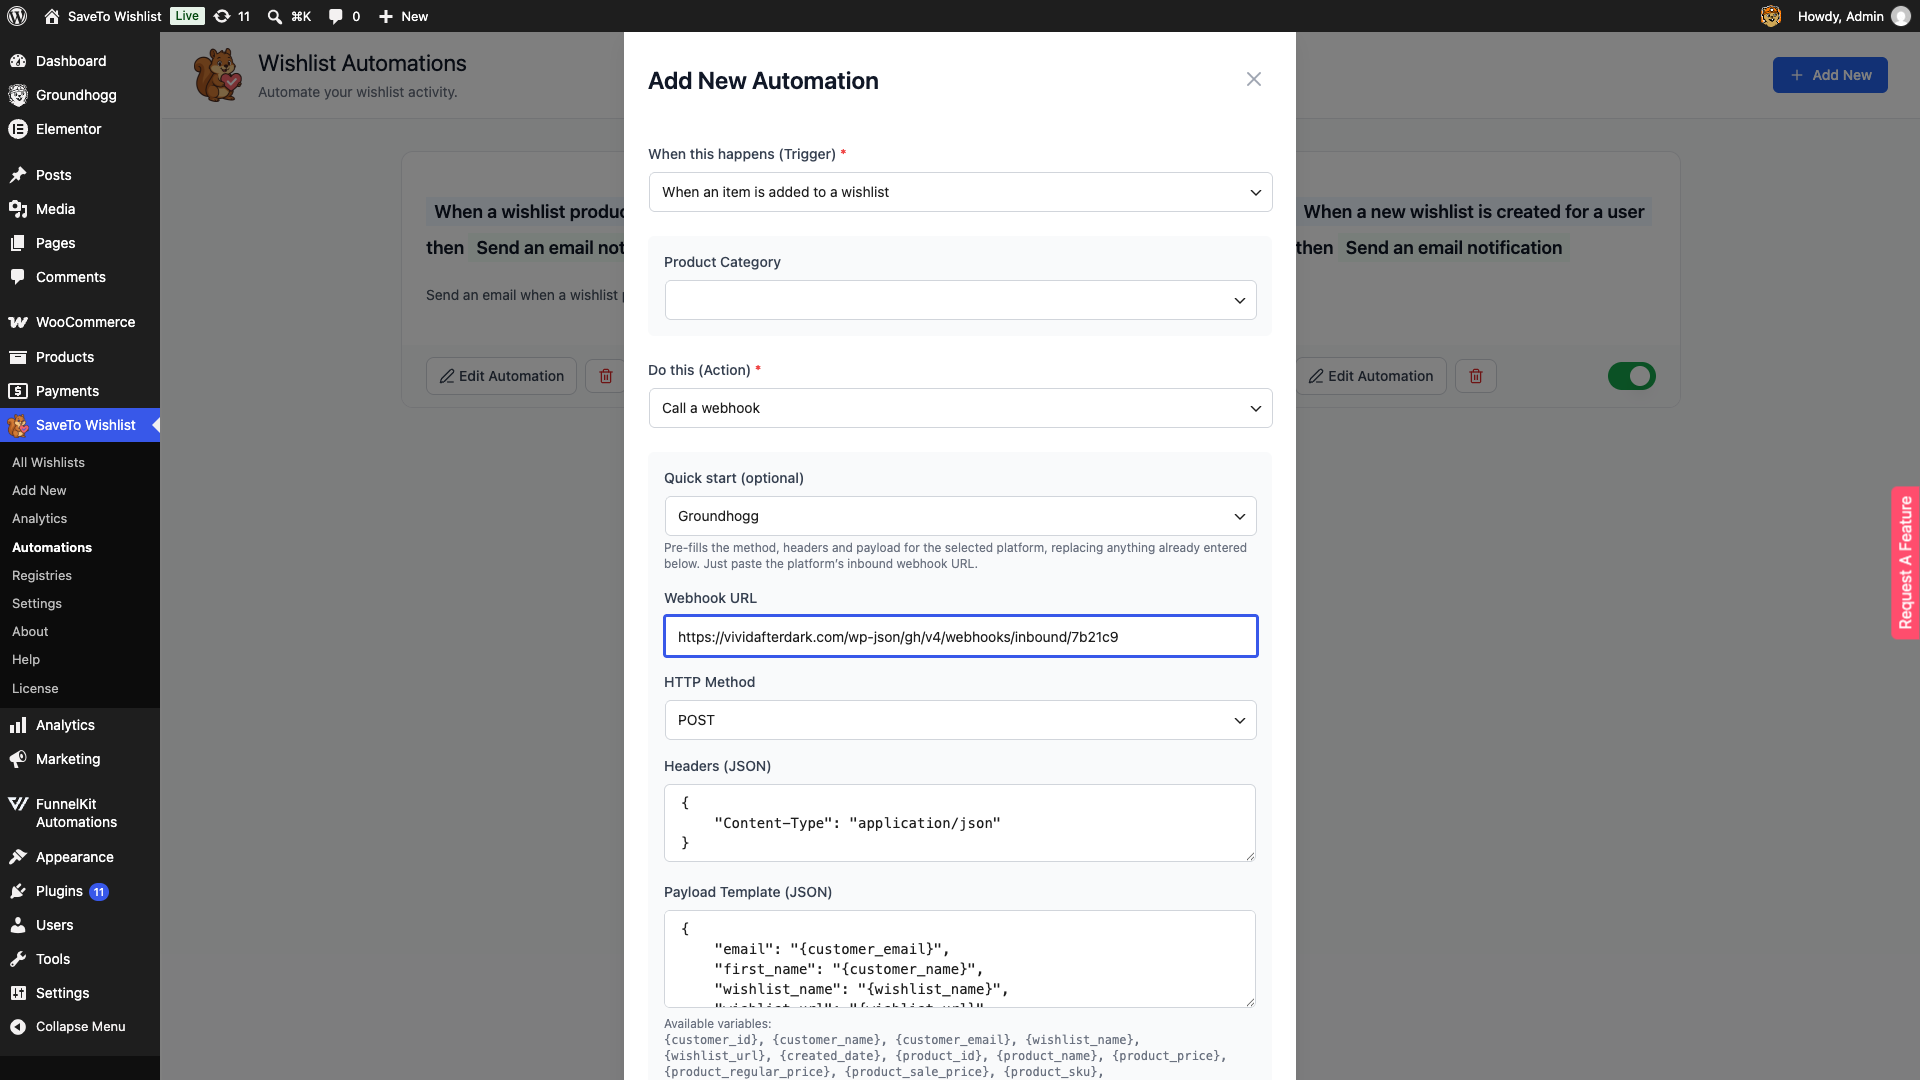
🔍️ What we’ve seen: the Groundhogg option is missing from the Quick start (optional) dropdown. That’s the step order, not a bug. Pro only offers a quick start the chosen trigger supports, so pick your trigger first. The Groundhogg option then appears.
Choosing Groundhogg sets HTTP Method to POST and adds a Content-Type: application/json header. It also writes a payload carrying the customer email and name, the wishlist name and its link. Note that it overwrites whatever those three fields already hold. So pick the quick start first, then customize.
Add product details to the payload
That payload stays editable, which is where the product detail comes in. On the When an item is added to a wishlist trigger, open Payload Template (JSON). Then add the product variables you want: {product_name}, {product_id}, {product_sku} or {product_price}.
Your Groundhogg email can then name the saved item instead of pointing back at the wishlist. One note on the price. {product_price} arrives as a raw number, without your store’s currency symbol.
Two edges worth knowing
The quick start is only offered on three triggers: wishlist created, item added, and item removed. The sale and back-in-stock triggers don’t get it, because they’re product-scoped rather than customer-scoped. Use the email action for those instead.
The other edge should feel familiar from the tagging section above. The customer email resolves from the wishlist owner’s account. A guest wishlist has no account behind it, so that field arrives empty. Both paths stop at the same point, for the same reason.
What The Groundhogg WooCommerce Wishlist Integration Doesn’t Do
Knowing the edges up front saves you building a flow that can’t work.
- The tag doesn’t tell you which product. You learn that a customer saved something, not what they saved. Your email has to send them back to their wishlist rather than name the item. Use the webhook path above if you need the product itself in the payload.
- There’s one tag per event, not one per category. You can’t map different tags to different product types from this screen.
- It doesn’t build your list. Contacts still have to arrive through your normal signup, checkout, or opt-in paths.
- It doesn’t report on itself. Groundhogg reports on the flow. For the wishlist side, SaveTo Wishlist Pro’s analytics show which items have the highest total saves.
None of that is a reason to skip the integration. A flat “this customer is saving things” signal still reaches the tool that already sends your email. That beats a rich signal which never leaves the database. Our knowledge base has the full Groundhogg setup reference, and you can see what else connects on the integrations page.
FAQs: Groundhogg WooCommerce Wishlist Flows
Does this work with the free version of Groundhogg?
Yes. Tags, flows, and the Tag Applied trigger all ship in the free Groundhogg plugin. The SaveTo Wishlist side is in our free plugin too. So you can build every flow in this guide without paying for either product.
My flow only ran once even though the customer added several products. Why?
That’s expected. Groundhogg starts a Tag Applied flow only when the tag actually changes. On later adds the tag is already on the contact, so nothing triggers. Add a Remove Tag action at the end of your flow if you want it to re-arm.
Nothing is being tagged. What should I check?
Check three things in order. Confirm Enable Groundhogg Integration is set to Yes. Confirm you’ve picked a tag for the event you’re testing. Then confirm you’re testing as a logged-in customer who already has a Groundhogg contact.
Will this create contacts for people who browse my store?
No. The integration only ever updates a contact Groundhogg already holds. It never creates a record and never overwrites one. So wishlist activity can’t quietly grow your CRM with people who never opted in.
Does it slow my store down?
It shouldn’t. Everything runs locally through Groundhogg’s own PHP API on the same site. There’s no external HTTP request to wait on. The settings screen also caches your Groundhogg tag list for five minutes instead of re-querying it on every render.
We ran a wishlist plugin speed test if you want the load-time numbers.
Do I lose my tag choices if I turn the integration off?
No. Switching it to No stops all tagging immediately, but your two tag mappings stay saved. Turn it back on and the setup is exactly as you left it.

Turning Saved Products Into Sent Emails
Most stores don’t have an email problem. They have a signal problem.
The CRM is installed and the templates exist. The missing piece is a way for it to hear that a customer named what they want. Two tags close that.
Here’s what to do next:
- Check the four prerequisites, including SaveTo Wishlist 1.1.2 or later.
- Map two event-named tags in the Integrations tab, then switch the integration on.
- Build one flow on the
Tag Appliedtrigger and activate it. - Decide whether that flow is a one-shot or re-arms before you write the email.
- Add the suppression flow next, then the rest, one at a time.
- Check who actually gets tagged before you judge the results.
- Send the product itself with a webhook when a tag isn’t specific enough. That one needs Pro.
If you’re not running a Groundhogg WooCommerce wishlist setup yet, that’s the piece to start with. Grab SaveTo Wishlist Lite, connect it to Groundhogg, and let saved products decide what you send next!