
If you’re selling internationally, your customers expect your store to speak their language, and that includes their wishlists. This guide shows you how to translate every wishlist surface with WPML, from button labels and page titles to Pro automation emails, so international customers see your store in their language.
Prerequisites
Before we start translating, ensure you have the following plugins installed and activated on your WordPress site. SaveTo Wishlist’s WPML integration specifically looks for these four active WPML components:
- SaveTo Wishlist Lite (required)
- SaveTo Wishlist Pro (optional; required only to translate premium features such as Public Wishlists settings)
- WPML Multilingual CMS
- WooCommerce Multilingual & Multicurrency
- WPML String Translation
- WPML Translation Management
💡 Note:
If any of the above WPML add-ons are missing, the SaveTo Wishlist translation features will remain inactive.
What Can You Translate?
Our built-in WPML integration automatically registers your custom text for translation. When you use SaveTo Wishlist with WPML, the following key elements are completely translatable:
- Wishlist Button Label (e.g., “Save to Wishlist”)
- Wishlist Button Cart Label (e.g., “Save Cart to Wishlist”)
- Wishlist Page Title (e.g., “My Wishlist”)
- Wishlist Page Description (The welcome text shown above the customer’s saved items)
- Public Wishlists Title & Description (Available for SaveTo Wishlist Pro users)
- Automation Email Subject & Body (Available for SaveTo Wishlist Pro users)
How To Translate Your Wishlists
Follow these simple steps to translate your buttons and page text using WPML’s String Translation tool.
1. Set your Base Language Text
Before WPML can translate your text, you need to save your default strings in the plugin settings.
- Navigate to SaveTo Wishlist → Settings.
- Click the Wishlist Page tab and enter your Wishlist Title and Wishlist Description in your default language.
- Click Save Changes.
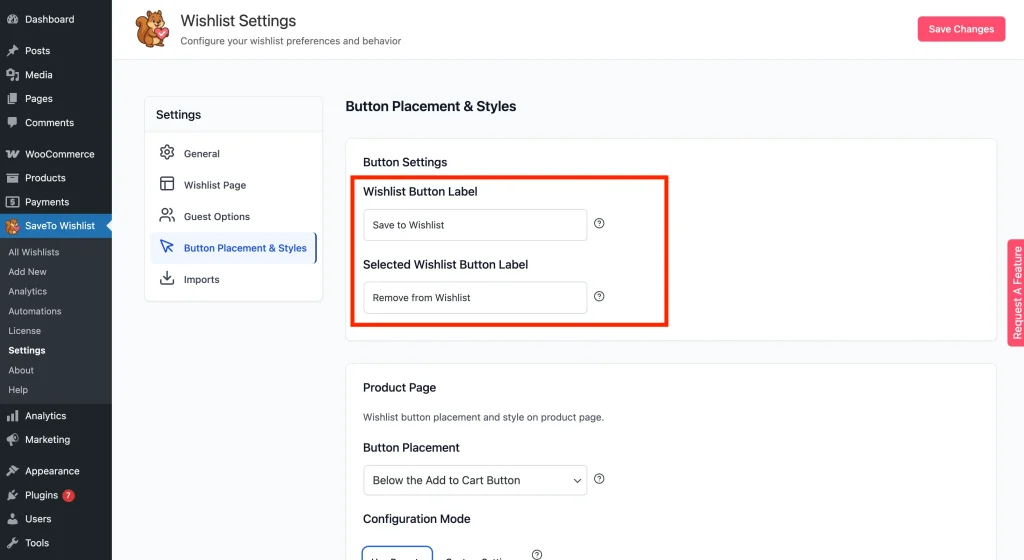
- Click the Button Placement & Styles tab and set your Wishlist Button Label and Cart Button Label in your default language.
- Click Save Changes.
2. (Optional) Scan Plugins for Strings
If you only need to translate the Button Label, Cart Label, Page Title, and Page Description you set up in Step 1, you can skip this step and go straight to Step 3, those strings are registered with WPML automatically every time you save the relevant settings tab.
This step is for users who also want to translate hardcoded plugin interface strings: labels and messages built into the plugin files, rather than configured in the Settings screen.
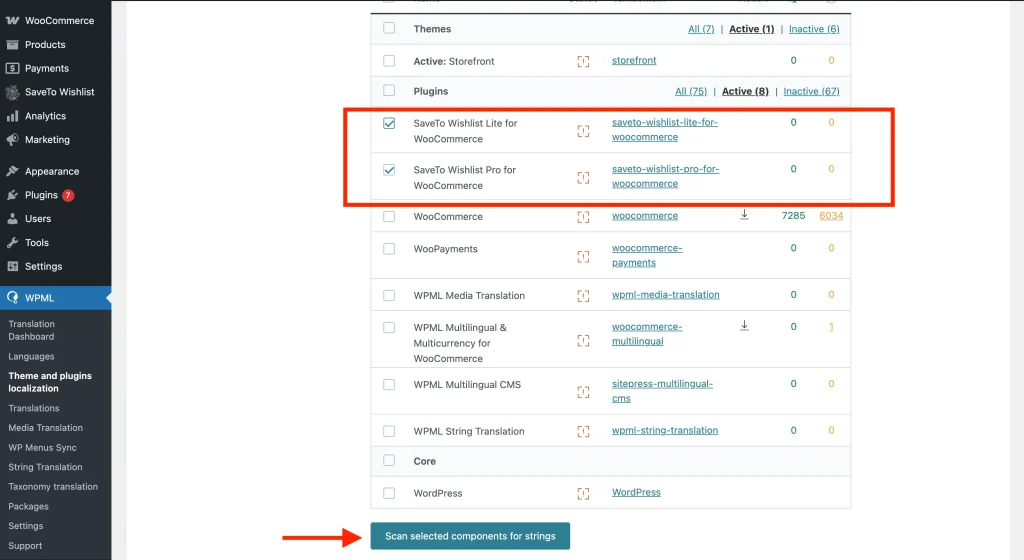
- Navigate to WPML → Theme and plugins localization.
- Scroll down to the Strings in the plugins section.
- Locate the SaveTo Wishlist plugins in the list and mark the checkbox next to them.
- Click the Scan selected plugins for strings button at the bottom of the list.
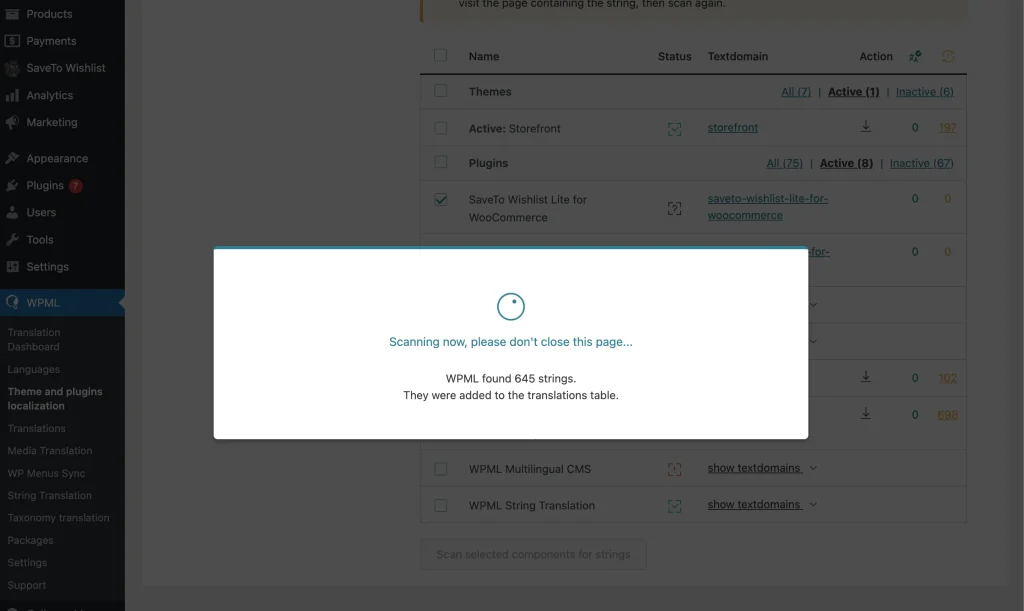
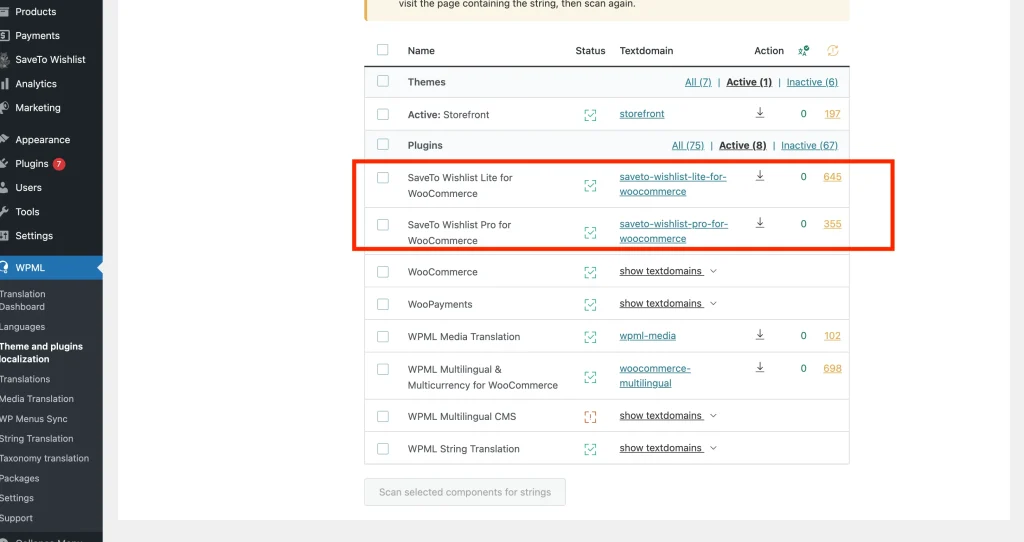
- Wait for the process to finish; WPML will notify you how many new strings were found.
3. Locate your Strings in WPML
Now that the strings are indexed, you can find them in the translation database.
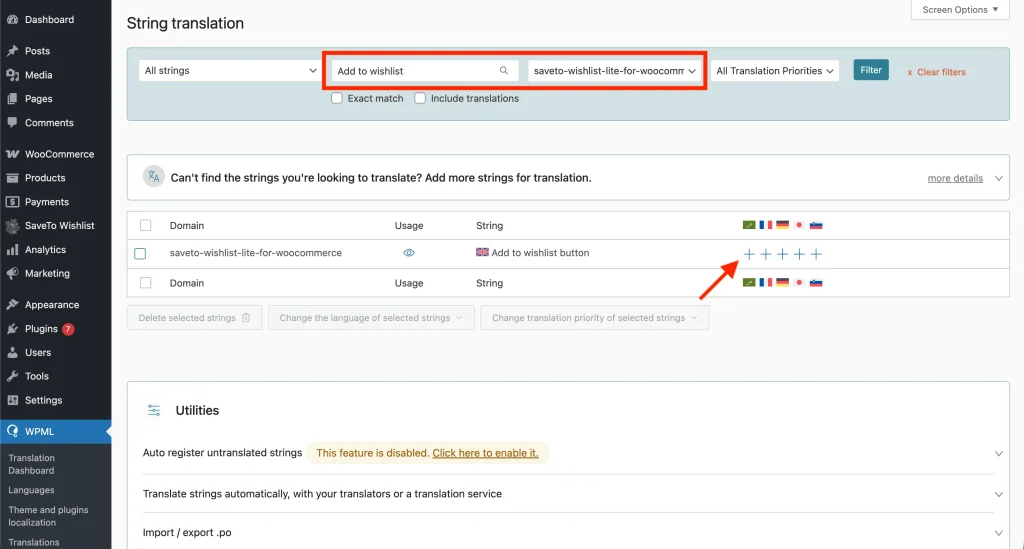
- Navigate to WPML → String Translation from your WordPress dashboard.
- In the Select strings within domain dropdown menu, select stwlite-settings-stwlite_settings to find the button labels and page text you configured in Step 1. For other interface strings, look under saveto-wishlist-lite-for-woocommerce.
- Alternatively, you can use the search bar to search for the exact text you saved in Step 1 (for example, type “Save to wishlist”).
4. Apply your Translations
With your strings located, it’s time to add the localized text.
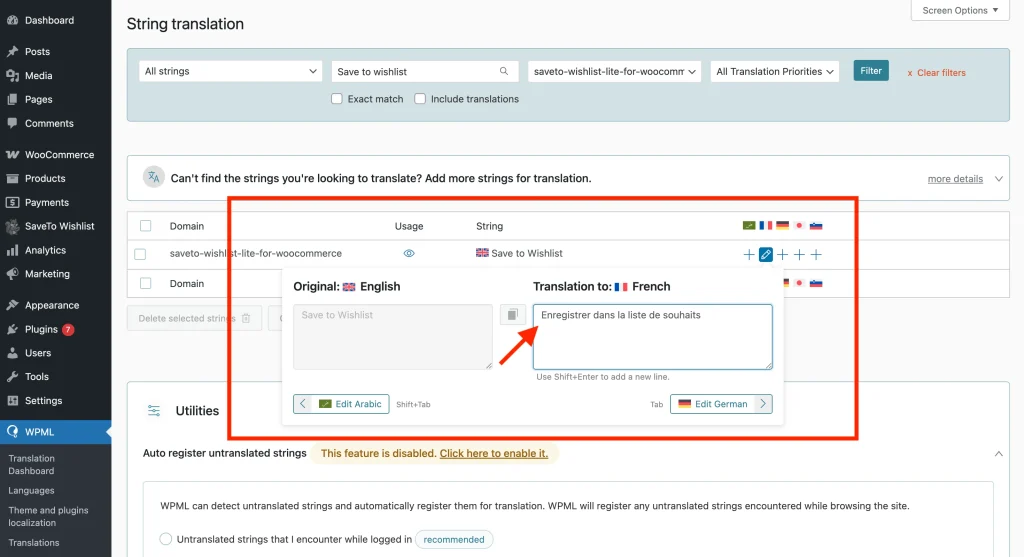
- Click the + (plus) icon under the flag of the language you want to translate.
- Type your translated text into the pop-up box.
- Press Enter or click anywhere outside the box to save the translation automatically.
💡 Note:
Want to learn more about how string translation works? Check out the official WPML String Translation documentation.
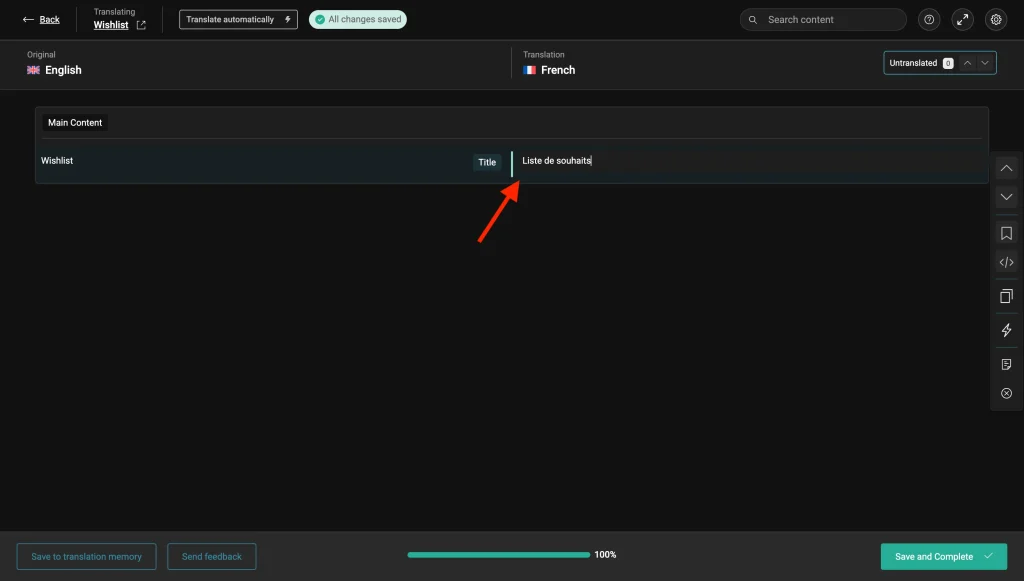
5. Ensure Wishlist Page Accessibility Across Languages
Translating the button labels is only half the process; you also need to ensure the actual Wishlist page exists in your secondary languages.
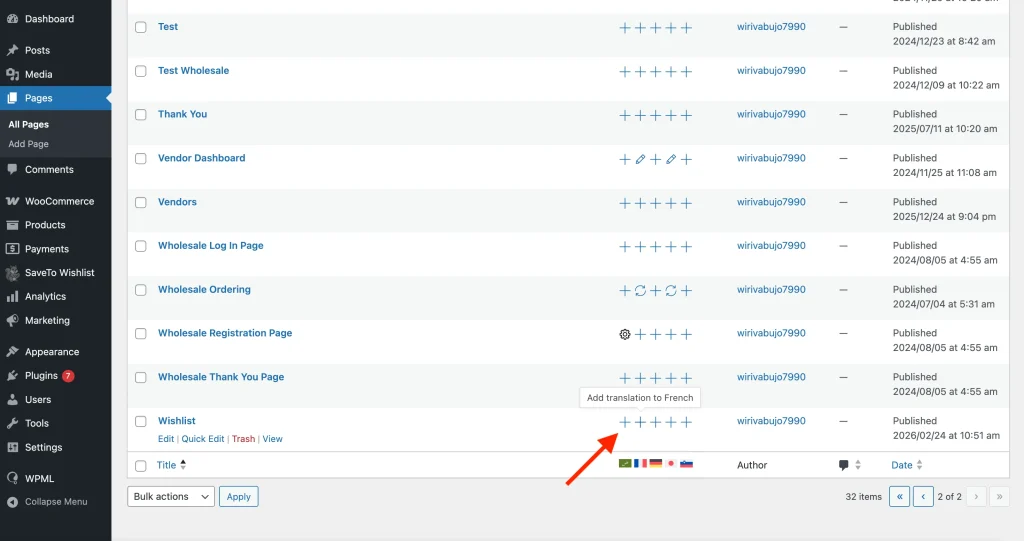
- Navigate to Pages → All Pages and locate your designated Wishlist page.
- Click the + (plus) icon next to the page to create a translated version.
- Keep the SaveTo Wishlist shortcode
[saveto_wishlist]exactly as it is in the English version, do not translate the shortcode itself! - Publish the translated page. WooCommerce Multilingual will now know exactly where to route your international customers when they click the wishlist icon.
Translating Automation Emails
If you use SaveTo Wishlist Pro automations to send email notifications, you can translate those emails so each customer receives them in their own language. The plugin registers the email subject and body with WPML automatically when you save the automation. No plugin scanning needed.
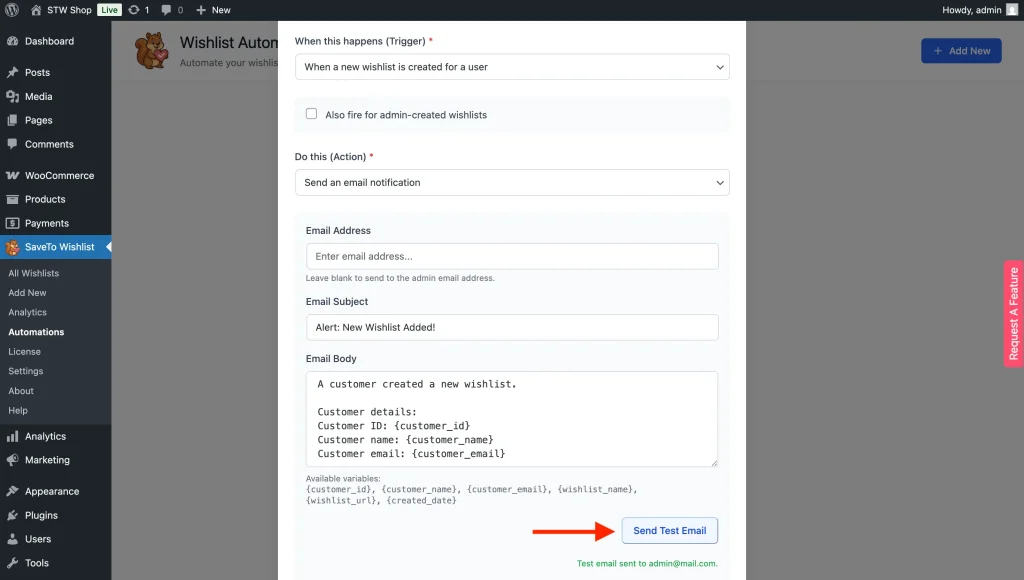
1. Save your Automation Email Content
- Go to SaveTo Wishlist → Automations and open the automation you want to translate.
- Under Do this (Action), select Send an email notification.
- Fill in the Email Subject in your default language.
- Fill in the Email Body in your default language.
- Click Create or Update to save. Saving registers both strings with WPML automatically.
2. Find your Automation Strings in WPML
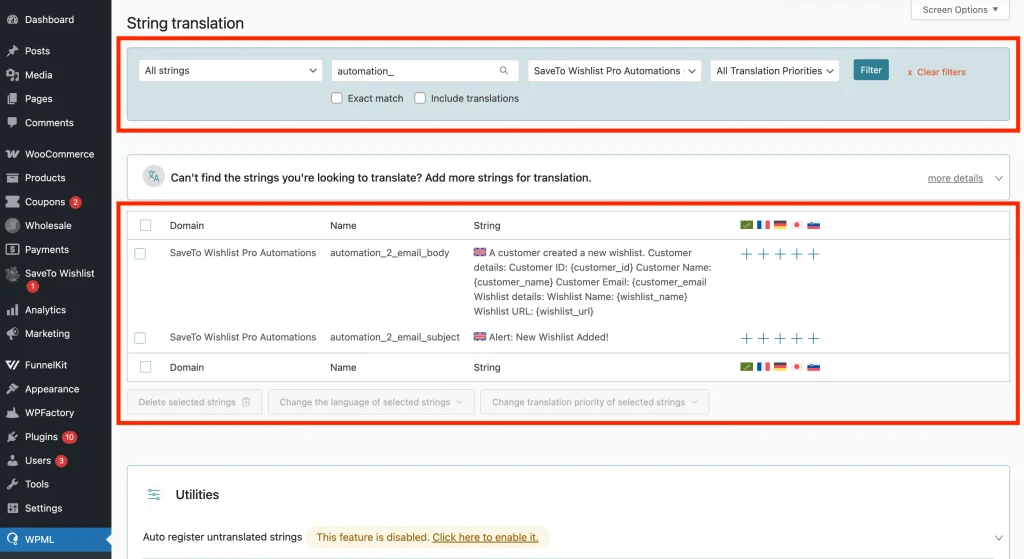
- Go to WPML → String Translation.
- In the Select strings within domain dropdown, choose SaveTo Wishlist Pro Automations.
- You’ll see strings named
automation_X_email_subjectandautomation_X_email_body, where X is the automation’s ID number. - If you don’t see any strings, go back to SaveTo Wishlist → Automations and open the automation you want to translate then click Update.
3. Add your Translations
- Click the + icon under the target language flag.
- Type your translated text.
- Press Enter or click outside the field to save.
Repeat for each language and for both the subject and body strings.
💡 Note:
Variable tags like {customer_name} and {product_name} are replaced after translation, so they work correctly in every language. Keep the tag format exactly as-is when writing your translated versions.
Troubleshooting Common Translation Roadblocks
⚠︎ Why is my translated button text not updating on the front end?
First, ensure you are running the absolute latest version of SaveTo Wishlist. Second, try clearing your site’s cache and your browser cache.
⚠︎ Why is WPML String Translation not showing my custom SaveTo Wishlist text?
Go back to SaveTo Wishlist → Settings, make a tiny edit to your text (like adding a space), and hit Save Changes. This forces the plugin to re-register the string with WPML. Then, check the String Translation screen again. This is also applicable to Automations.
⚠︎ Why do my customers get a 404 “Page Not Found” error when clicking the wishlist in another language?
This happens when the core Wishlist page hasn’t been translated. Follow Step 5 above to duplicate and translate the WordPress page containing the wishlist shortcode.
Frequently Asked Questions
➤ Do I absolutely need all four WPML plugins active?
Yes. SaveTo Wishlist’s integration relies heavily on WooCommerce Multilingual to handle the product connections and WPML String Translation to handle the custom UI text. Without all four active, the integration will not trigger.
➤ Can I translate the Pro features?
Absolutely! If you are using SaveTo Wishlist Pro, the “Public Wishlists Title” and “Public Wishlists Description” settings are automatically registered via a special filter (stwlite_wpml_translate_setting_options) and will appear in the String Translation menu just like the Lite strings.
Verify Your Translations
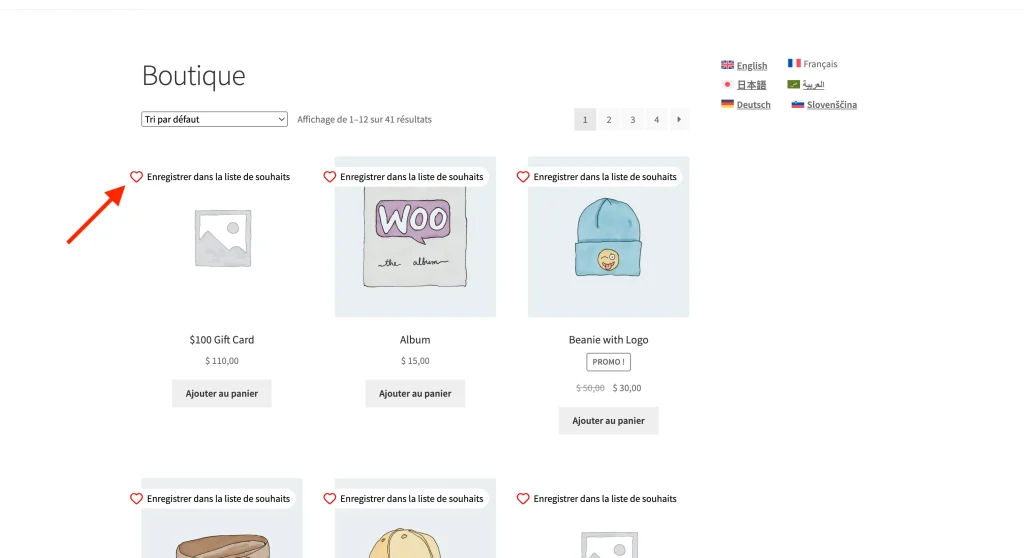
Now check that the translations actually appear. Open your store in a private or incognito browser, switch the language with WPML’s language switcher, and add a product to a wishlist. Confirm the buttons, page titles, and success messages all show in the right language.
Help & Support
We have a dedicated support team for SaveTo Wishlist Pro for WooCommerce who knows our products, WooCommerce, and the industry very well. You’re welcome to make use of their expertise at any time, worldwide.
- Premium users: Open a support ticket
- Free users: Visit our community forum

