
 Reviewed by
 The default wishlist page is built for customers who keep several lists. A simpler one-list page, though, is a request we hear often.
That mismatch shows. A customer with a single list still sees the multi-list table, with navigation for lists they haven’t created. It’s scaffolding around one row of products.
Since v1.0.9, the WooCommerce wishlist shortcode takes an attribute that fixes this. Add defaultonly="yes" and the page renders one list instead of the full table.
Read on to see what’s waiting in your free SaveTo Wishlist Lite plugin today!
Jump to:
1. Simpler Wishlist Pages: The defaultonly Attribute
One attribute does it. The shortcode now accepts a second parameter, written out like this:
[saveto_wishlist defaultonly="yes"]Then drop that on any page and a logged-in customer sees their default list on its own. No table of other lists, and no list navigation around it.
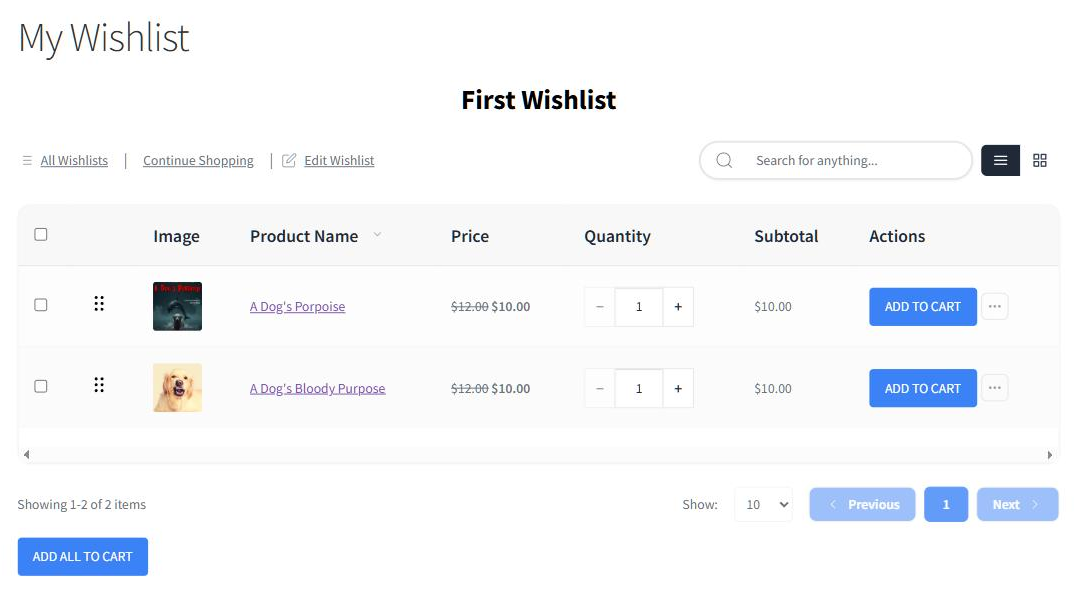
What you need to know:
- It replaces a code snippet: This started as a workaround a customer wrote themselves. Turning a snippet people keep asking for into a supported attribute is usually the right call.
- There’s a fallback built in: If the customer hasn’t marked a default, the shortcode uses their first published list instead. They don’t land on an empty page.
- Only “yes” turns it on: The attribute defaults to
no. Any other value leaves the behavior exactly as it was, so a typo can’t quietly change your page. - The old attribute still works:
idcontinues to target one list by its ID. Nothing about existing pages changes when you update. - Shared links take priority: If someone arrives on a shared wishlist link, they see the shared list. The attribute steps aside rather than overriding it.
That last behavior matters more than it sounds. After all, share links carry a code in the URL, and a customer following one expects somebody else’s list. Overriding that with their own default would break sharing.
2. What The Shortcode Renders, And When
The same shortcode produces different views depending on who’s looking and how they arrived. Knowing the order helps when a page doesn’t show what you expected.
The checks run in this sequence:
- A shared wishlist code in the URL wins first. The visitor gets the shared list, whatever else the shortcode says.
- Then
defaultonly="yes"for a logged-in customer. They get their default list, or their first published one. - Then the guest view, if the visitor isn’t logged in. This applies while guest wishlists are enabled.
- Otherwise the standard wishlist view. That’s the multi-list experience your customers already know.
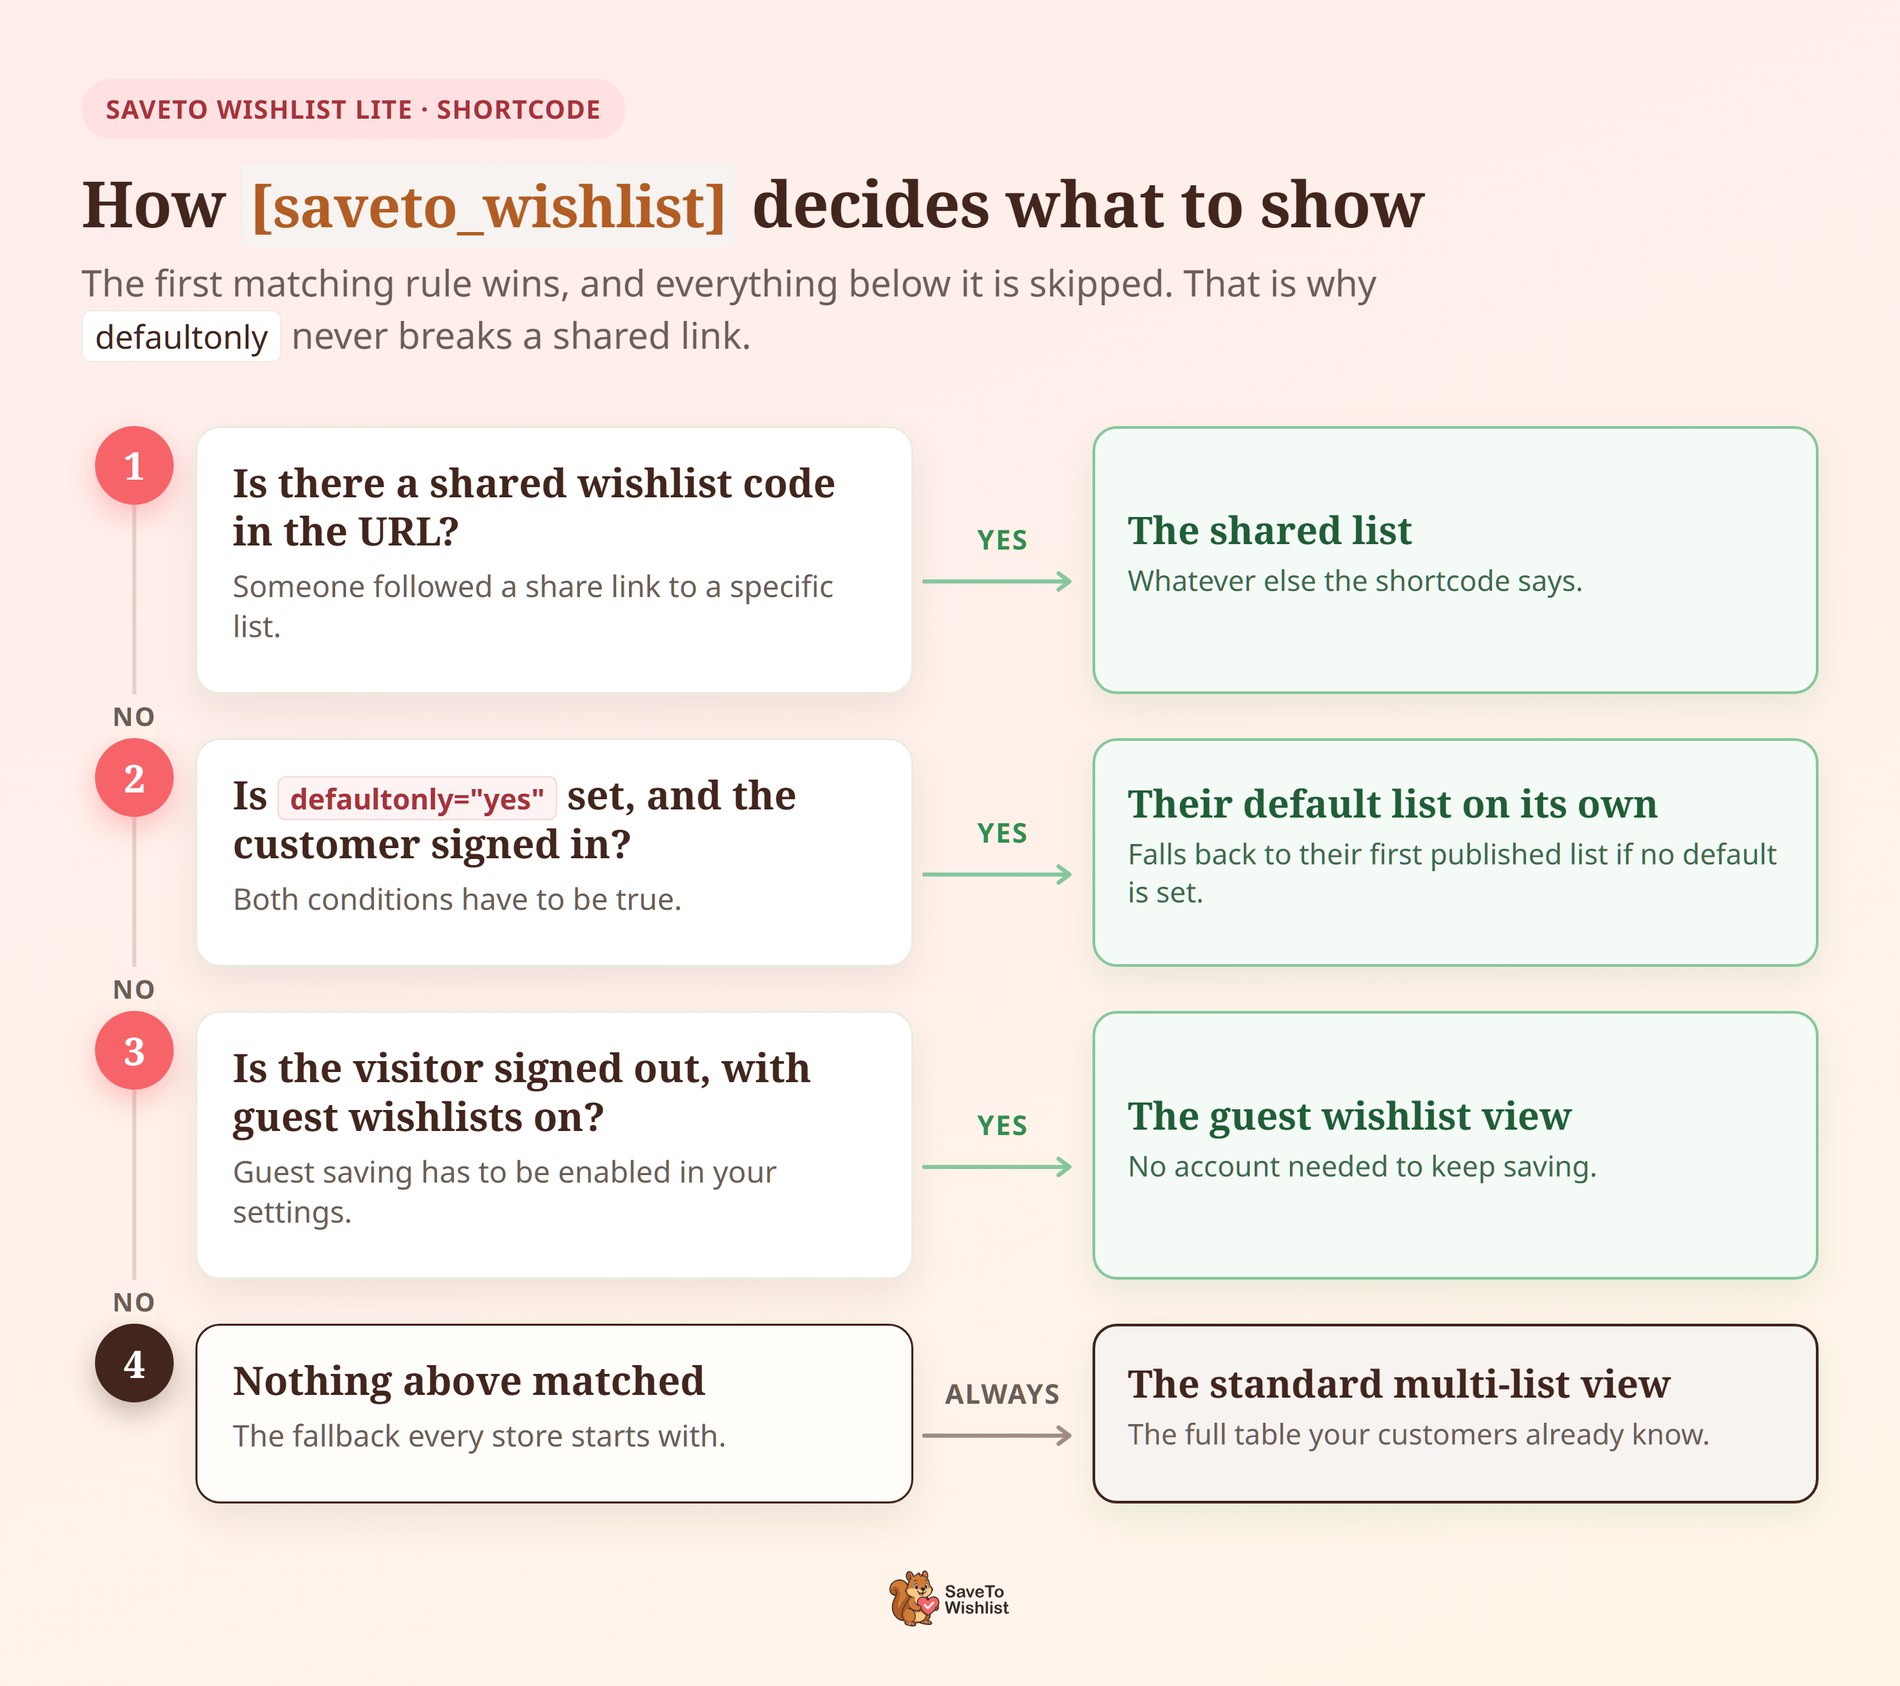
So defaultonly is a preference, not a command. Instead, it applies in the one case it was designed for and gets out of the way otherwise.
I’d read that as a good thing. An attribute that forced one list on every visitor would break guest saving and sharing at once.
So keep that order handy for troubleshooting. If a page renders something you didn’t expect, walk the list from the top.
A leftover wishlist code in the URL is the usual culprit. Meanwhile, testing while still logged in is the second most common one.
Where Your Wishlist Page Should Live
The shortcode decides what renders. Meanwhile, a separate setting decides where customers get sent, and the two need to agree.
So look for Redirect page under SaveTo Wishlist > Settings > General. It’s a dropdown of your published pages, and it controls where a customer lands after saving a product.
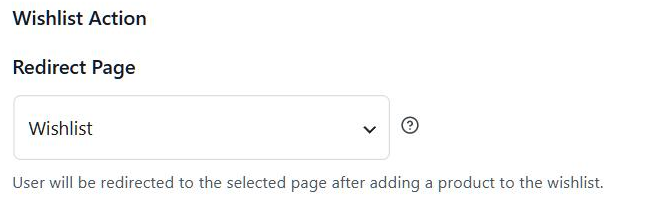
What you need to know:
- The plugin already made you one: A wishlist page is created at activation, and that page is the factory default here. Resetting the section restores it.
- Leaving it empty has a consequence: With no page selected, customers are sent to your My Account page instead. That works, but it isn’t the page you styled.
- Share links point here too: A shared list URL is your redirect page plus a wishlist code. So the page you pick is the page recipients open.
- That’s why the shortcode has to handle sharing: If you put
defaultonly="yes"on your redirect page, it still has to serve share recipients. The priority order covered above is what makes that safe.
There’s a practical upshot here. Putting the simplified list on your redirect page means share recipients keep working, because the shared code overrides the attribute.
Instead, if you’d rather keep them separate, point Redirect page at the full wishlist view. Then add a second page carrying the single-list shortcode and link it from your menu.
The Wishlist Block Has A Different Option
Here’s the honest limitation. The drag-and-drop wishlist block can’t do this one.
Behind the scenes the block runs the shortcode, which is why the two behave alike in most respects. Its sidebar exposes a single Wishlist ID field, and that maps to the shortcode’s id attribute. There’s no defaultonly toggle to tick.
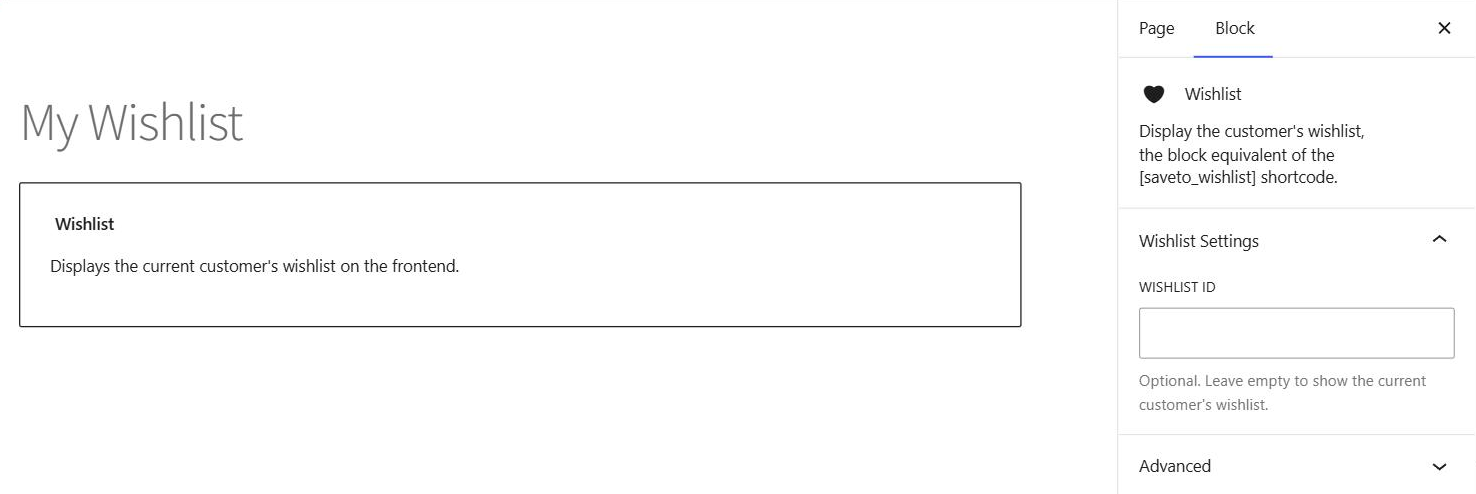
So if you want the single-list page, use the shortcode. Even so, you can put it inside a Shortcode block on a block theme, or anywhere else you’d place one.
Worth knowing if you build pages visually. The same applies to Elementor and similar builders, where a shortcode widget is the route in.
Which Option Should You Use?
There are now three ways to point the shortcode at a list. Each one suits a different job.
Plain shortcode for the main wishlist page
A bare [saveto_wishlist] is still the right choice for your main wishlist page. Plus, it handles guests, logged-in customers and shared links without any configuration.
So use it when customers might keep several lists, or when sharing matters to your store. It’s the most complete view of the three.
Defaultonly for a single-list experience
Reach for defaultonly="yes" when your customers realistically keep one list. In practice, stores selling a focused catalog fit this pattern, as do stores where saving is closer to a favorites feature.
It also suits a secondary page. Meanwhile, keep the full view at your main wishlist URL and put a simplified list in a My Account tab.
The id attribute for one specific list
Use id when you know exactly which list you want, by its ID. It isn’t per-customer, so everyone viewing that page is pointed at the same list.
That makes it the option for a curated list you’ve built yourself. A seasonal gift guide or a staff picks page are the usual examples.
One thing worth clearing up, because it trips people up. These two attributes don’t produce the same markup.
defaultonly switches the page over to the plugin’s single-list component. id keeps the standard wishlist component and points it at the list you named. So if the stripped-back view is what you want, defaultonly is the attribute that delivers it.
Whichever you pick, test the page while logged out as well as logged in. The two views differ by design, and that’s the step people skip. Our wishlist guide covers the wider setup if you’re starting fresh.
Frequently Asked Questions
Does defaultonly work for guests who aren’t logged in?
No. The attribute applies to logged-in customers only, because a default wishlist belongs to an account. Logged-out visitors get the guest wishlist view instead, assuming guest wishlists are switched on.
What happens if the customer has no default wishlist?
The shortcode falls back to their first published list. If they have no lists at all, the page returns to the standard wishlist view. They still get somewhere to start.
Can customers still create more than one wishlist?
Yes. The attribute changes what one page renders, not what the plugin allows. Multiple wishlists stay available, and the full view is still there on any page using the plain shortcode.
Conclusion
That’s the new attribute covered. So you can use it now by updating SaveTo Wishlist Lite from your WordPress dashboard.
To recap, this announcement explored:
- The defaultonly attribute and its built-in fallback.
- The order the shortcode checks things in, so you can predict what renders.
- Where the page itself should live, and how share links reach it.
- Why the block can’t do it and what to use instead.
- When to use each of the three options.
My take: try defaultonly="yes" if your wishlist page has always felt heavier than it needed to be. Plus, it’s one attribute, and switching back is as quick as removing it.
Need a hand with your wishlist page setup, or want to see what the paid plans add? Check out our knowledge base, browse the plan comparison, or reach out to our support team.
If you haven’t tried wishlists on your store yet, download the free version of SaveTo Wishlist today.