
 Reviewed by
 A wishlist button earns its place on a product page. On a category page showing 40 products at once, it can turn into visual noise.
Plenty of store owners want the button in one place and nowhere else. Until v1.0.9, the only way to get that was a CSS snippet, which isn’t a fair ask for a non-developer.
Two recent releases fixed different halves of that problem. You can now hide the WooCommerce wishlist button per page type. Separately, you can stop the wishlist page showing Add to Cart buttons that don’t work.
Read on to see what’s waiting in your free SaveTo Wishlist Lite plugin today!
Jump to:
1. Page-Level Control: Hide The Wishlist Button With Don’t Show
The Button Placement dropdown now opens with a Don’t show option. Pick it and the wishlist button stops rendering on that page type, with no code involved.
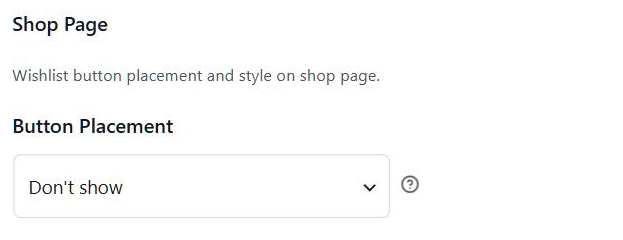
You’ll find the dropdown under SaveTo Wishlist > Settings > Button Placement & Styles. Each page type has its own tab, so choose Product Page or Shop Page first.
What you need to know:
- It’s the first option in the list: Don’t show sits above every placement choice on both tabs. Below it sit the positions you already know, starting with Top Right of the Product Image.
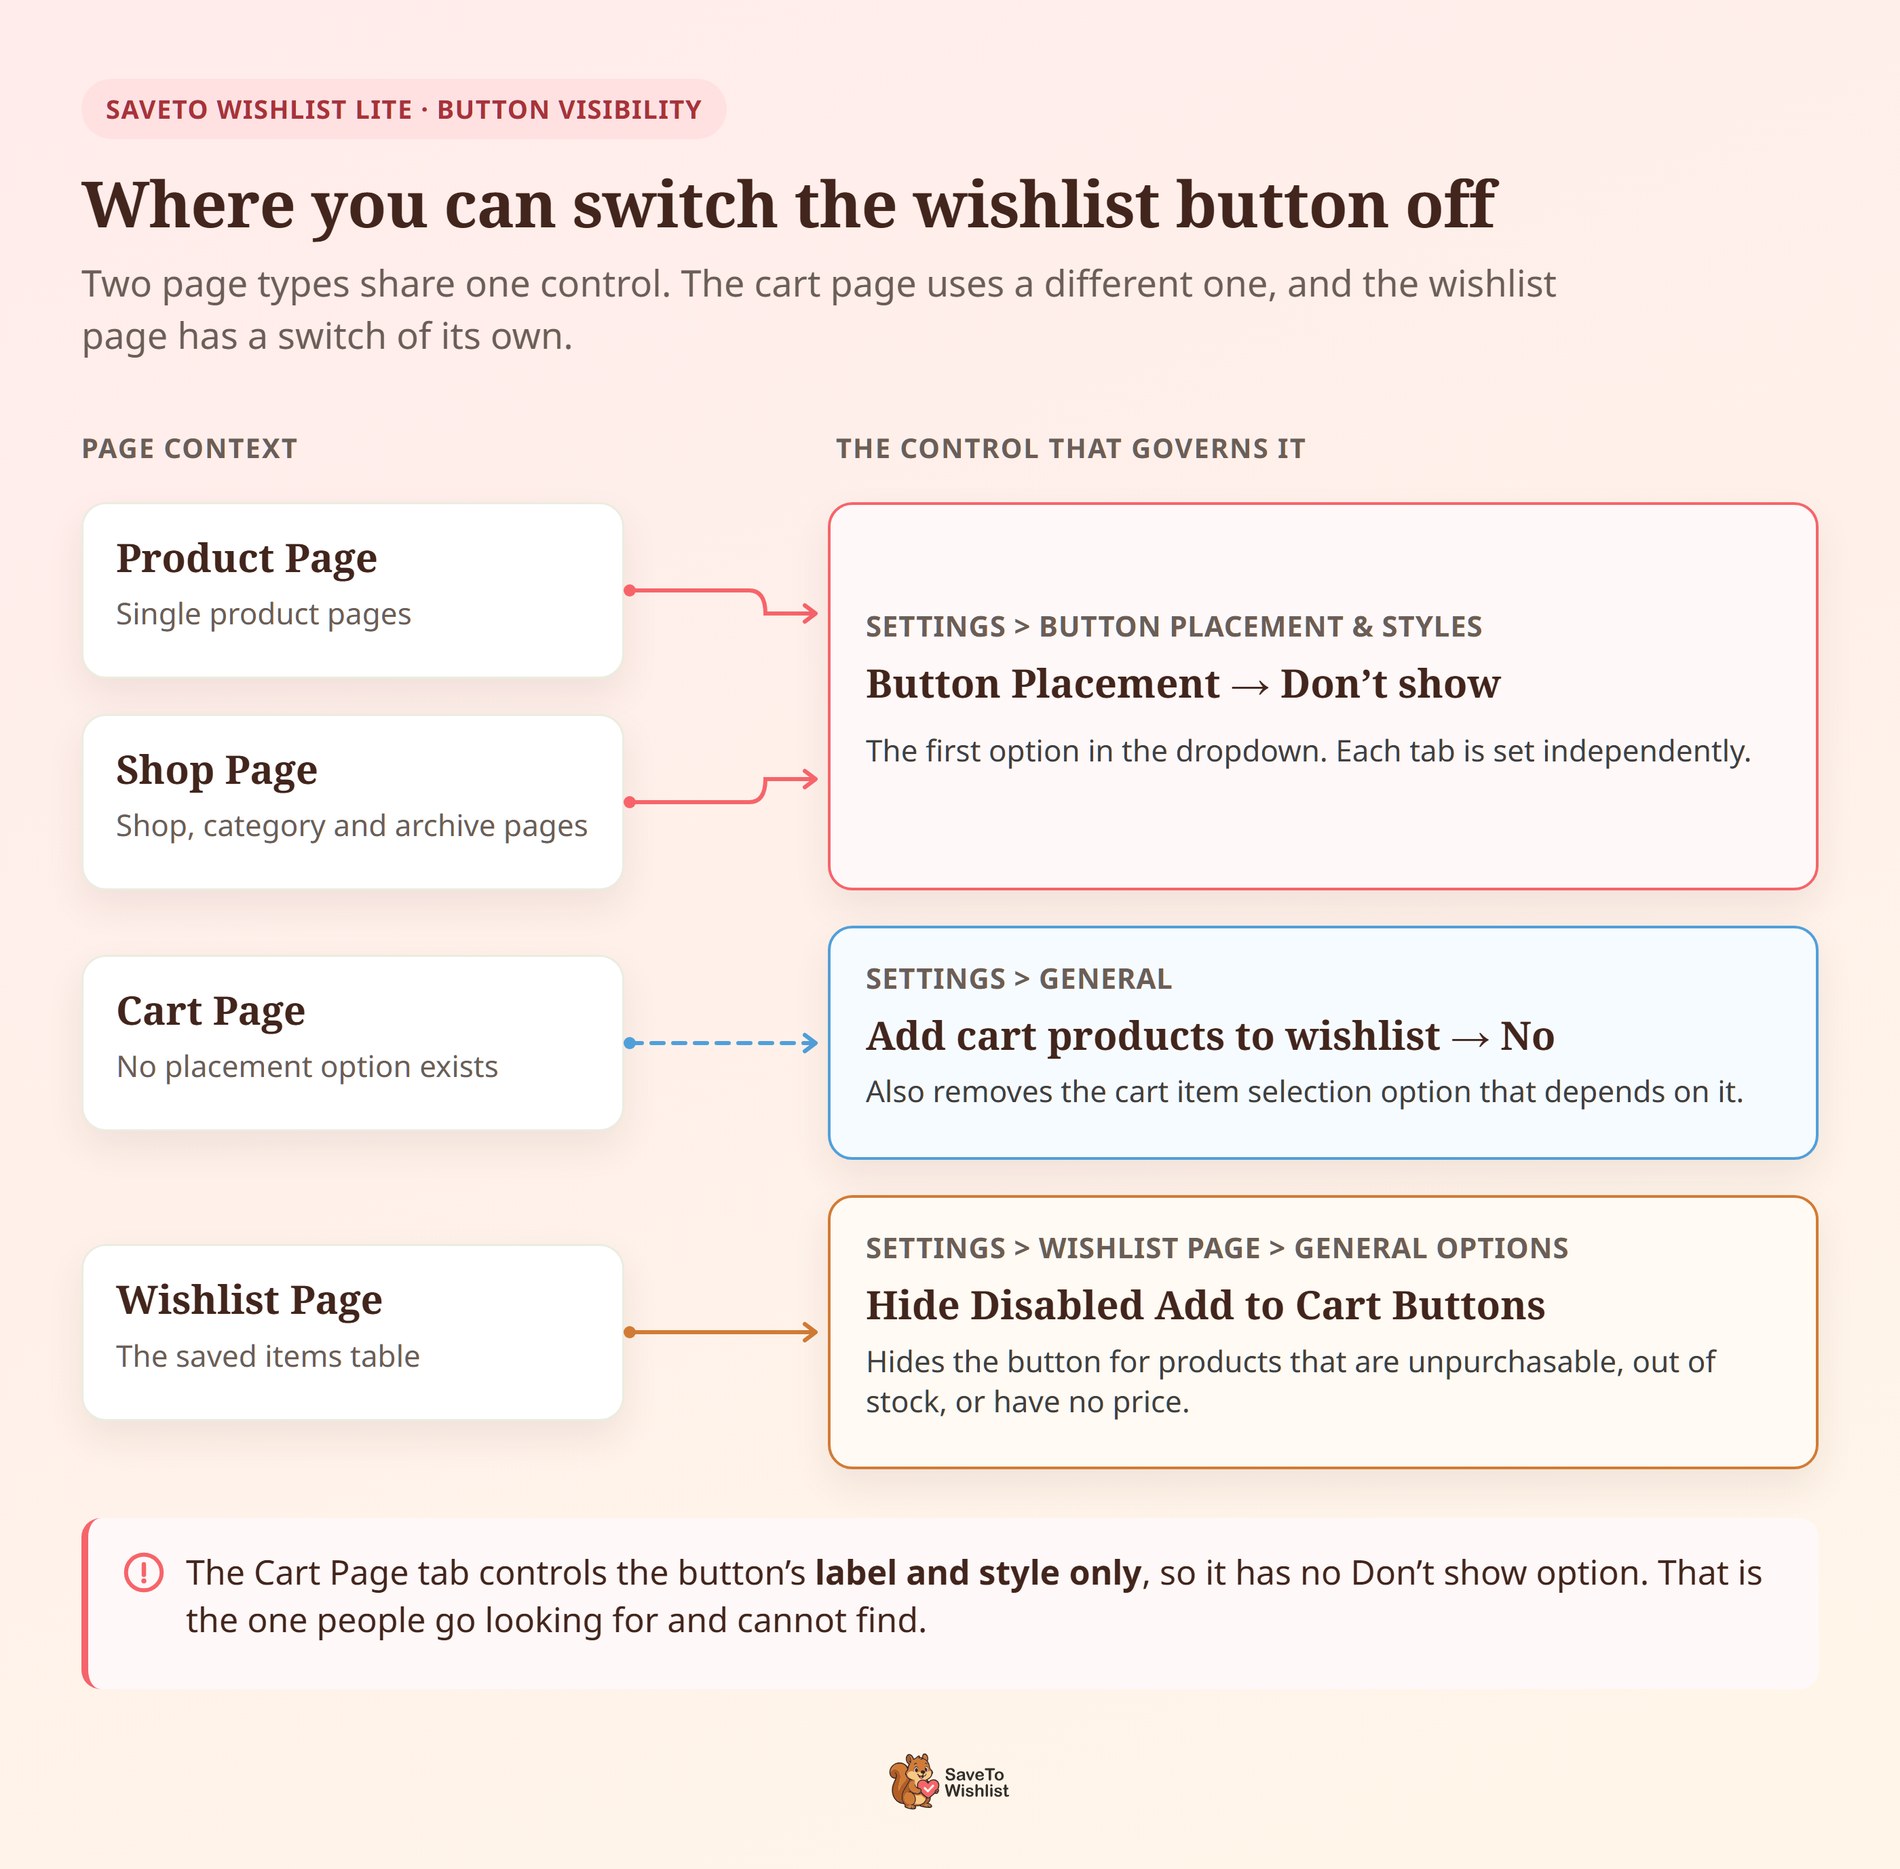
- Shop Page covers more than the shop: Choosing it there hides the button on shop, category and archive pages together. That’s one setting for every product listing view on your store.
- The two tabs are independent: Hiding the button across your shop pages leaves single product pages exactly as they were. That combination is the most common one I see.
- Nothing changes by default: Both tabs ship with the button sitting below the Add to Cart button. You have to choose Don’t show yourself.
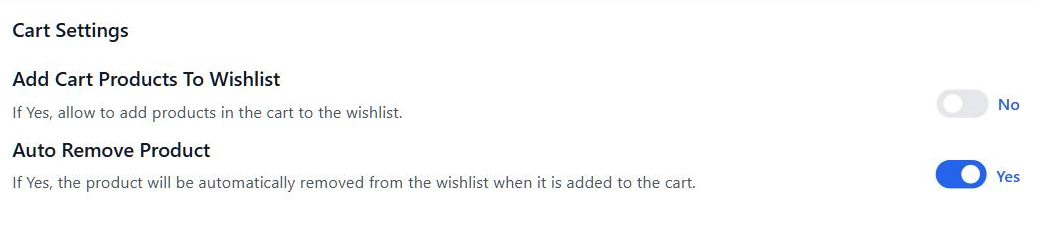
- The Cart Page works differently: That tab controls the button’s label and style, not its placement, so it has no Don’t show. To switch it off, set Add cart products to wishlist to No under Settings > General.
That last point is worth a moment. The cart button isn’t a placement at all, so it lives behind a different switch. Turning it off also removes the cart item selection option that depends on it.
Meanwhile, the two tabs don’t offer identical positions. Product Page carries eight choices, including Inline with the Add to Cart Button. Shop Page carries seven, and inline isn’t among them.
Still, that difference makes sense once you picture an archive grid. There’s no single Add to Cart row for the button to sit beside. So if you’re weighing “hide it” against “move it”, product pages give you more room to work with.
2. A Cleaner Wishlist Page: Hide Disabled Add To Cart Buttons
Some products on a saved list can’t be bought right now. As a result, they used to show a grayed-out Add to Cart button, which invites clicks that go nowhere.
A switch called Hide Disabled Add to Cart Buttons now removes them. So look under SaveTo Wishlist > Settings > Wishlist Page > General Options.
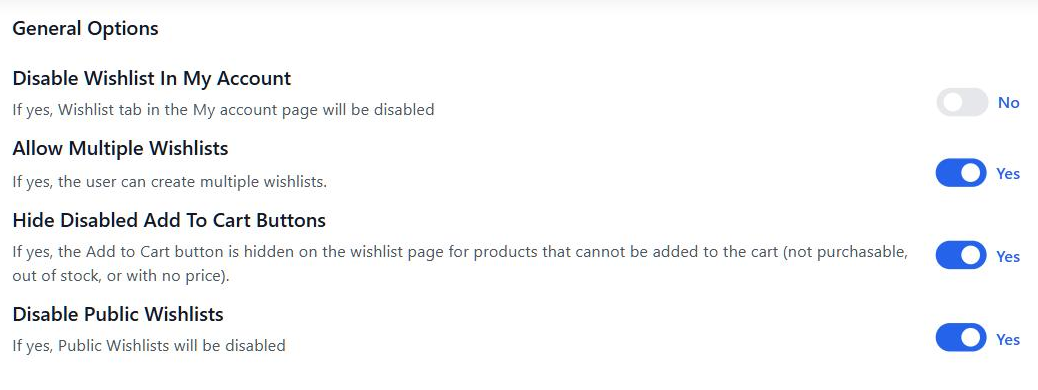
What you need to know:
- Three cases trigger it: The button hides for products that aren’t purchasable, are out of stock, or have no price set. Everything else keeps a working button.
- It’s off by default: The switch ships set to No, so your wishlist page looks the same until you turn it on.
- Only the button goes: The product stays on the list with its name, image and price. Customers keep the item saved for when it comes back.
- It sits with the other page switches: The same General Options section holds Show Product Image and Allow Multiple Wishlists. All three change what the table renders.
The “no price set” case is the one I’d think hardest about. If you hide prices on purpose, for quote-based selling, this switch cleans up the result.
One honest caveat: hiding the button doesn’t tell the customer why it’s gone. For a product that’s temporarily out of stock, a short note in the description does more. That’s worth pairing with the switch rather than relying on it alone.
Where Store Owners Turn The Button Off
Hiding the button isn’t a retreat from wishlists. Saving matters: in Baymard Institute’s study of 1,193 shoppers, 21% said they rely on save features. So the goal is concentration, not removal.
Here are the patterns that come up most.
Dense shop and category pages
A grid of 40 products with a wishlist button on each one adds 40 competing controls. In my experience, shoppers scanning a category are still deciding what to look at.
As a result, turning the button off there pushes the save decision to the product page. That’s where shoppers have the detail they need to commit.
Marketplace and vendor listings
Many multi-vendor plugins render vendor storefronts as product archives. Where that holds, one Don’t show setting clears the button from every vendor listing at once.
So if you run WC Vendors, check a vendor page once you’ve saved the setting. Either way, your own product pages carry on unchanged.
Quote-based and wholesale catalogs
A wholesale catalog often hides prices until a buyer logs in. Even so, saving is useful there, but a wishlist button beside a hidden price can read as a shortcut to buying.
So pairing Don’t show on shop pages with the disabled-button switch keeps both views honest. Buyers get a list without buttons that imply instant checkout.
Stores with one hero product
Single-product and small catalogs get little from a save-for-later button. Because there is nothing to compare it against, the cart is the natural next step.
If that’s your store, then hiding the button on both tabs is reasonable. Still, you can keep the wishlist itself available through your menu for returning customers.
Whichever pattern fits, change one page type at a time and look at the result. Our placement and styling walkthrough covers the positions if you’d rather move the button than remove it.
What To Check After You Hide The Button
Both settings take effect as soon as you save. Even so, a few things are worth a quick look first.
- Clear your cache first: Page caching and CDNs serve the old markup until they refresh. If the button is still showing, purge the cache before assuming the setting failed.
- Check your theme is not adding its own: Some themes ship a wishlist button of their own on product cards. Ours disappearing will not remove theirs, so look at what is actually rendering.
- Leave a route to the list: With the button gone from shop pages, shoppers still need a way in. A menu link to your wishlist page or block handles that.
- Look at mobile as well as desktop: Grids collapse to one or two columns on phones. A button that felt crowded on desktop may read fine there, so judge the change on both.
- Remember guests are affected too: Both settings apply to everyone, including shoppers saving without an account. There is no separate rule for logged-out visitors.
If you would rather restyle the button than hide it, that is the other half of the same panel. We have covered the wishlist customization options separately.
Frequently Asked Questions
Conclusion
That’s both settings covered. You can put them to work now by updating SaveTo Wishlist Lite from your WordPress dashboard.
To recap, this announcement explored:
- A Don’t show placement option for product pages and shop pages.
- A Hide Disabled Add to Cart Buttons switch for the wishlist page.
- Four store patterns where turning the button off makes sense.
- Five things to check once you’ve made the change.
My advice is to treat these as focus tools rather than off switches. In practice, fewer buttons in the right places beats a button everywhere. Our wishlist guide covers where saves tend to come from.
Need a hand with placement, or want to see what the paid plans add? Check out our knowledge base, browse the plan comparison, or reach out to our support team.
If you haven’t tried wishlists on your store yet, download the free version of SaveTo Wishlist today.