When you’re setting up an automation to send email notifications, it’s worth checking the email looks right before a real trigger fires it. SaveTo Wishlist Pro lets you send a test email directly from the automation editor, so you can confirm the subject line, message body, and any variable tags are working exactly as you expect.
Prerequisites
- SaveTo Wishlist Lite 1.0.8 or later installed and active
- SaveTo Wishlist Pro 1.0.4 or later installed and active
- WooCommerce installed and configured
How to send a test email
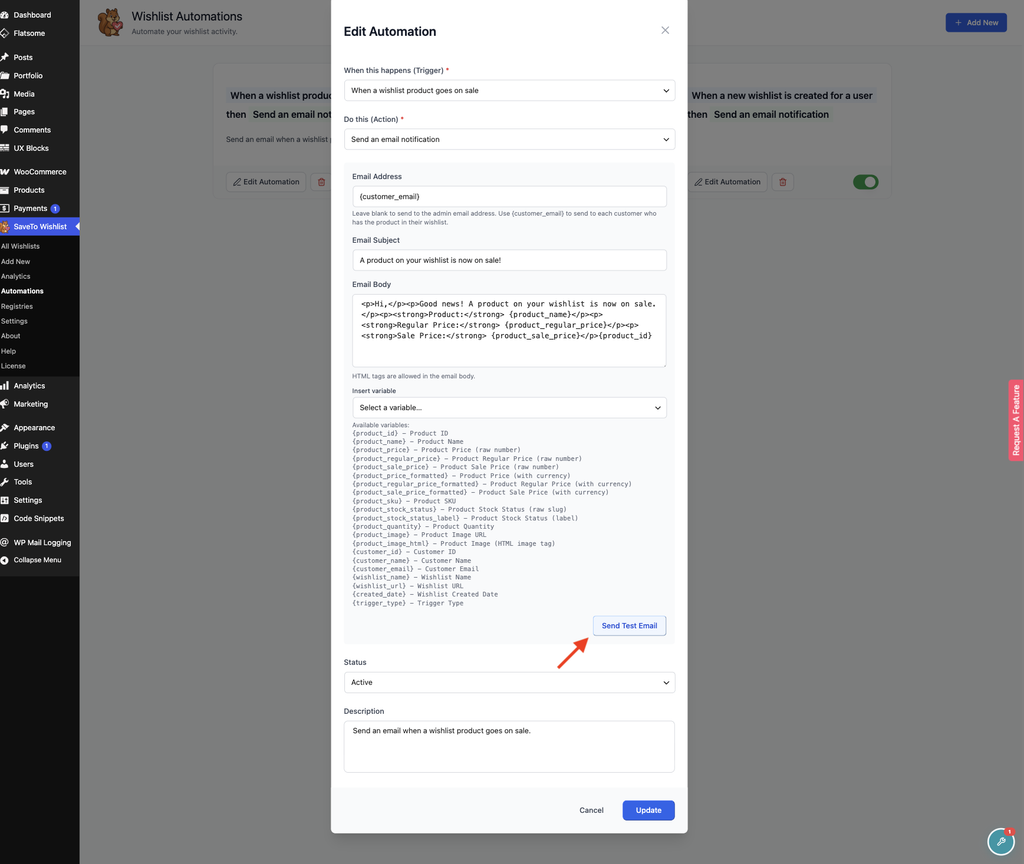
- Go to SaveTo Wishlist → Automations.
- Open an existing automation or click Add New to create one.
- For a new automation, choose a trigger under When this happens (Trigger).
- Under Do this (Action), select Send an email notification.
- Fill in the Email Address, Email Subject, and Email Body fields.
- Instead of typing a variable tag by hand, use the Insert variable dropdown below the Email Body field: selecting a tag inserts it at your cursor position.
- The trigger you choose sets which variable tags appear in the Email Body variable list.
- Leave the Email Address blank, or enter
{customer_email}, and the test email goes to your site’s admin email, since a test has no real customer.
- Click Send Test Email.
- Check the inbox for the address you entered (or your admin inbox if left blank).
What to check in your test email
When the test email arrives, check the following:
Subject line. The test email arrives with a [Test] prefix added to whatever subject you entered. For example, [Test] Your subject here. If you left the subject blank, it arrives as [Test Email] Automation Preview. Confirm the rest of the subject reads as intended.
Message body. Review the layout and wording. Variable tags are replaced with sample data so you can see how the formatted email will look. For example, {customer_name} shows as “Jane Doe” and {wishlist_name} shows as “My Sample Wishlist”. None of it is real customer data. Two tags have no sample value: {wishlist_items} and {trigger_type} show in the test email exactly as you typed them.
Product image. If your email body uses {product_image_html}, the test email renders it as an actual picture instead of a bare URL. It uses WooCommerce’s placeholder image, since test data isn’t tied to a real product. The image is 300px wide by default.
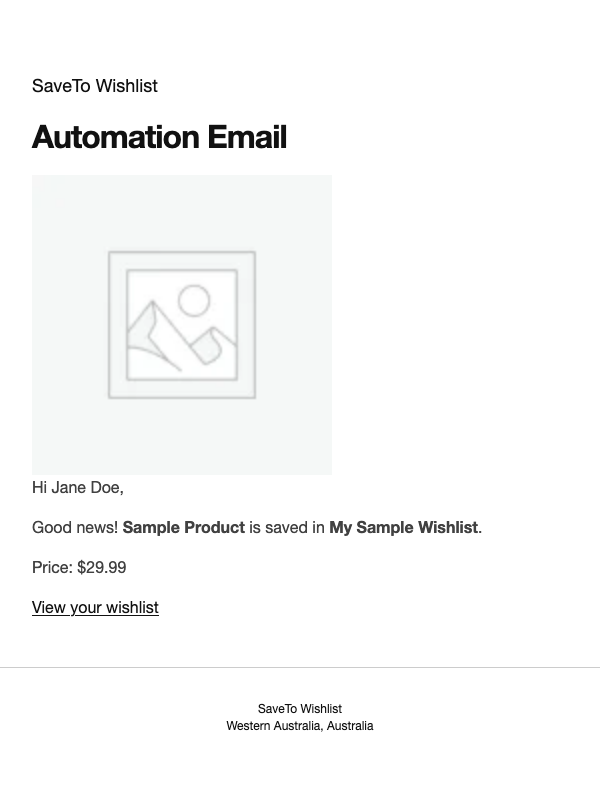
Sender name and address. The email comes from your site’s configured “from” name and address, the same as any other WooCommerce transactional email.
If anything looks off, adjust the subject or body and click Send Test Email again.

Available variable tags
The variables available in your email body depend on the trigger you’ve chosen. Here’s a quick reference:
| Trigger | Available variables |
|---|---|
| When a new wishlist is created for a user | {customer_id}, {customer_name}, {customer_email}, {wishlist_name}, {wishlist_url}, {created_date}, {wishlist_items} |
| When an item is added to a wishlist | {customer_id}, {customer_name}, {customer_email}, {wishlist_name}, {wishlist_url}, {created_date}, {product_id}, {product_name}, {product_price}, {product_regular_price}, {product_sale_price}, {product_price_formatted}, {product_regular_price_formatted}, {product_sale_price_formatted}, {product_sku}, {product_stock_status}, {product_stock_status_label}, {product_quantity}, {product_image}, {product_image_html} |
| When an item is removed from a wishlist | Same as above, minus {product_quantity} |
| When a wishlist product goes on sale | {customer_id}, {customer_name}, {customer_email}, {wishlist_name}, {wishlist_url}, {created_date}, {product_id}, {product_name}, {product_price}, {product_regular_price}, {product_sale_price}, {product_price_formatted}, {product_regular_price_formatted}, {product_sale_price_formatted}, {product_sku}, {product_stock_status}, {product_stock_status_label}, {product_quantity}, {product_image}, {product_image_html}, {trigger_type} |
| When an out of stock wishlist product comes back in stock | {customer_id}, {customer_name}, {customer_email}, {wishlist_name}, {wishlist_url}, {created_date}, {product_id}, {product_name}, {product_price}, {product_regular_price}, {product_sale_price}, {product_price_formatted}, {product_regular_price_formatted}, {product_sale_price_formatted}, {product_sku}, {product_stock_status}, {product_stock_status_label}, {product_quantity}, {product_image}, {product_image_html}, {trigger_type} |
You’ll see the full list of available tags for your chosen trigger at the bottom of the Email Body field in the automation editor, each one shown next to a plain-language label (for example, {product_image} - Product Image URL) so you don’t have to memorize the tag names.
Here’s what each tag shows, using the same label as the editor, and the sample value it gets in a test email:
| Tag | What it shows | Sample value in a test email |
|---|---|---|
{customer_id} | Customer ID | 123 |
{customer_name} | Customer Name | Jane Doe |
{customer_email} | Customer Email | jane.doe@example.com |
{wishlist_name} | Wishlist Name | My Sample Wishlist |
{wishlist_url} | Wishlist URL | Your site address followed by /wishlist/sample |
{created_date} | Wishlist Created Date | Today’s date, in your site’s date format |
{wishlist_items} | Wishlist Items | No sample value, shows as typed |
{product_id} | Product ID | 456 |
{product_name} | Product Name | Sample Product |
{product_price} | Product Price (raw number) | 29.99 |
{product_regular_price} | Product Regular Price (raw number) | 39.99 |
{product_sale_price} | Product Sale Price (raw number) | 29.99 |
{product_price_formatted} | Product Price (with currency) | 29.99 in your store’s currency format, for example $29.99 |
{product_regular_price_formatted} | Product Regular Price (with currency) | 39.99 in your store’s currency format |
{product_sale_price_formatted} | Product Sale Price (with currency) | 29.99 in your store’s currency format |
{product_sku} | Product SKU | SAMPLE-SKU-001 |
{product_stock_status} | Product Stock Status (raw slug) | instock |
{product_stock_status_label} | Product Stock Status (label) | In stock |
{product_quantity} | Product Quantity | 1 |
{product_image} | Product Image URL | The web address of the WooCommerce placeholder image |
{product_image_html} | Product Image (HTML image tag) | The WooCommerce placeholder image, shown as a picture |
{trigger_type} | Trigger Type | No sample value, shows as typed |
Troubleshooting
After you click Send Test Email, a message appears under the button. If it shows an error, use the matching fix below.
“Email subject and body cannot both be empty.” Fill in the Email Subject or the Email Body field, then send the test again.
“Invalid email address.” Correct the address in the Email Address field, or clear the field to send to your admin email.
“Failed to send test email.” Check that your site can send email, for example with your SMTP plugin or host mail settings, then send the test again. Your site could not hand the email off for delivery.
Test email didn’t arrive? Try these checks:
- Check your spam or junk folder. Test emails can sometimes be filtered there.
- Check your WooCommerce email settings. Go to WooCommerce → Settings → Emails and confirm outgoing email is configured correctly.
- Check the Email Address field. If the field is blank, the email goes to your admin address; confirm that address is correct in Settings → General.
Frequently asked questions
Does the test email use real customer data?
No. Variable tags are replaced with sample data. For example, {customer_name} becomes “Jane Doe” and {product_name} becomes “Sample Product”. This lets you see how the formatted email will look without needing a real customer action. None of it is real customer data. {wishlist_items} and {trigger_type} have no sample value, so they show as typed.
Where does the test email go?
It goes to the address you entered in the Email Address field. If you left that field blank, or it holds {customer_email}, the test email goes to your site’s admin email address.
Does sending a test email save the automation?
No. The test send is independent of saving. Once you’re happy with the email, click Create (or Update if editing) to save your changes.
Need help?
- Premium users: Open a support ticket
- Free users: Visit our community forum