
 Reviewed by
 You install a wishlist plugin on your Woostify store and load the shop page. The button is sitting somewhere odd. It crowds the Add to Cart button, or it clashes with the theme’s own controls. On some layouts it gets cut off inside the product card.
That isn’t a small cosmetic problem. A Woostify wishlist button nobody can find is a save that never happens. And a save that never happens is a shopper you can’t bring back.
Here’s the good news: SaveTo Wishlist Lite handles the styling side for you the moment it spots Woostify. What it can’t decide for you is where the button should sit.
So this guide covers both halves. First, what the integration does on its own. Then, the placement choices you’ll make to get a seamless layout, including two specific positions you’ll want to avoid.
Table of Contents
- Why Wishlist Button Placement Decides Whether Shoppers Save
- What The SaveTo Wishlist And Woostify Integration Actually Does
- What You Need Before You Start
- How To Set Up Your Woostify Wishlist Buttons
- The Two Placements To Avoid On Woostify
- How To Confirm The Woostify Styles Are Loading
- Guest Wishlists Matter More Than The Styling
- Scope & Compatibility Guidelines
- Frequently Asked Questions: SaveTo Wishlist And Woostify
- Give The Save Button A Place To Live
Why Wishlist Button Placement Decides Whether Shoppers Save
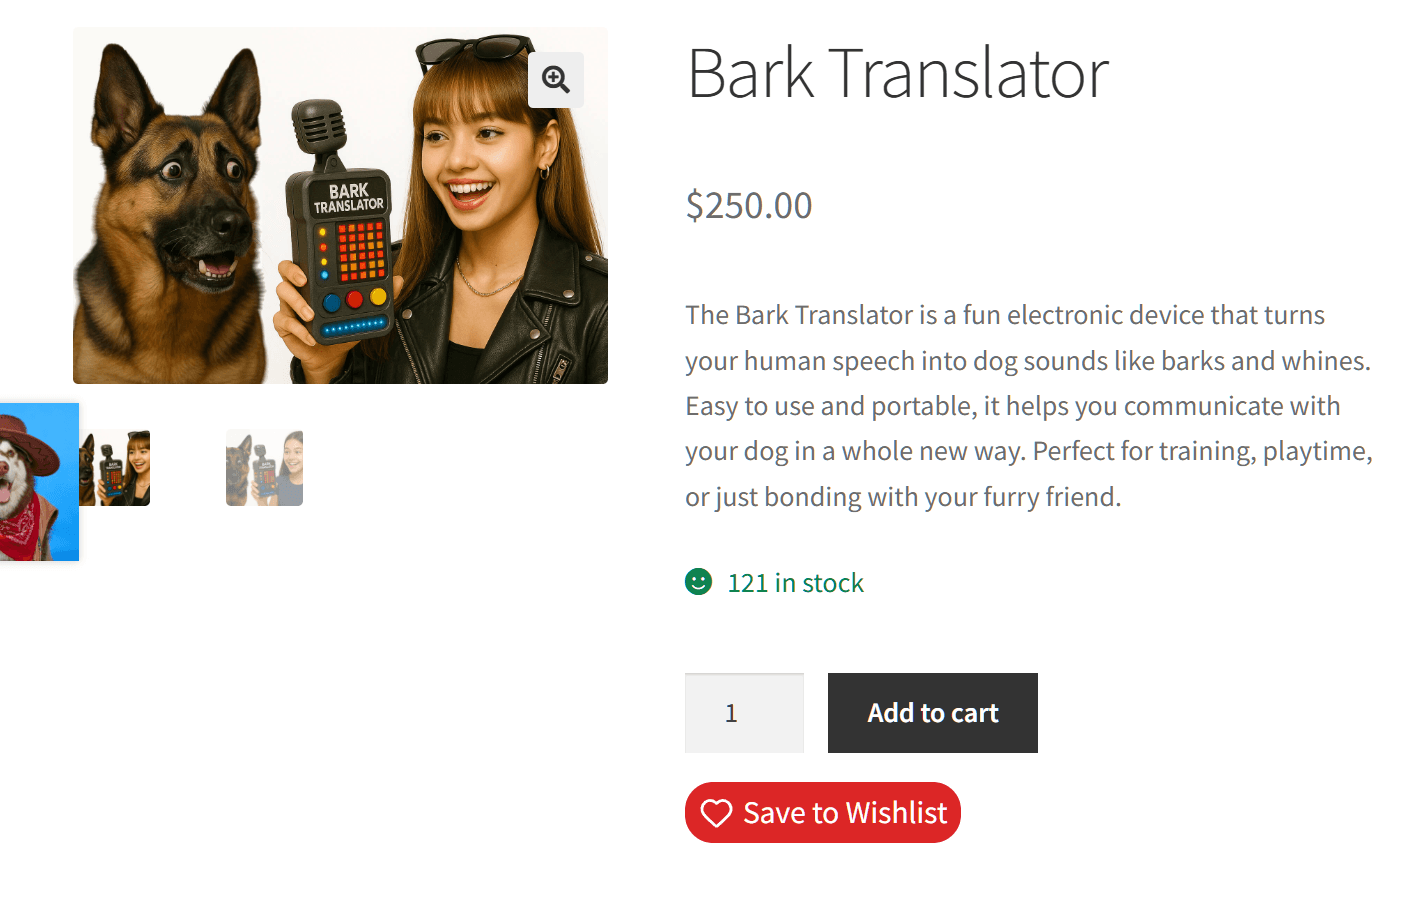
A wishlist only earns its keep if shoppers actually use it, and placement plays a major role. Industry evidence highlights just how much room there is to stand out with great design.
The Baymard Institute’s product page UX benchmark was updated in March 2026. It found that 52% of leading desktop ecommerce sites have mediocre or worse product page performance. On mobile, that figure climbs to 62%. The benchmark covers 155 or more sites and over 30,000 manually rated scores.
Product listings offer an even bigger opportunity. Baymard’s product list benchmark found that 80% of ecommerce sites have serious product list issues. A clean, deliberate layout is an easy way to stand out.
Then there’s the device split. Adobe Analytics reported that mobile drove 56.4% of online transactions over the 2025 holiday season, up from 54.5% a year earlier. Testing your placement across both desktop and mobile screens ensures a seamless experience for all shoppers.
🔍️ One thing we see repeatedly: a store owner picks a placement, checks it once on a laptop, and moves on. The problems almost always turn up somewhere else. Usually on a category archive, on a variable product, or on a phone. Check all three before you call it done.
Want the broader picture of shoppers who look and leave? Our guide to WooCommerce browse abandonment covers that pattern in detail.
What The SaveTo Wishlist And Woostify Integration Actually Does

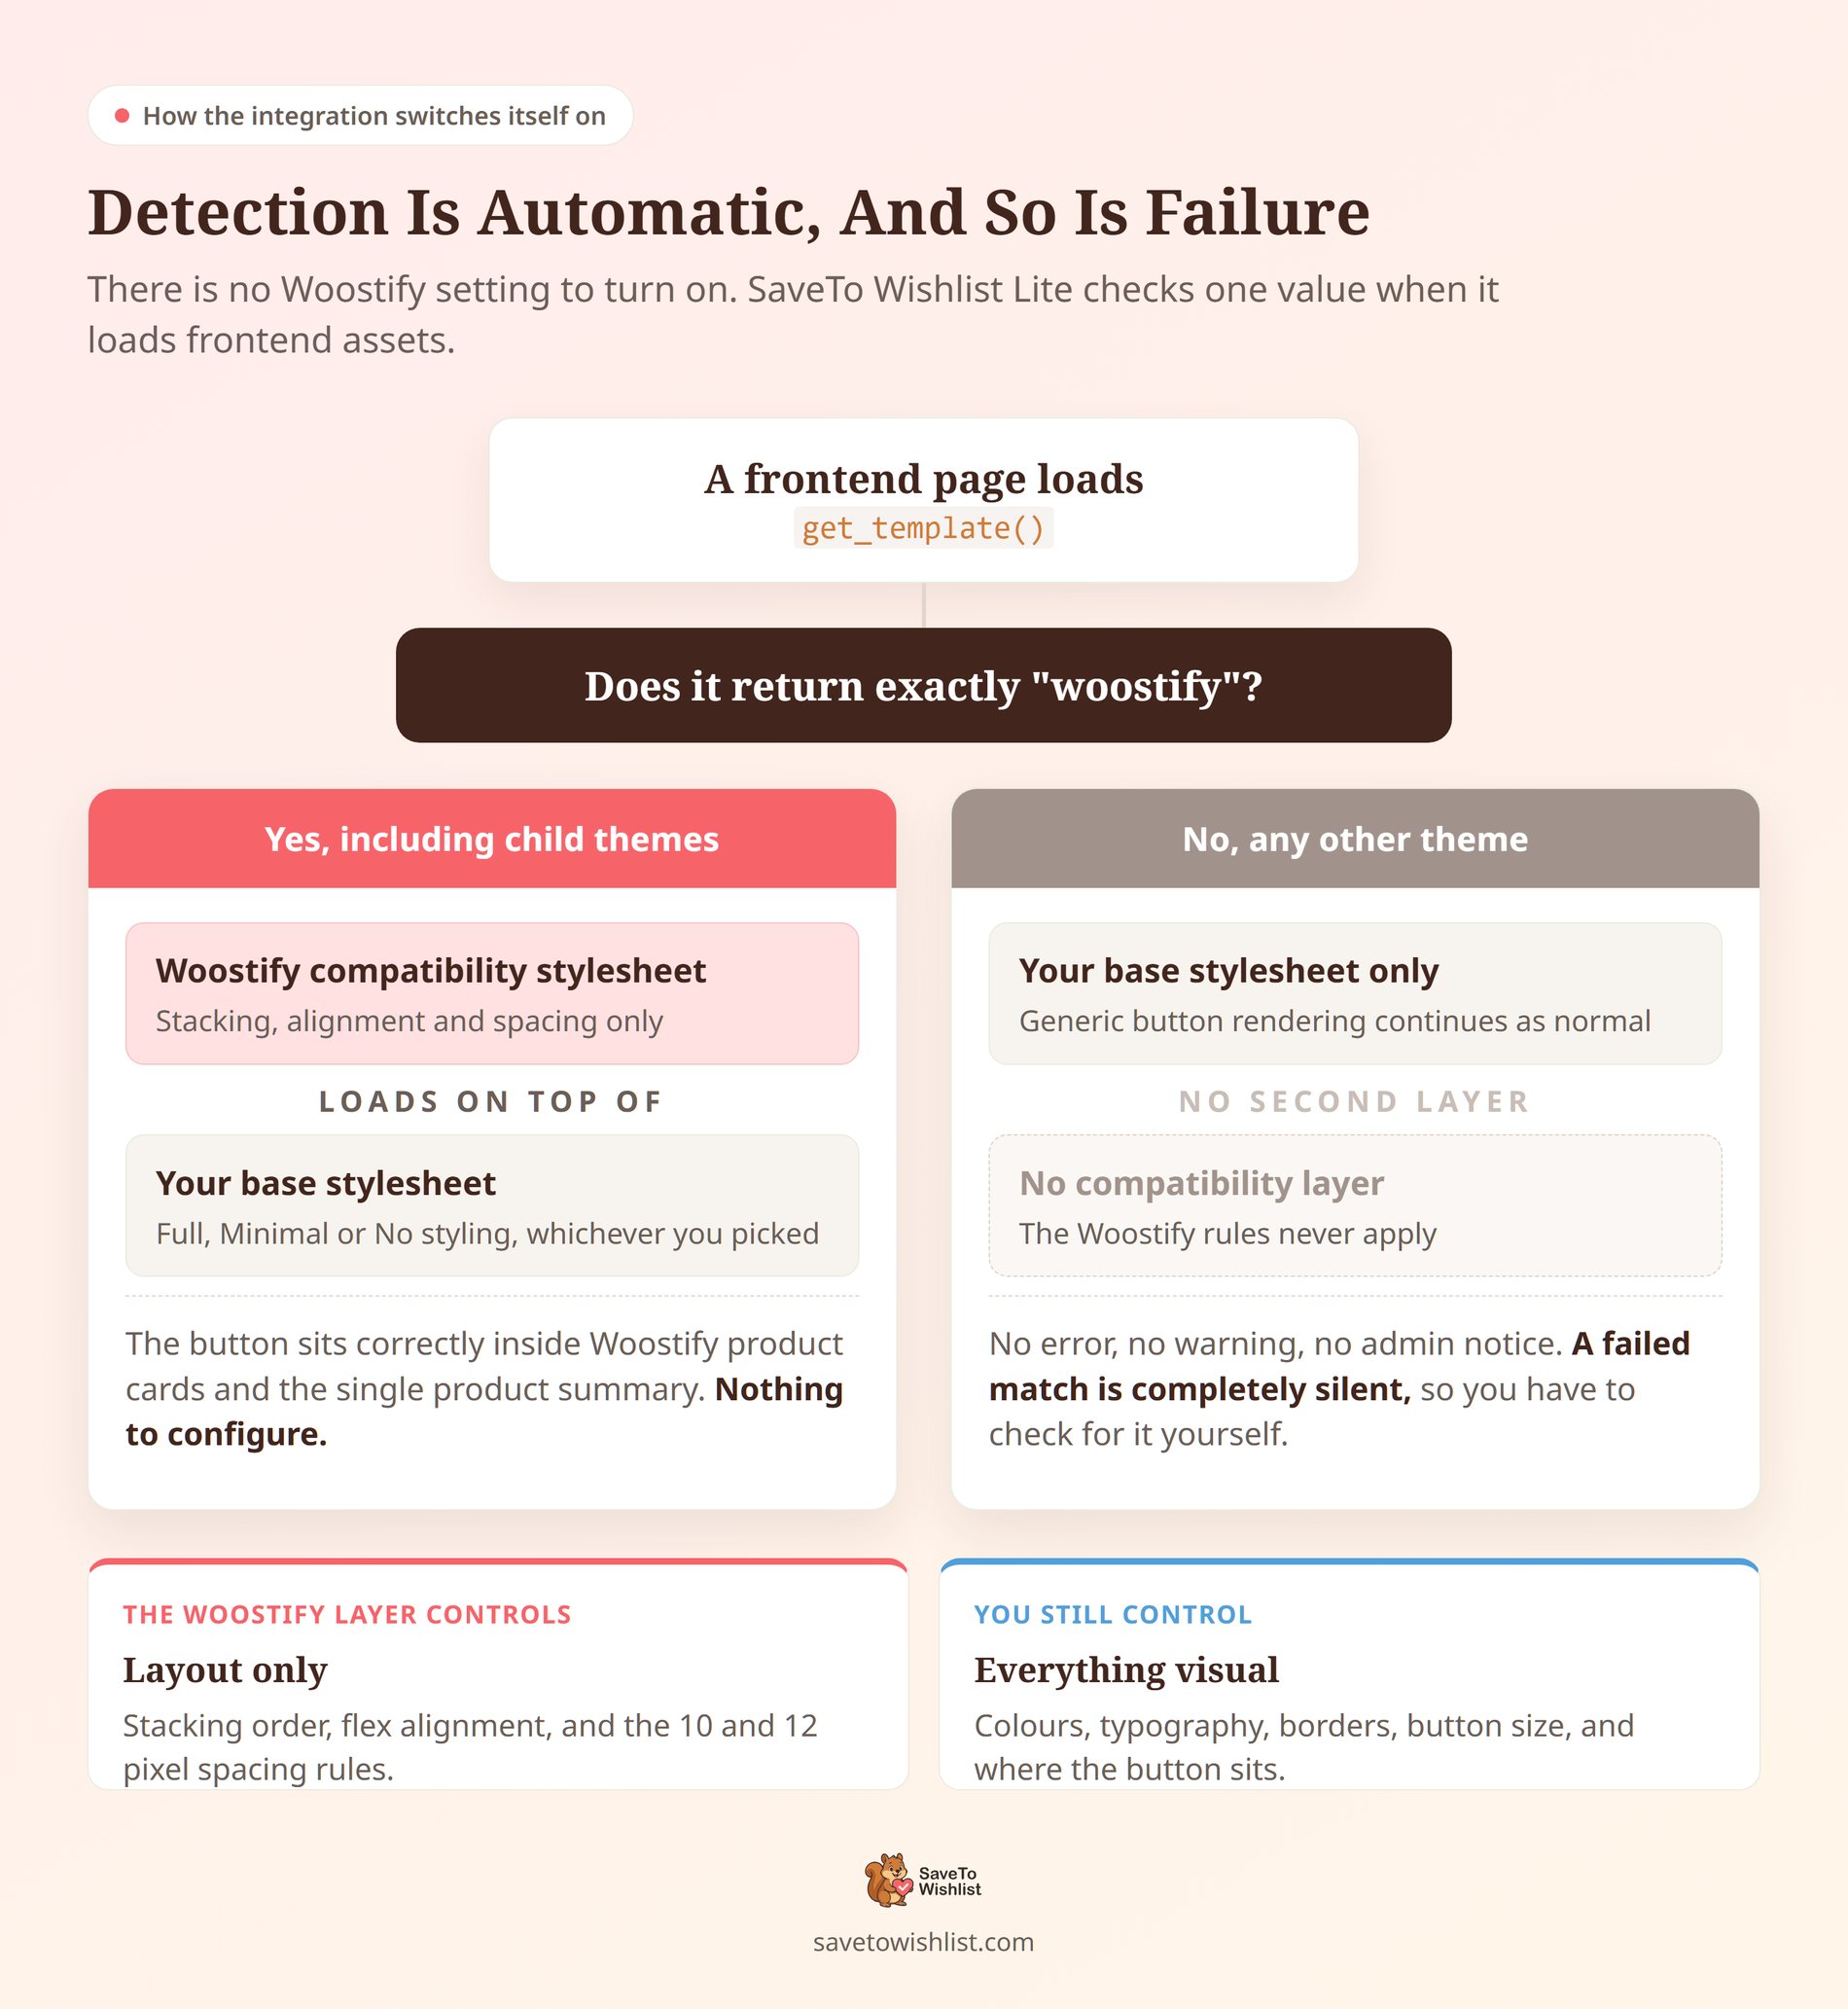
The integration is one compatibility stylesheet that loads on its own. There is no setup step, and no settings screen to go hunting for.
SaveTo Wishlist Lite 1.1.1 checks the active WordPress template identifier. When it reads exactly woostify, the plugin loads an extra stylesheet. That stylesheet sits on top of whichever base frontend stylesheet you’ve selected. It then adjusts stacking, alignment, and spacing so the button fits Woostify’s markup.
Here’s what it changes, and what it deliberately leaves alone.
| Context | What the Woostify stylesheet adjusts |
|---|---|
| Shop and archive, on-image placements | Raises the button container to z-index: 3, so it stacks above the product image |
| Shop and archive, inline placements | Sets a vertical flex layout with a 10 pixel top margin. Also matches Woostify’s left, centre, and right alignment |
| Single product summary | Adds a 12 pixel top margin to create clean, balanced spacing from the element above it |
| Colours, typography, borders, sizing | Preserved as-is. These remain fully customizable via your plugin and theme settings. |
Our guide to wishlist button customization covers the settings that do control appearance.
What the integration doesn’t do
The list of things the SaveTo Wishlist and Woostify integration doesn’t do is just as useful. It adds no JavaScript, no REST endpoints, and no database records. It processes no user data. It also registers no Woostify-specific rendering hooks, and adds no Woostify settings page.
Since the integration runs automatically in the background, you won’t need to look for a dedicated Woostify settings tab or toggle. Detection is automatic, and no setting turns the Woostify stylesheet on or off by itself.
Child themes are covered too. Run a child theme whose parent identifier is still woostify, and the stylesheet loads the same way. The child theme’s own identifier isn’t used for detection.
Even if a customized setup prevents automatic detection, your site remains completely functional. SaveTo Wishlist Lite seamlessly falls back to its standard stylesheet to ensure your buttons keep working smoothly.
What You Need Before You Start
The requirements are short, and each one is essential for the integration to run.
| Component | Requirement |
|---|---|
| SaveTo Wishlist Lite | 1.1.1 or later |
| WordPress | 5.8 or later, tested through 7.0 |
| PHP | 7.4 or later |
| WooCommerce | 4.0 or later, tested through 10.2 |
| Active theme | Woostify, or a child theme built on Woostify |
SaveTo Wishlist Lite checks that WooCommerce is active before it starts up. If WooCommerce isn’t active, the plugin shows an error notice in your dashboard and doesn’t load its main controller.
Two things you don’t need: a paid plan and a specific Woostify version. The compatibility stylesheet ships in SaveTo Wishlist Lite, the free version. Plus, the code checks no Woostify version, licence, or companion plugin. There’s no free versus Pro distinction on the Woostify side either.
The flip side is that no Woostify version has been declared or tested for this integration. Detection rests on the theme identifier alone. So give your pages a quick look on whichever Woostify version you run, and again after you update it.
How To Set Up Your Woostify Wishlist Buttons
The Woostify integration works out of the box, so you can focus entirely on selecting the placement that gives your store the most polished look.
Placement is one of the levers we cover in our guide to wishlist conversion optimization.
Everything lives in one screen: SaveTo Wishlist → Settings → Button Placement & Styles. You’ll need administrator access (manage_options) to open it.
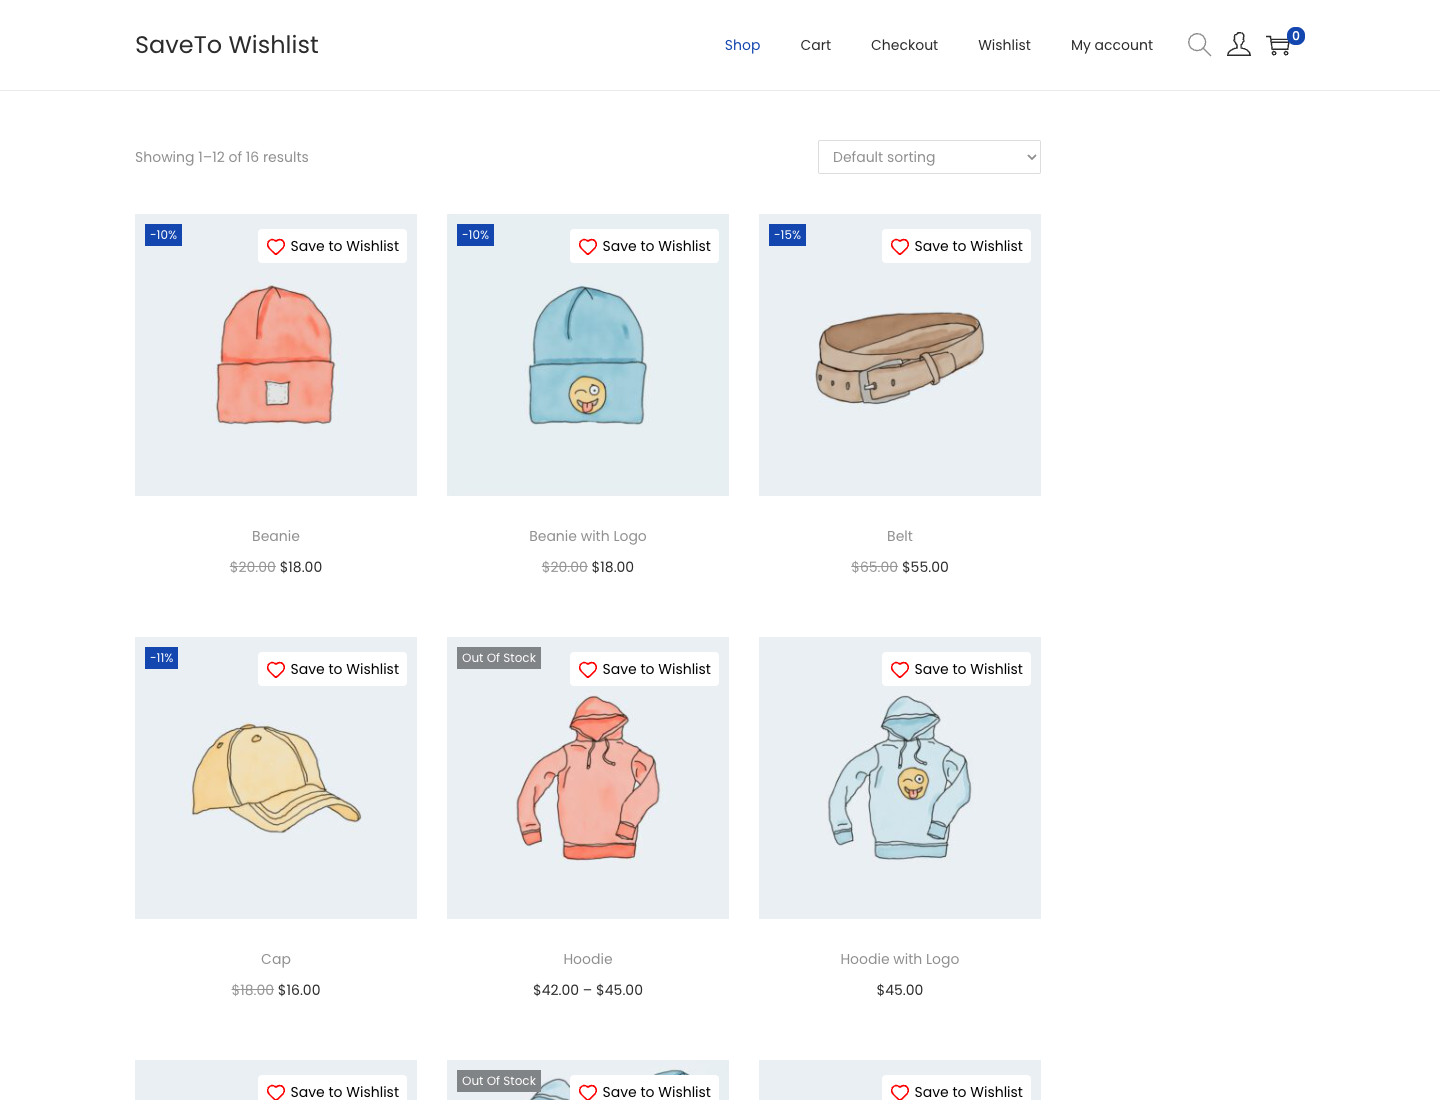
Set your shop and archive placement
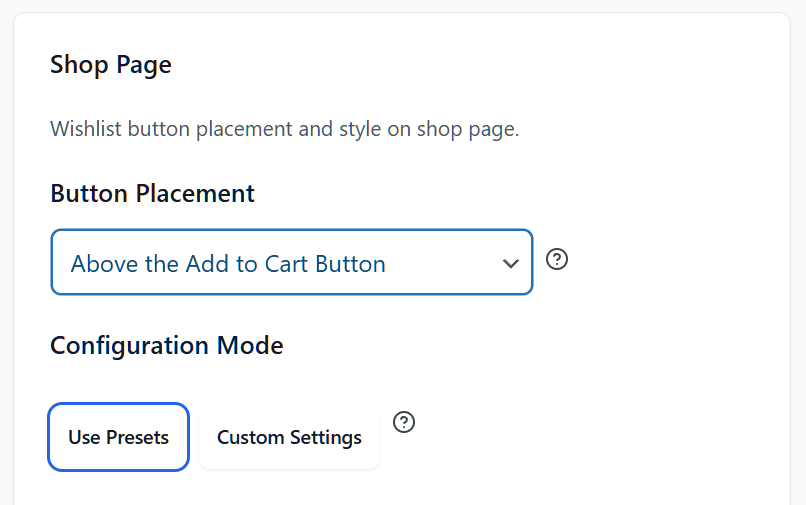
Under Shop Page, open the Button Placement dropdown. This one control covers your main shop page, product category pages, and other product archives. Five options are documented as working well with Woostify’s product cards.
Advanced Coupons has a great rule of thumb for this in its guide to optimising an ecommerce site: can you spot the button from across the room?
- Top Right of the Product Image: The stylesheet stacks the button above the image.
- Top Left of the Product Image: Same handling as the right corner. Pick whichever corner is free in your card design.
- Above the Product Title: Sits in Woostify’s card content area and inherits your card alignment.
- Below the Product Title: Sits under the title, so long titles push it down rather than crowd it.
- Above the Add to Cart Button: Puts the save action directly above the buy action.
The three content-area placements inherit Woostify’s alignment automatically. Set your product cards to centred text, and the button centres. Left and right aligned cards behave the same way.
Set your single product placement
Under Product Page, you’ll find a second Button Placement dropdown. The two settings work independently, so changing one does nothing to the other.
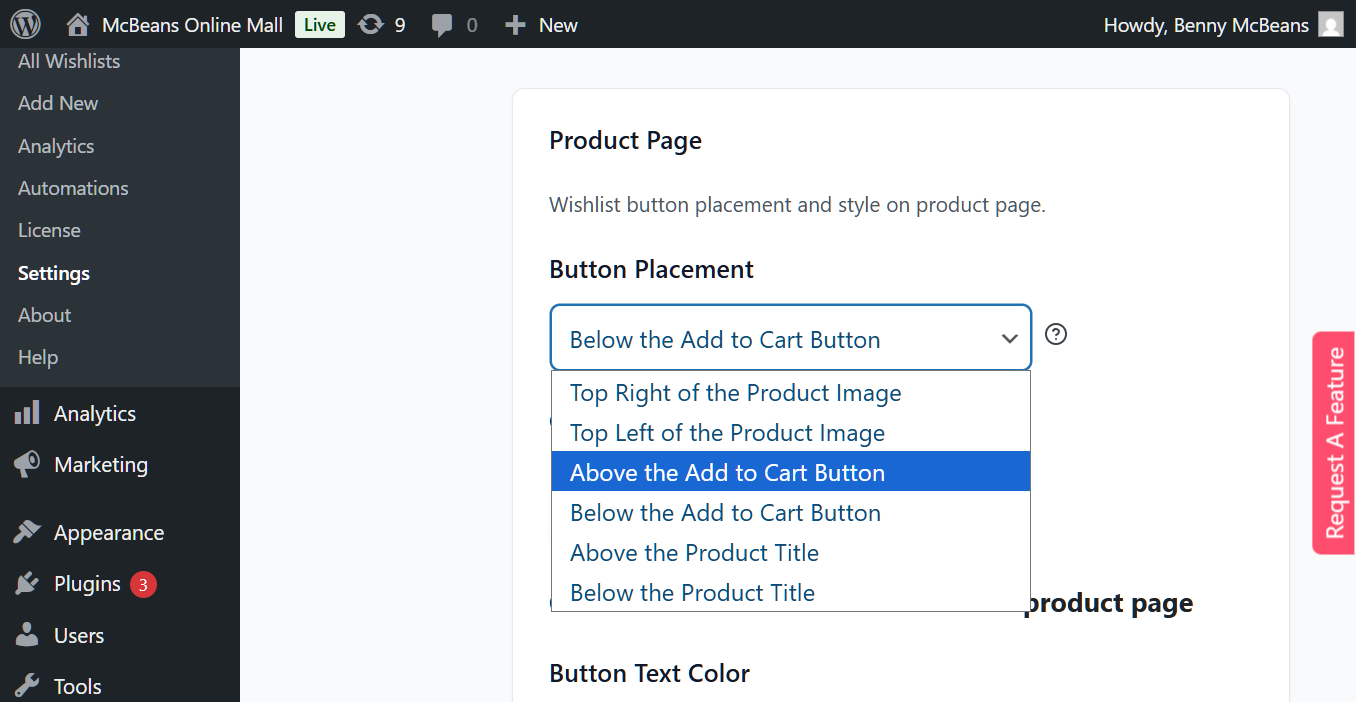
Four placements are documented as working well on Woostify product pages.
- Above the Add to Cart Button: Puts the save option in front of shoppers before they commit.
- Below the Add to Cart Button: The settings screen’s own default, and it picks up the 12 pixel top margin.
- Above the Product Title: Useful when your product summary runs long and you want the save action visible early.
- Below the Product Title: Sits with the title block rather than the buying controls.
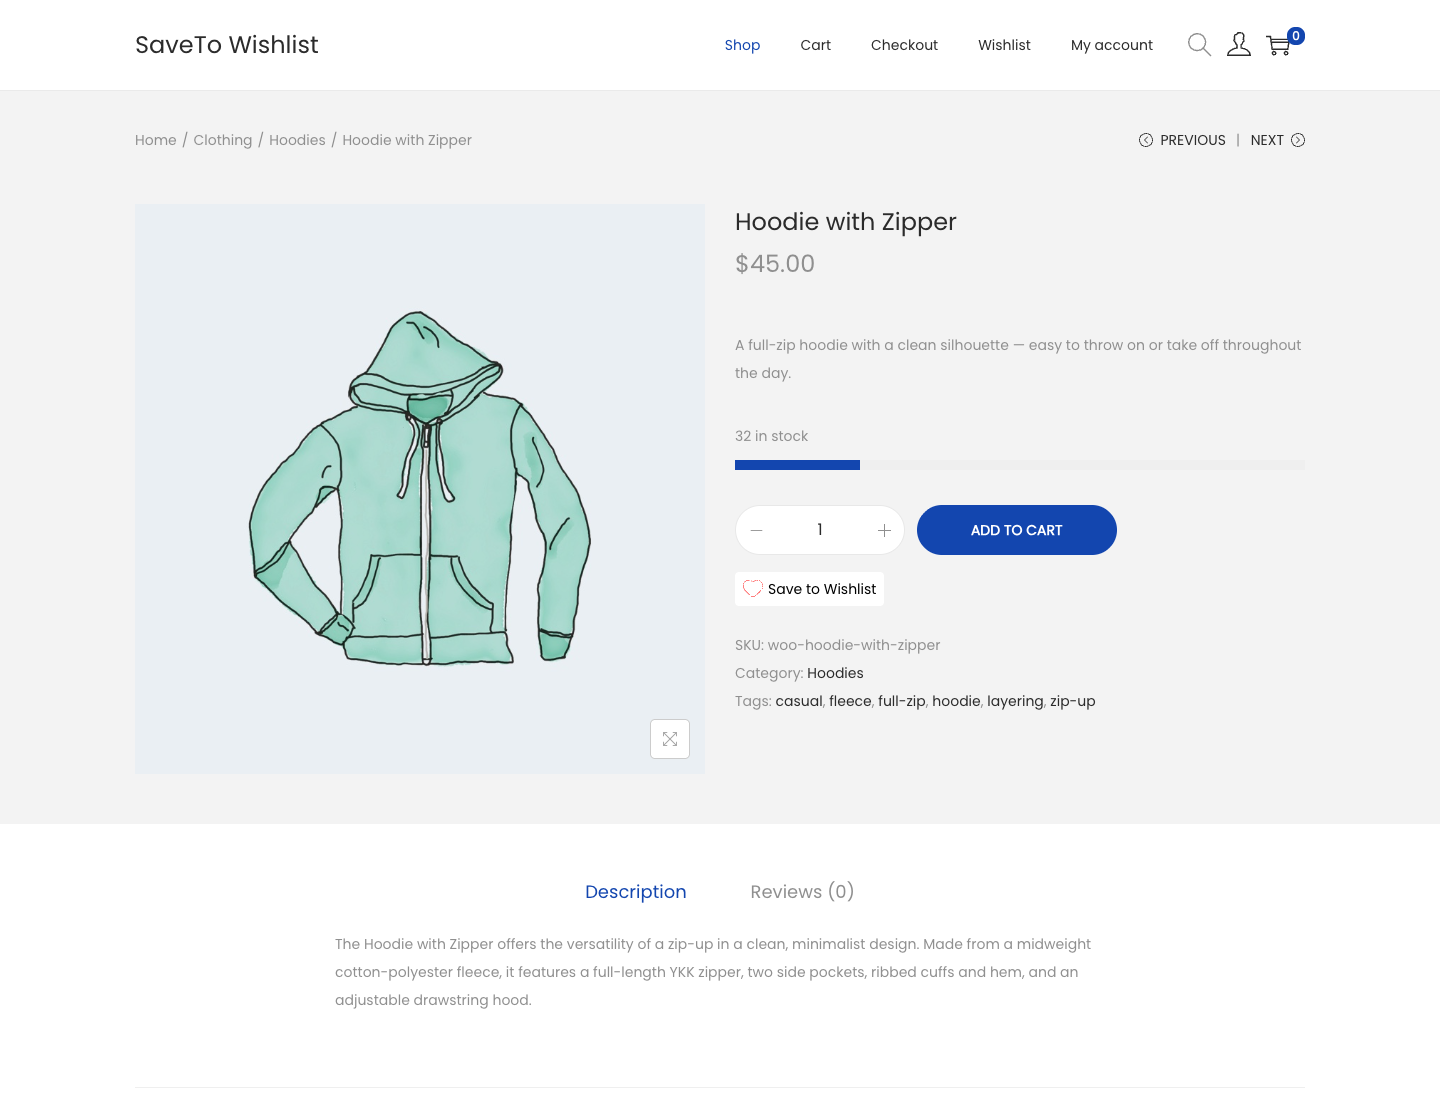
There’s a fifth option: Inline with the Add to Cart Button. The documentation doesn’t recommend it for Woostify, and it doesn’t rule it out either. Test it against your own product layout before you settle on it.
Both dropdowns also carry a Don’t show option. Choosing it stops the button rendering hook from being registered in that context. The button is never built in the first place, rather than built and then hidden.
Choose how much styling to load
Still on the same screen, find Frontend Styling and the setting labelled Frontend CSS Loading. It picks which base stylesheet loads. The Woostify stylesheet then loads on top of whichever you choose.
- Full styling: Uses the plugin’s own colours and fonts. This is the factory default.
- Minimal styling: Lets your theme override colours and fonts.
- No styling: Loads positioning only, and inherits everything visual from Woostify.
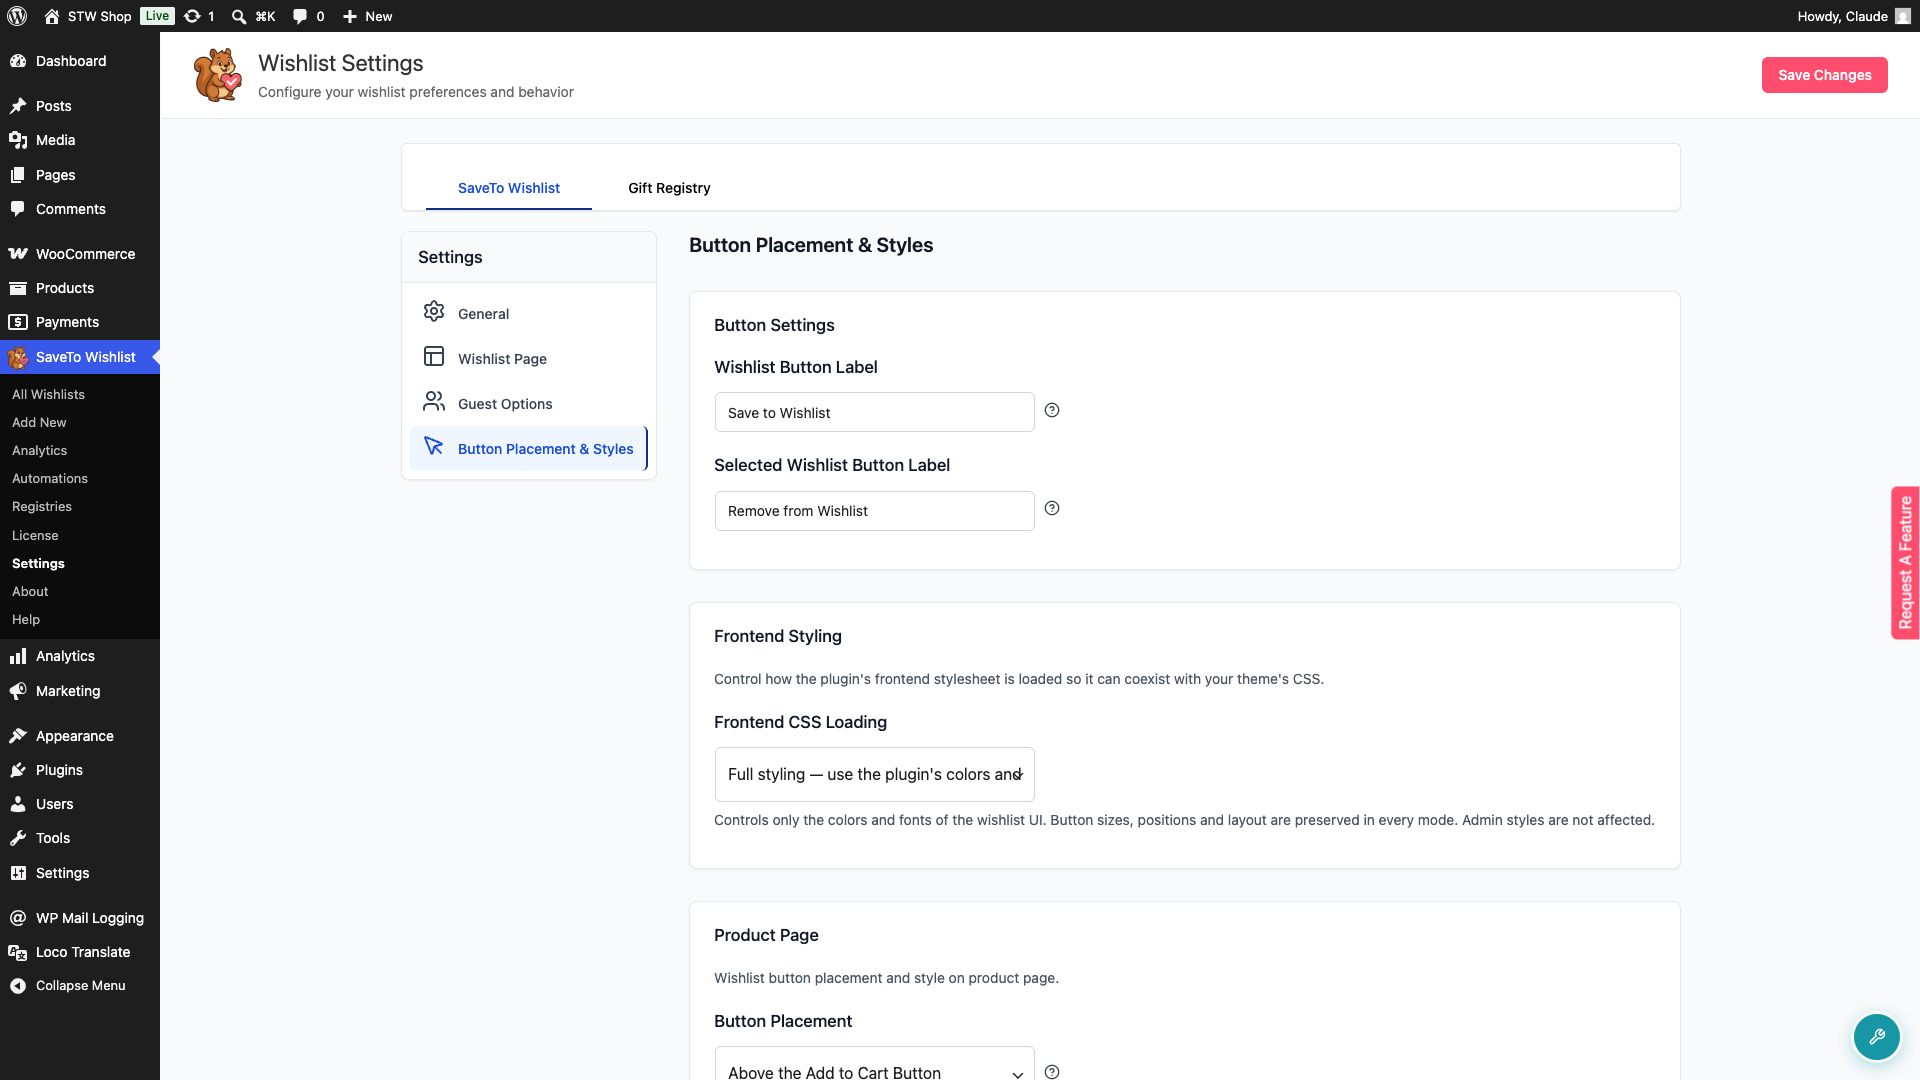
Have you already tuned Woostify’s typography and colours? Then Minimal or No styling usually gives a more native result. Importantly, the Woostify layout rules stay active in all three modes. You aren’t trading the integration away to get theme colours.
Each mode loads a different stylesheet file, so your choice also changes what the browser downloads. If frontend weight matters to you, our WooCommerce wishlist plugin speed test measures what SaveTo Wishlist actually adds to a page.
The Two Placements To Avoid On Woostify
To ensure the cleanest layout right out of the box, here are two placement options you’ll want to bypass for Woostify.
- On shop and archive pages, avoid Below the Add to Cart Button. Woostify renders that row inside a fixed-height animated area on desktop product cards. The wishlist button can get clipped there, hiding part or all of it.
- On single product pages, avoid the two on-image placements. Woostify uses a custom product gallery, and top-corner buttons don’t display reliably inside it.
Notice that the advice flips between the two contexts. The image corners are recommended on shop and archive pages but discouraged on single product pages. Below the Add to Cart Button is the other way around. That’s exactly why the two dropdowns are separate, so set each one on its own.
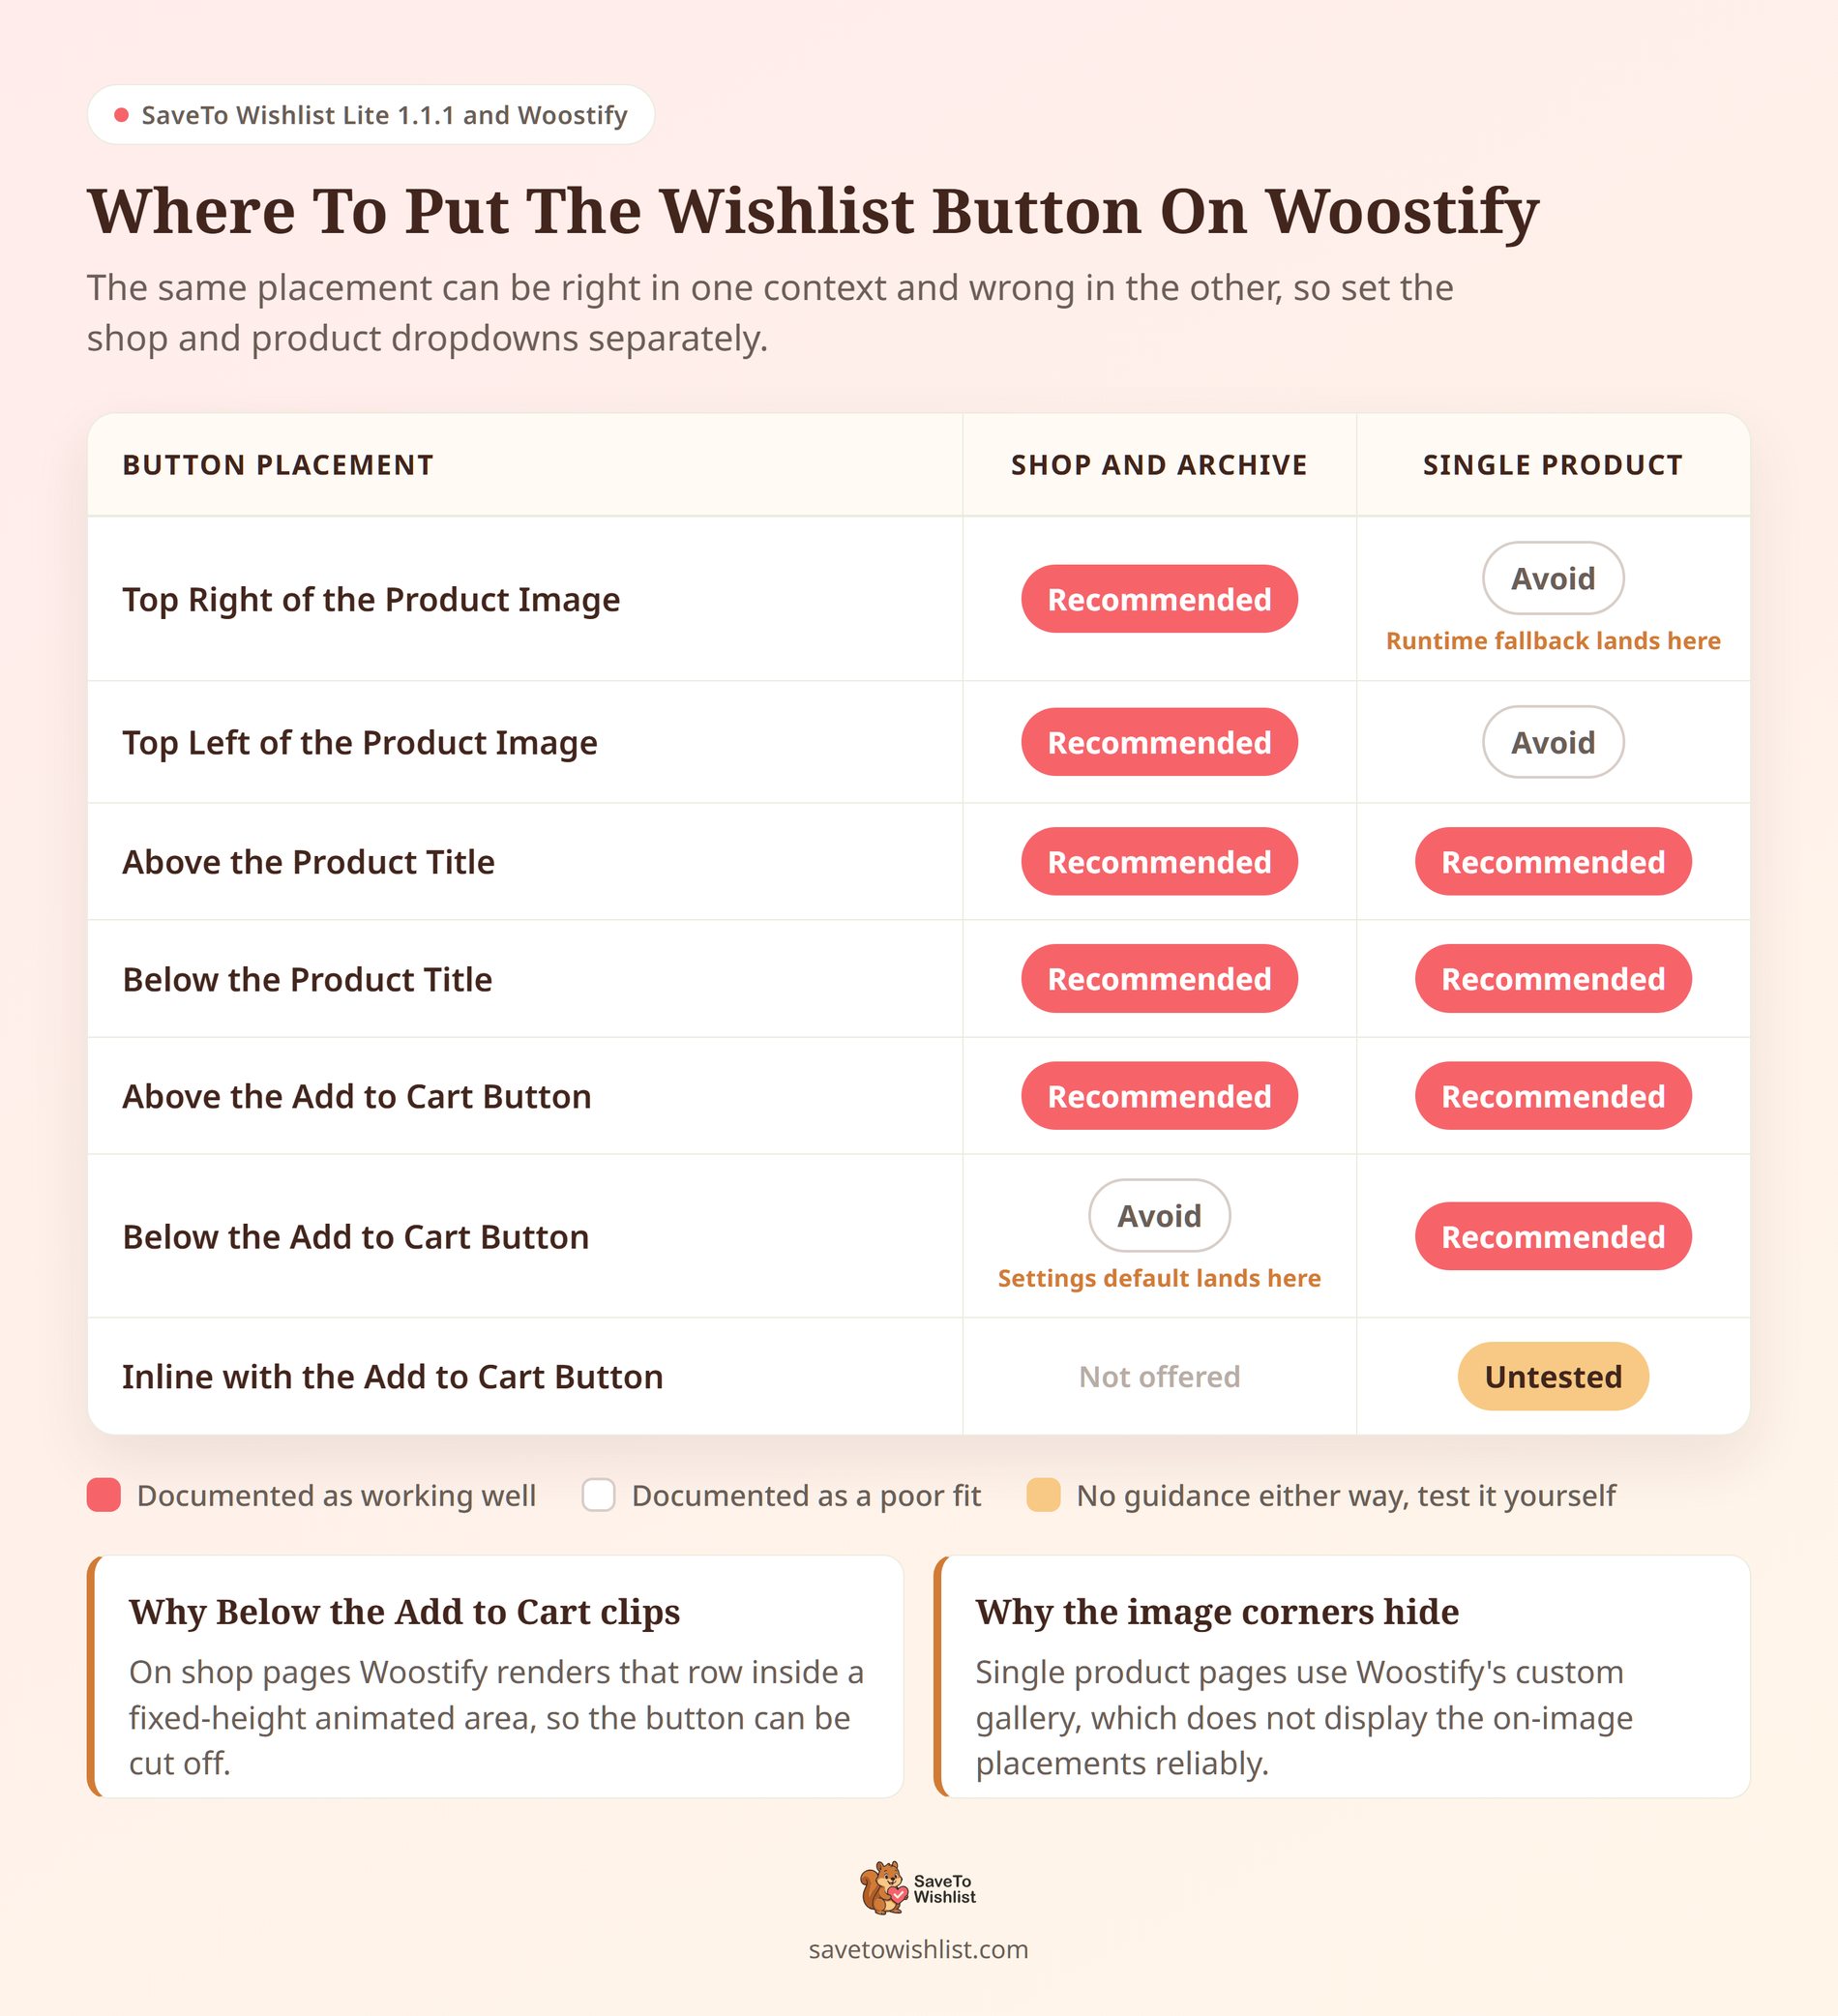
⚙️ Important setup step: SaveTo Wishlist Lite 1.1.1 doesn’t save the shop and product placement options when you activate it. That leaves two different answers to the question “what is the default?” The settings screen shows Below the Add to Cart Button for both contexts. But while the option is still unsaved, the frontend falls back to Top Right of the Product Image for both. On Woostify, one of those two values is a placement to avoid in each context, so don’t assume the settings screen is showing you what shoppers actually see.
The fix takes seconds: open both placement dropdowns, pick the placement you want, and press Save even if the value on screen already looks right. Saving writes the option to the database, and from then on the screen and the frontend agree.
How To Confirm The Woostify Styles Are Loading
Since there’s no setting to check, verification happens in the browser. It takes about a minute.
- Confirm Woostify, or a Woostify child theme, is active under Appearance → Themes.
- Load any frontend page and open your browser’s developer tools.
- Search the page source for
savetowishlist-woostify.css. That file is the integration. - Check the order. It must load after the main SaveTo Wishlist frontend stylesheet, since it depends on it.
- On a shop or archive page using a corner placement, inspect the button. Its container should resolve to
z-index: 3. - In a single product summary, that container should carry a 12 pixel top margin.
If the file isn’t showing up, double-check your template identifier. Detection matches woostify exactly, so a theme that has been renamed or forked away from that identifier won’t trigger the stylesheet.
A failed match is completely silent. No error, no warning, no admin notice. Developer tools is the only place it shows up, which is why this check is worth a minute of your time.
Working deeper in the code? Our wishlist REST API guide covers programmatic access.
Guest Wishlists Matter More Than The Styling
One setting does more for your save rate than any styling decision. It’s whether logged-out shoppers can use the button at all.
The control is Disable Guest Wishlist, and it defaults to off. That means guests can save. Turn it on, and SaveTo Wishlist Lite stops registering its shop and product button hooks for logged-out visitors. The button doesn’t appear at all.
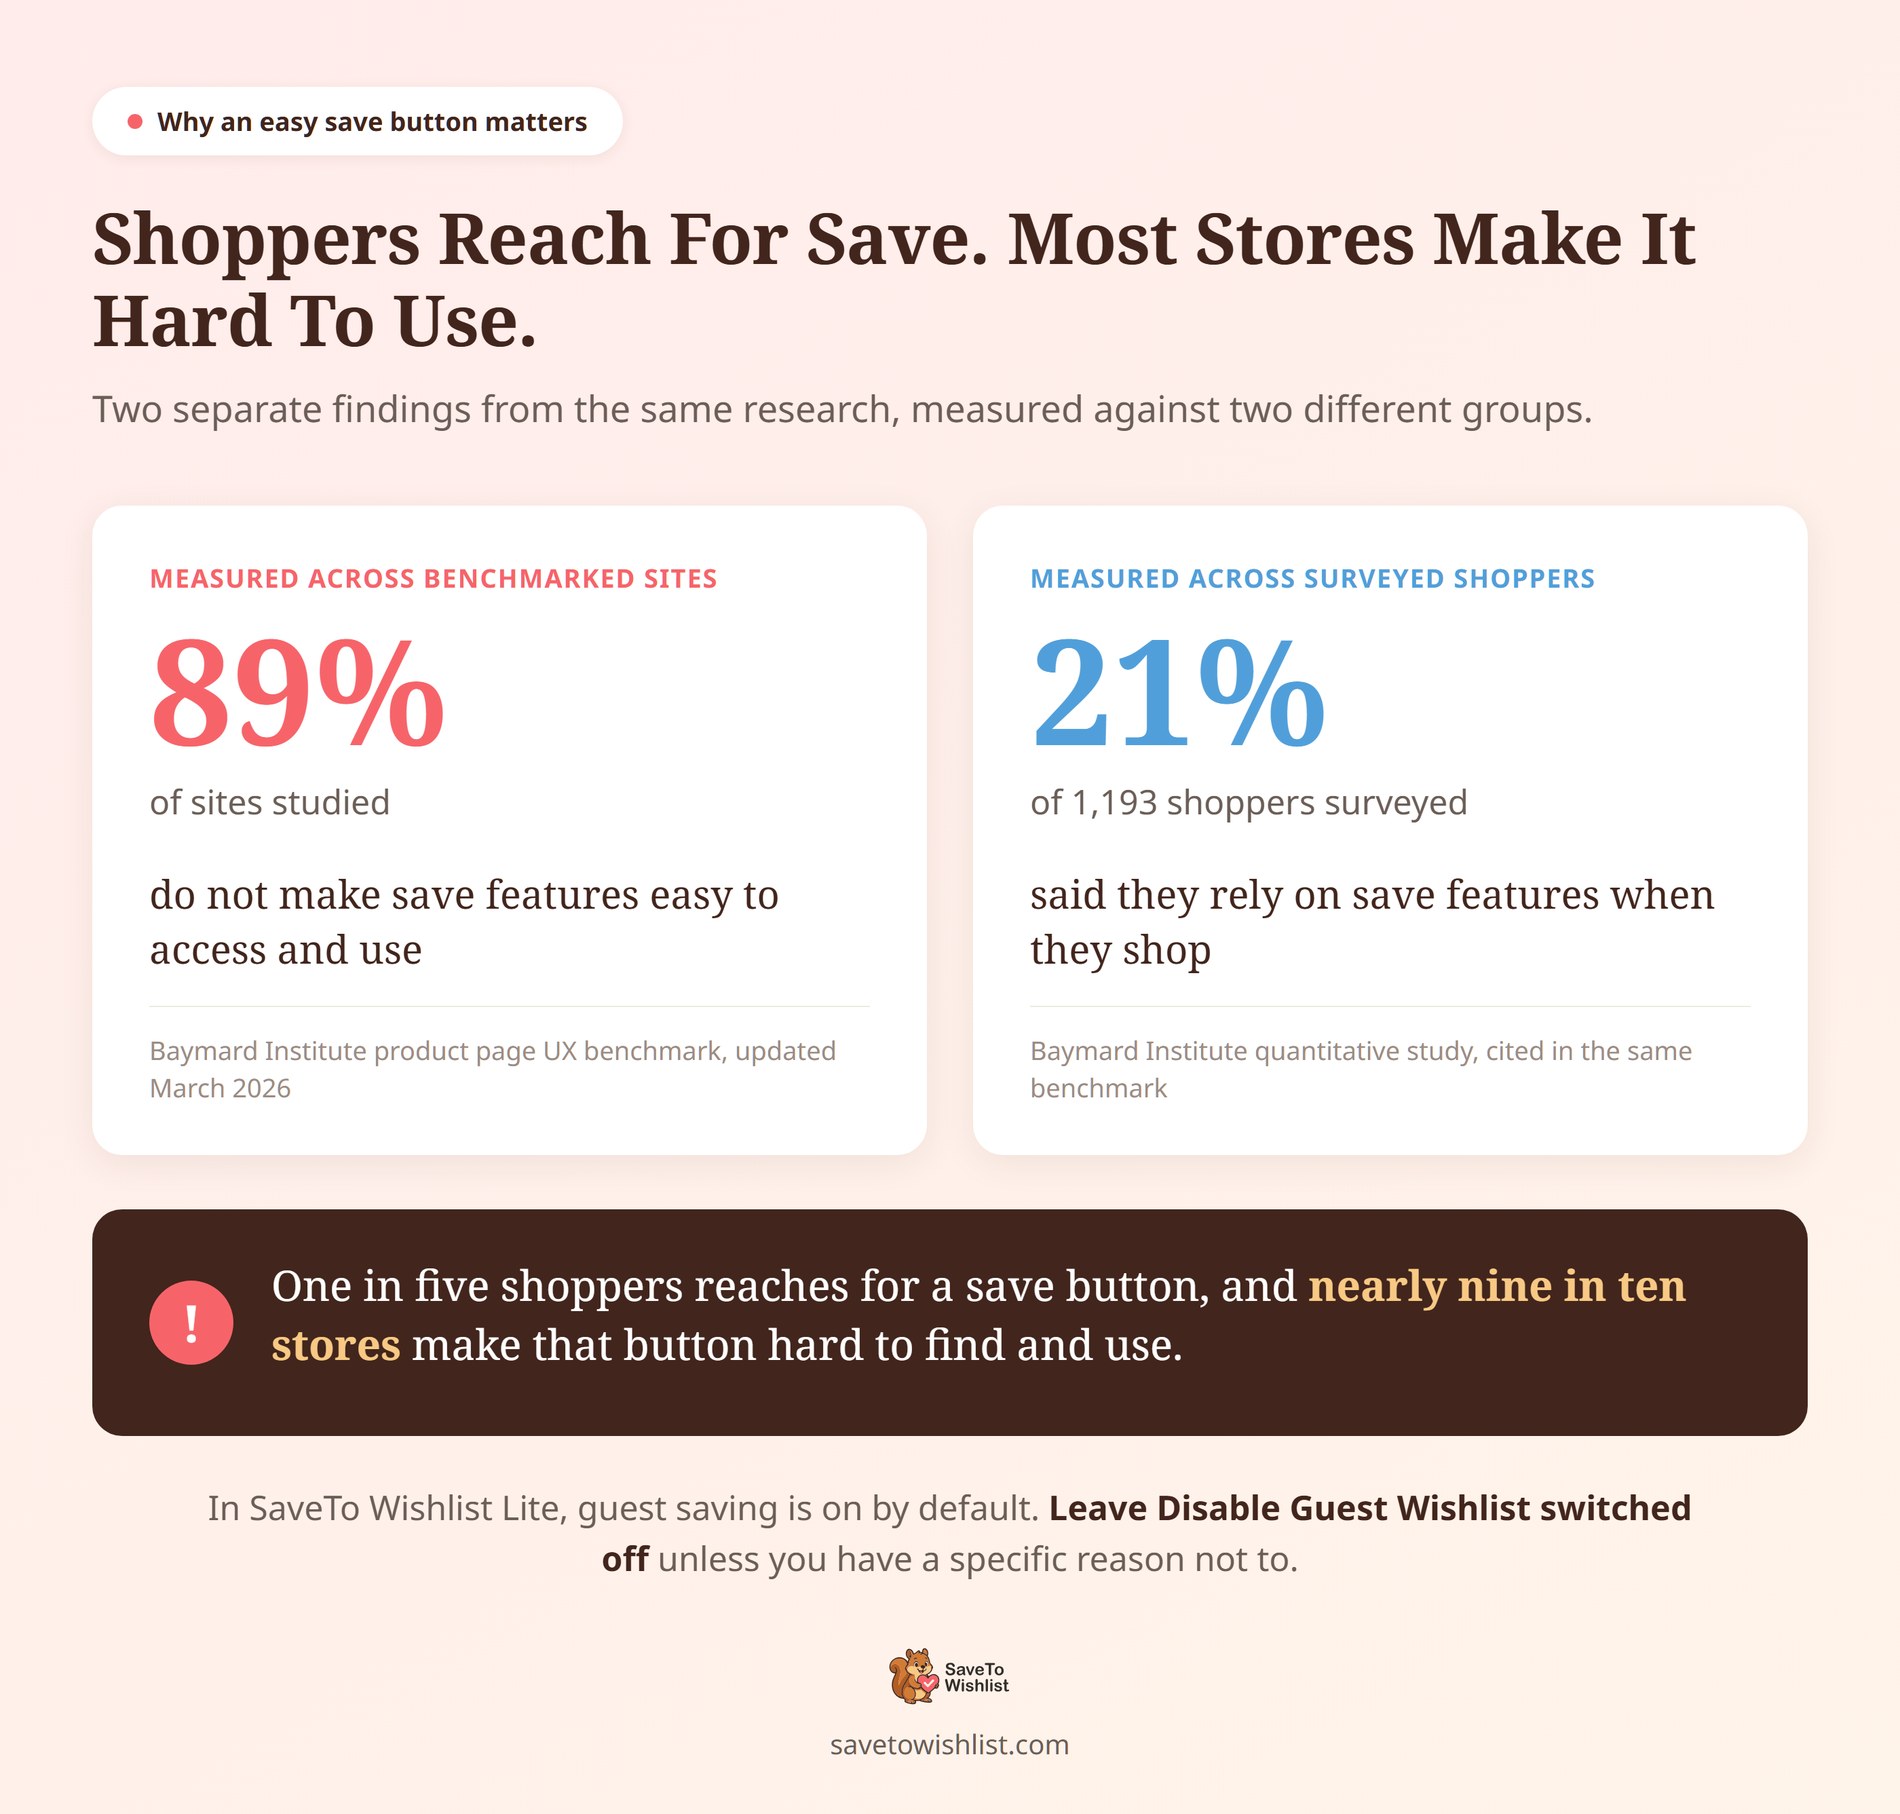
We’d leave it switched off. Baymard’s product page benchmark found that 89% of the sites it studied don’t make save features easy to access and use. In a separate survey of 1,193 shoppers, 21% said they rely on save features. That gap is your opportunity.
The same logic drives WooCommerce guest checkout: making key actions seamless for guests boosts engagement and increases conversions.
The Woostify integration doesn’t branch on login status. Guests and logged-in customers get the same placements and the same layout rules. There’s no separate guest styling to configure.
Scope & Compatibility Guidelines
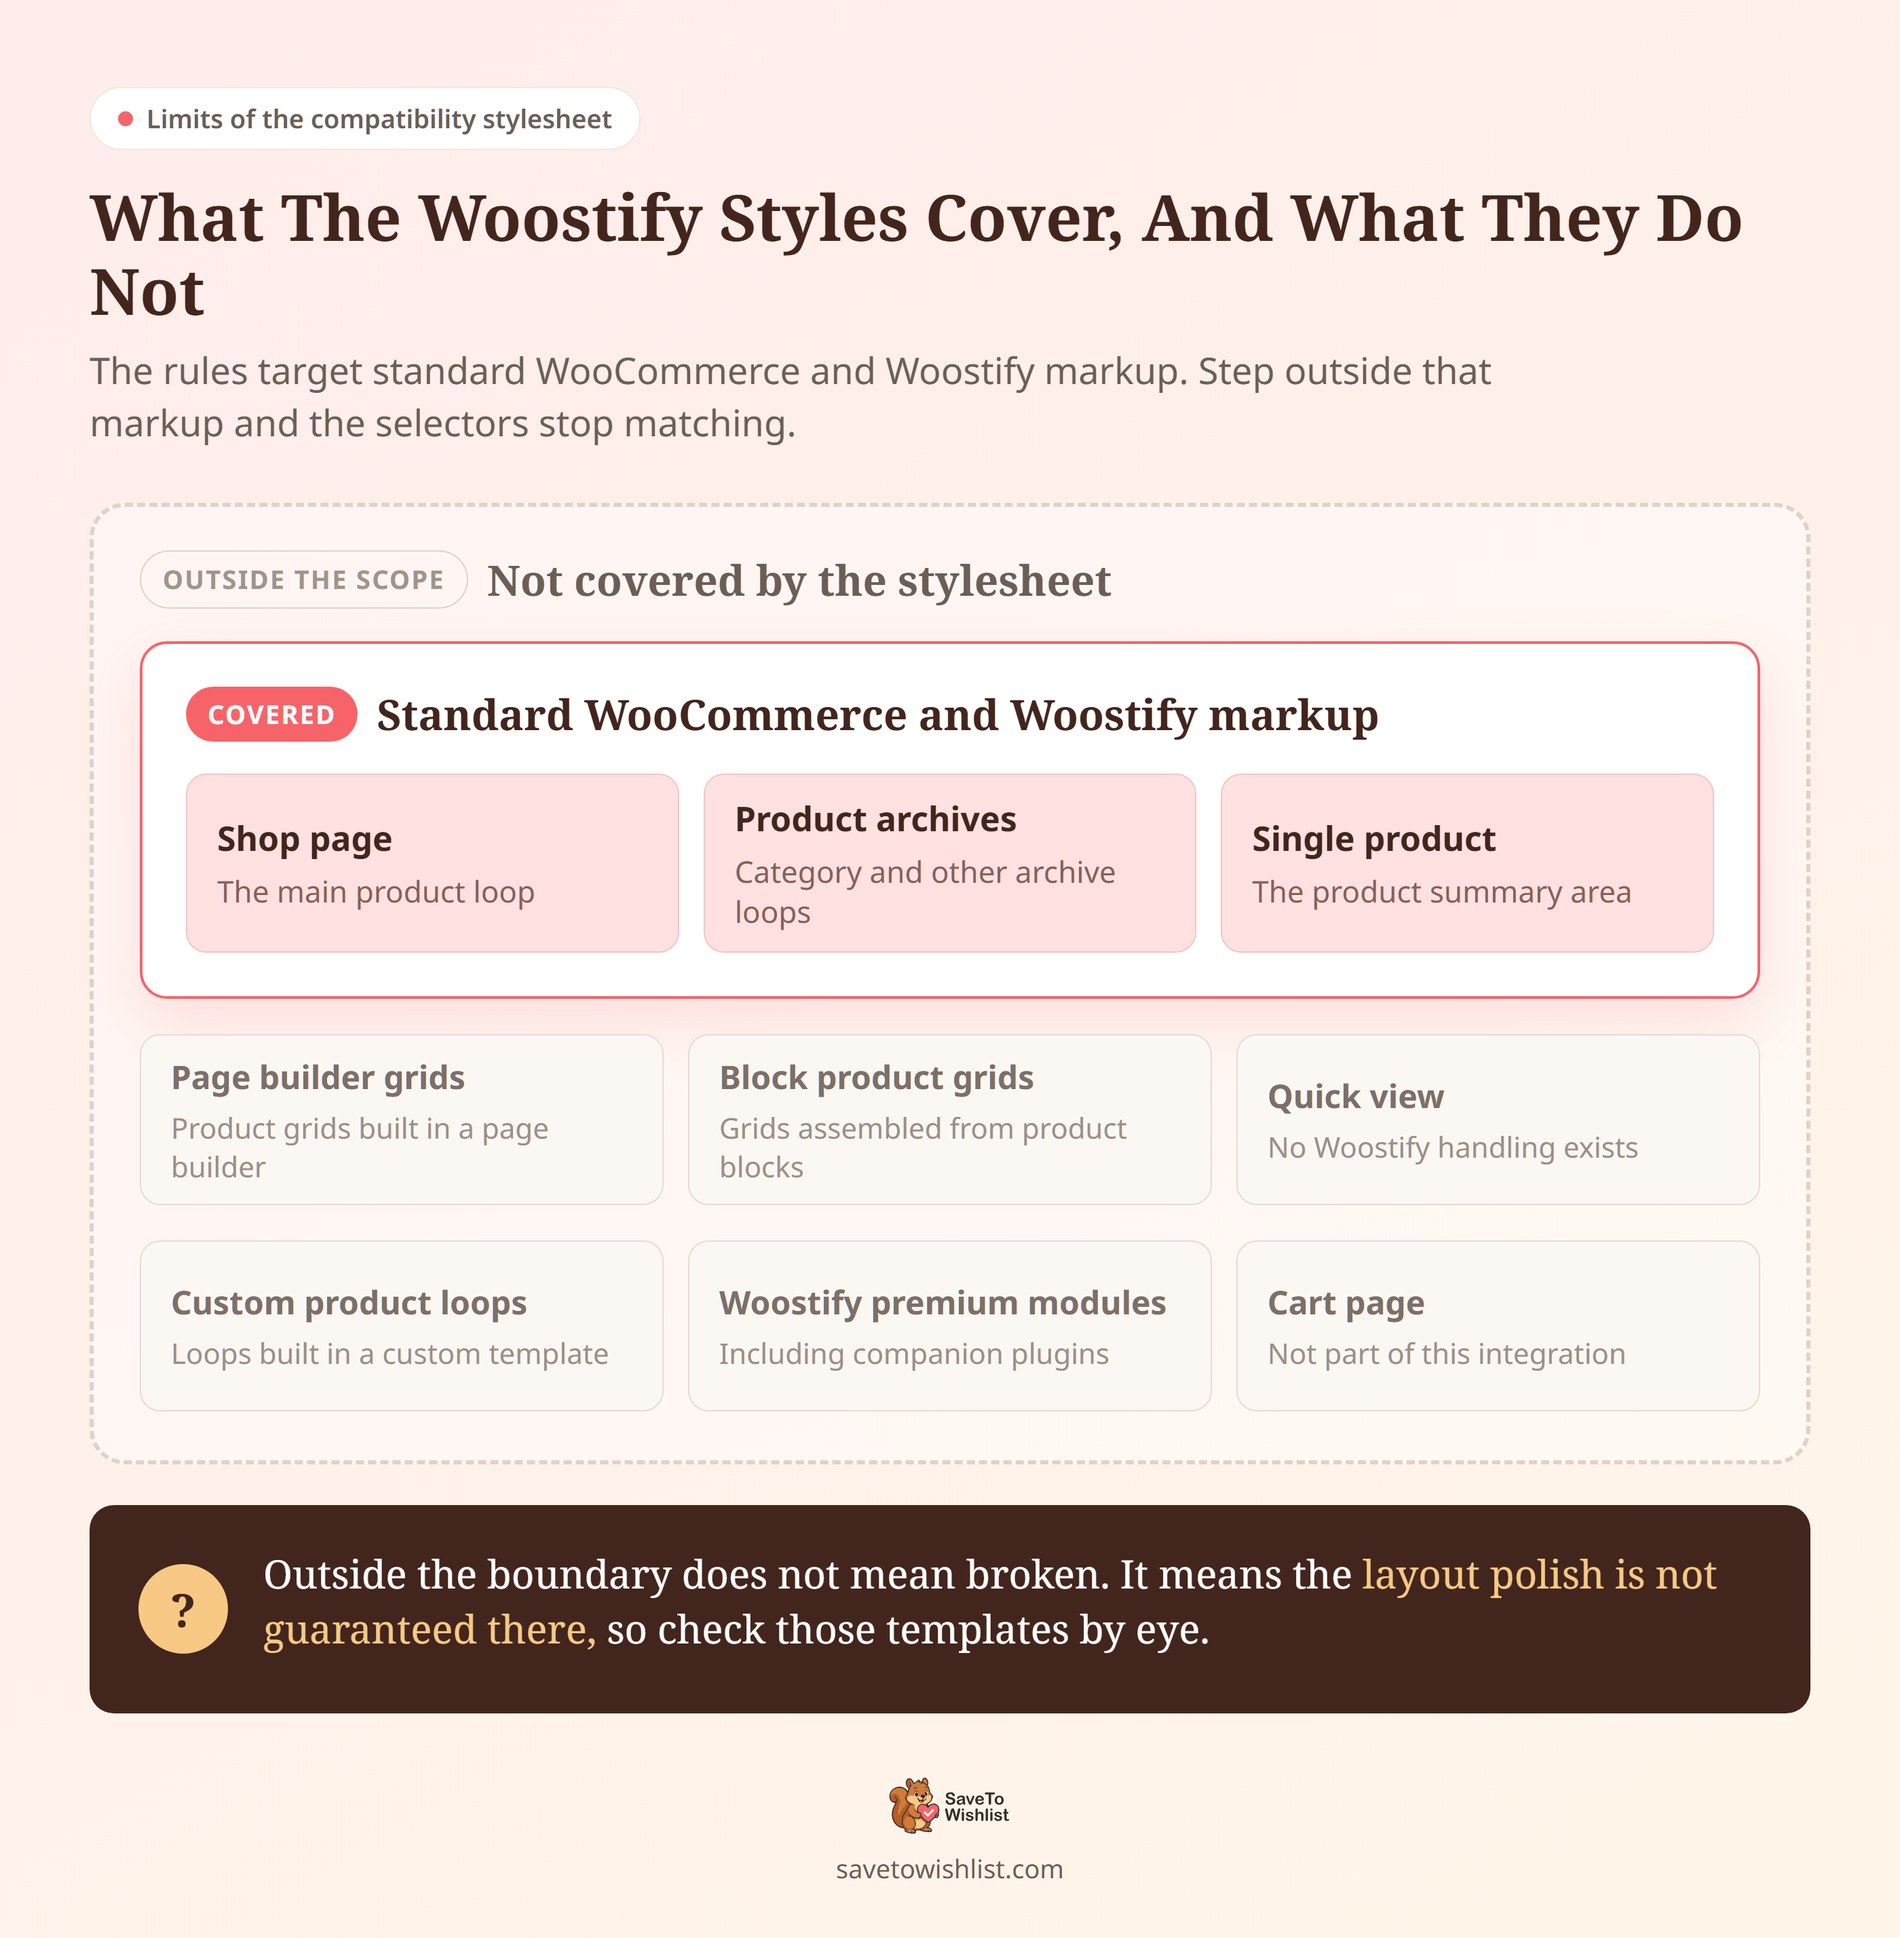
The stylesheet targets standard WooCommerce and Woostify markup. Where your store departs from that markup, the rules stop matching.
- Page builder and block product grids: The rules target standard Woostify card markup. Grids built in a page builder or assembled from product blocks fall outside that, so check them by eye.
- Quick view interfaces: No Woostify-specific handling exists for quick view modals, so check yours by eye.
- Custom product loops: A loop built in a custom template sits outside the tested scope.
- Woostify premium modules and companion plugins: No compatibility is established for these.
- Cart page behaviour: The cart page sits outside this integration. No Woostify-specific cart code is part of it.
The documentation covers SaveTo Wishlist Lite. It doesn’t establish Woostify compatibility for SaveTo Wishlist Pro or the Gift Registry Addon, so give those a visual check if you run them.
One more thing worth knowing: no automated test in the plugin’s suite switches Woostify on or checks these compatibility rules. The general button tests run on a standard theme. Woostify layout is confirmed by looking at it.
Custom layouts and special product types (such as out-of-stock or non-purchasable items) are simply worth a quick visual check on your live store to ensure the button renders exactly where you want it.
Does your store lean on any of the uncovered contexts? Our product table integration guide shows how a different layout context gets handled.
Frequently Asked Questions: SaveTo Wishlist And Woostify
Do I need to turn the Woostify integration on?
No. There’s no Woostify settings page, no toggle, and no option controlling the stylesheet on its own. SaveTo Wishlist Lite checks the active template identifier when it loads frontend assets. If it reads woostify, the stylesheet is enqueued automatically.
Does it work with a Woostify child theme?
Yes. Detection looks at the parent template identifier, not the child theme’s own identifier. As long as the parent is still woostify, the compatibility stylesheet loads normally.
Do I need SaveTo Wishlist Pro for this?
No. The Woostify compatibility stylesheet ships in SaveTo Wishlist Lite, the free version, from release 1.1.1. Paid plans add wishlist analytics, price drop alerts, and back-in-stock alerts. None of those are required for Woostify layout support.
Which Woostify version is supported?
The plugin doesn’t check a Woostify version at all. It only checks that the theme identifier is woostify, so no minimum, maximum, or tested version is declared for this integration. That keeps it working across theme updates, and it’s also why a quick visual check after an update is worth doing.
Give The Save Button A Place To Live
The Woostify integration is deliberately small. One stylesheet, no JavaScript, no REST endpoints, no database records, no settings page. It handles the layout so your save button looks like part of your theme rather than something bolted on afterwards.
All that’s left is choosing the placements that best highlight your products and fit your store’s style.
- Confirm the requirements and that Woostify is the active template (what you need).
- Open both placement dropdowns and save them explicitly, even if they look correct (how to set up).
- Select recommended layout positions for shop archives and single product pages (placements to avoid).
- Check that the compatibility stylesheet is loading to verify your theme setup (how to confirm).
- Keep guest wishlists enabled to maximize shopper saves (guest wishlists).
- Review page builder grids, quick views, and custom loops on your live site (limits).
Your Woostify wishlist buttons should look designed alongside your theme, not bolted on afterwards. Our Woostify setup guide walks through the settings screen. Or compare what each plan includes on the SaveTo Wishlist pricing page.