
 Reviewed by
 A guest lands on your wishlist page and sees a prompt to log in or create an account. For some stores, that’s the right nudge. However, for others, it’s clutter on a page meant for browsing. Now the guest wishlist login link is yours to switch off.
This update to SaveTo Wishlist Lite (version 1.1.6) puts that choice in a single setting. We’ve also added three refinements for shoppers. They cover phones and tablets, other languages, and adding items to the cart.
In this article, we’ll cover the new guest page setting, how to use it, and what else ships with it.
Jump to:
Major Update: Control The Guest Wishlist Login Link
Guest wishlists let shoppers save products without an account. By default, when a logged-out visitor opens the wishlist page, they see a line inviting them to sign in. It reads “Login or create an account to get started.”
Some stores want that invitation front and center. However, a store that sells mostly to one-time buyers, or runs a catalog-style shop, may prefer a cleaner page. Now you can decide.
Hide the login link on the guest wishlist page
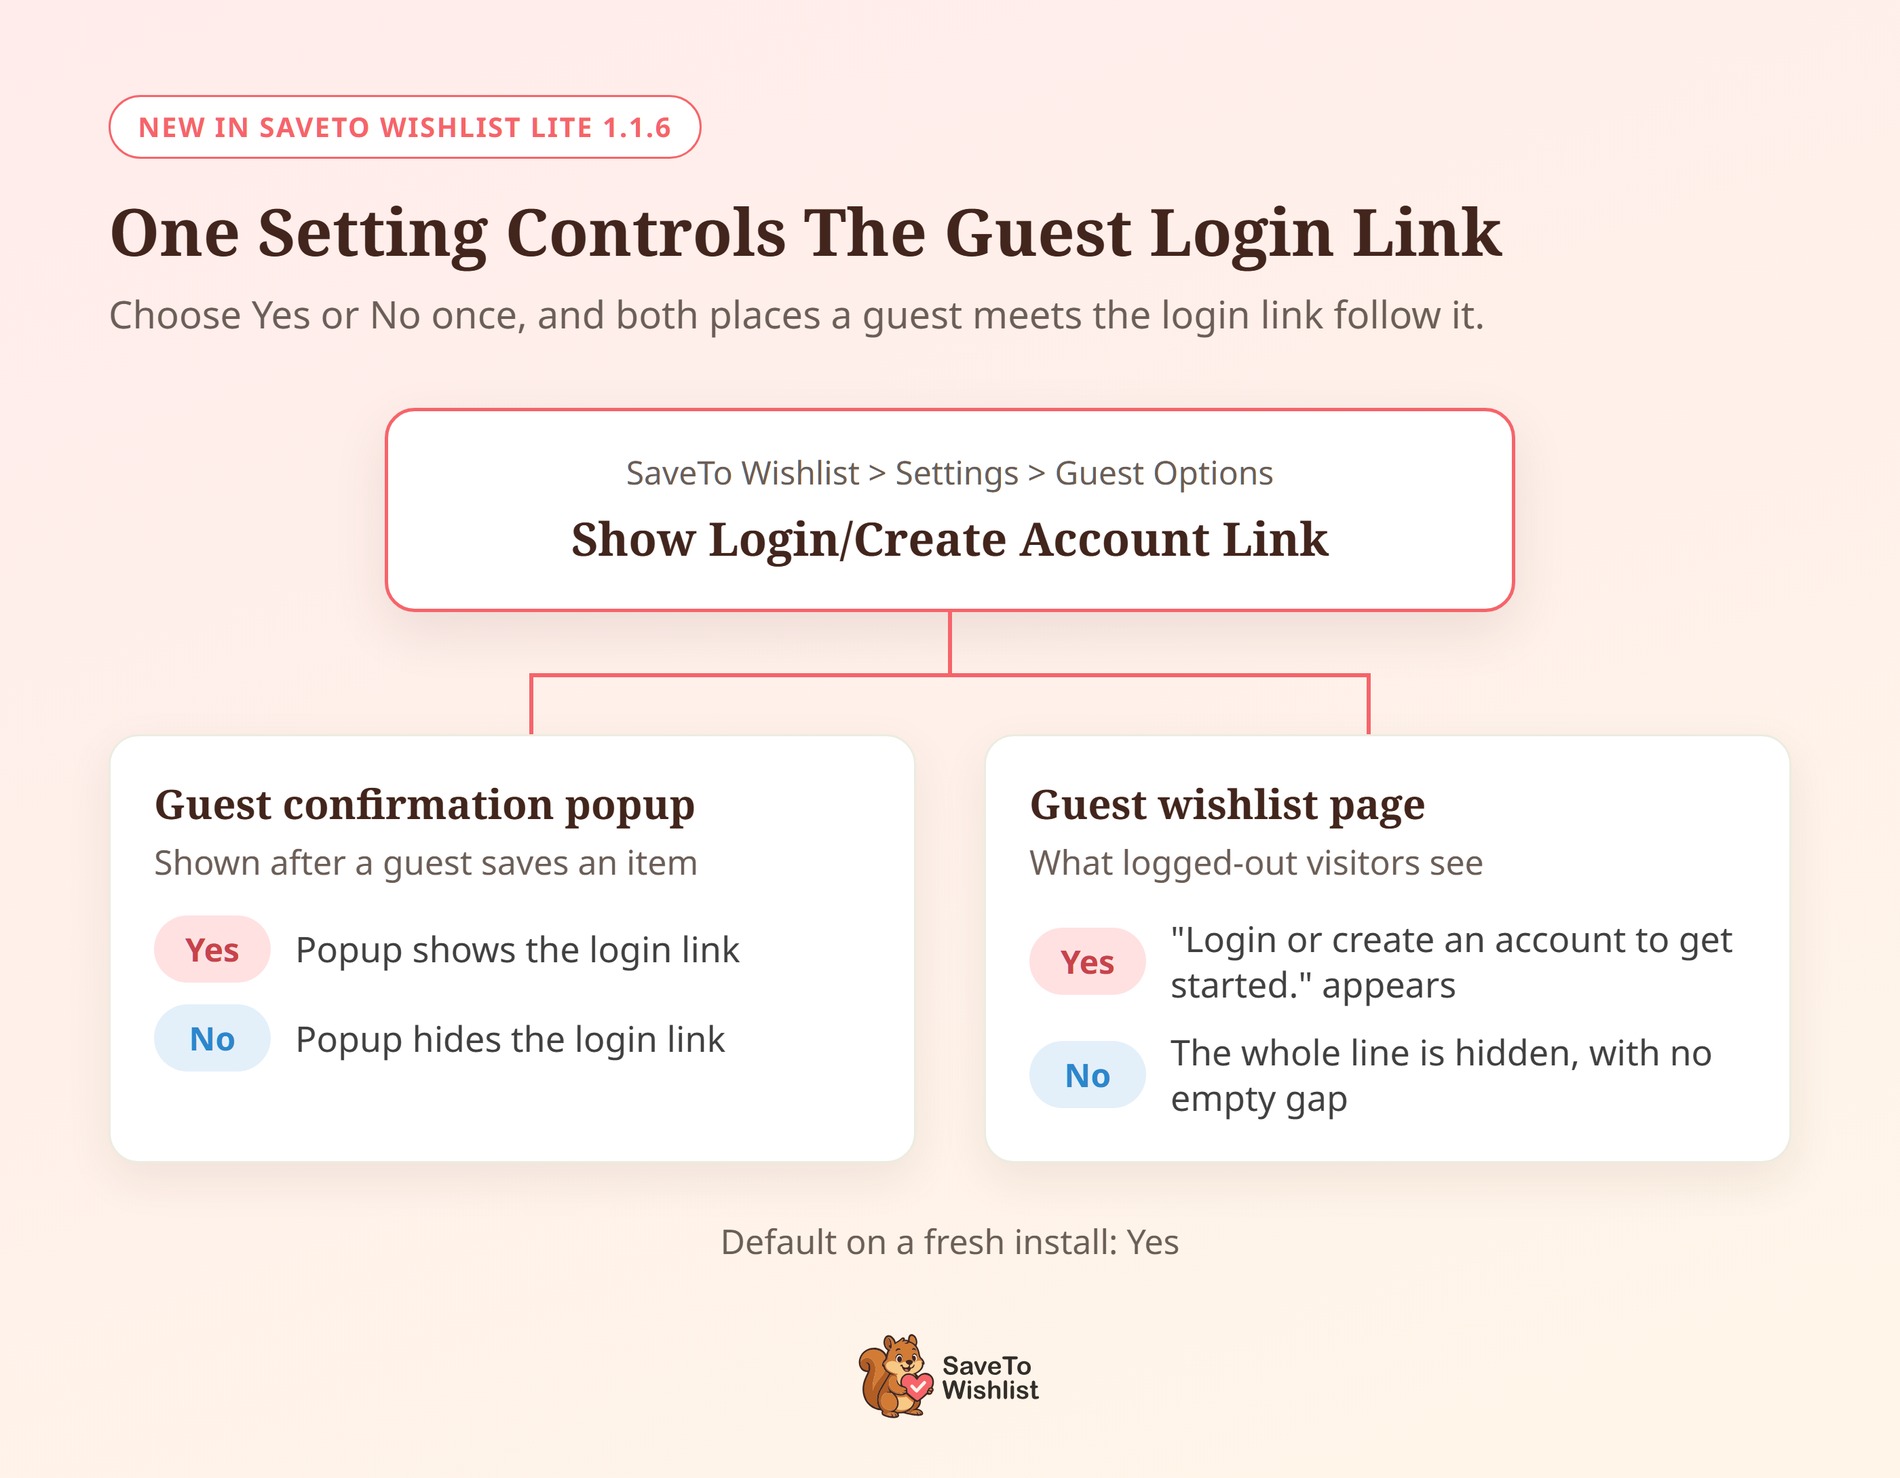
The setting lives in your Guest Options. It’s now called Show Login/Create Account Link, and it controls the login link in two places. Those are the guest confirmation popup and the guest wishlist page itself.
Here’s how to turn it off:
- In your WordPress dashboard, go to SaveTo Wishlist > Settings > Guest Options.
- Make sure Disable Guest Wishlist is set to No, so guests can use wishlists.
- Set Show Login/Create Account Link to No.
- Save your changes, then open your wishlist page in a logged-out browser window to check it.
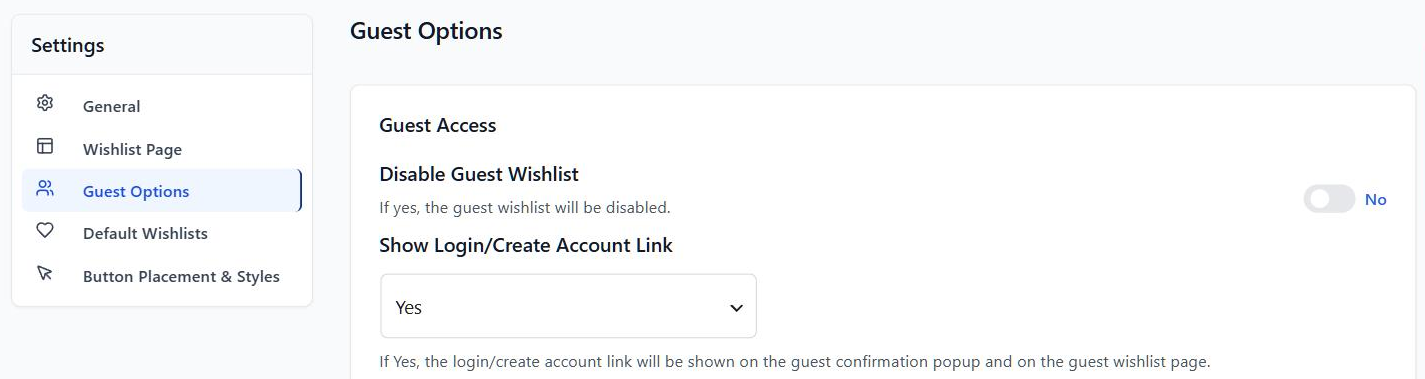
In the admin, the setting’s description reads: “If Yes, the login/create account link will be shown on the guest confirmation popup and on the guest wishlist page.”
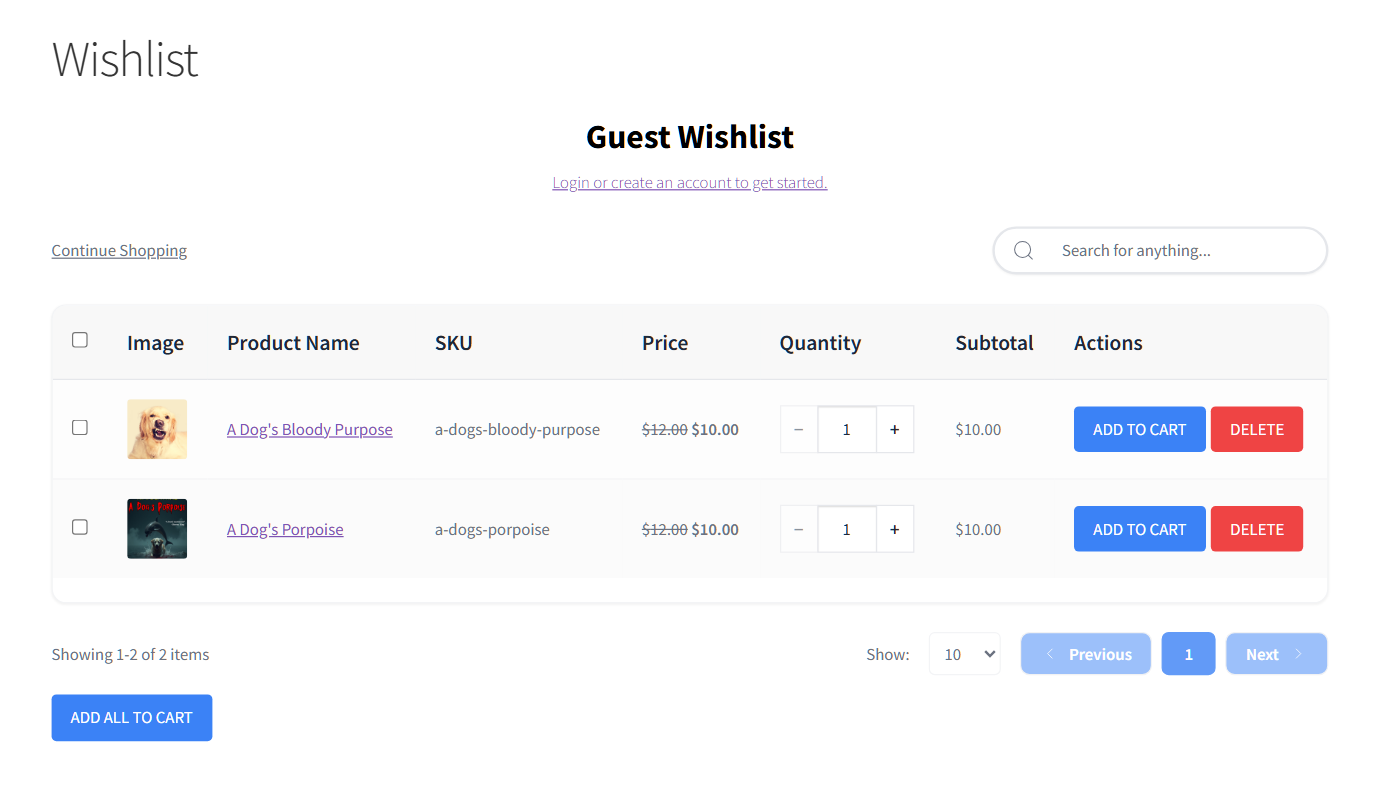
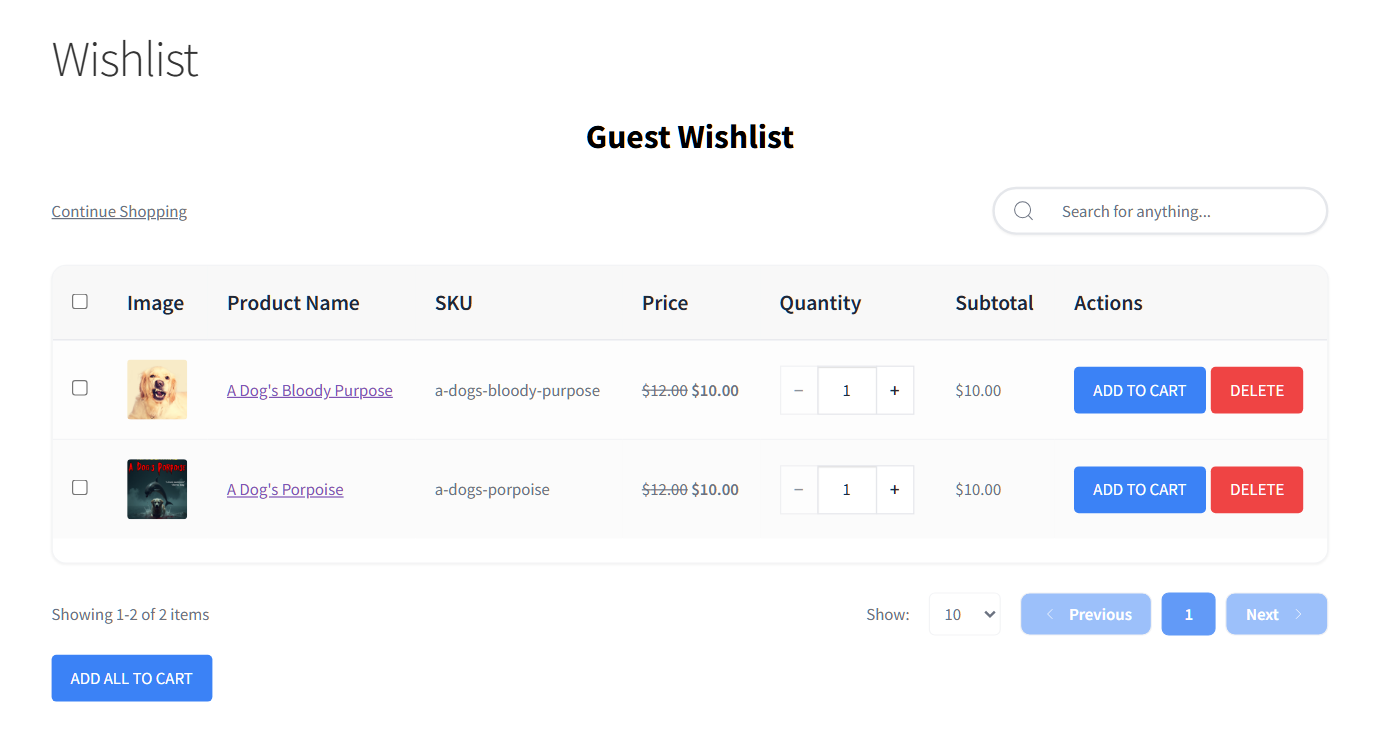
What changes when you turn it off
- The whole line disappears: SaveTo Wishlist hides the full sentence, not only the link inside it. Your page keeps its Guest Wishlist heading, Continue Shopping link and search box, with no empty gap left behind.
- One switch, two places: The same setting covers the confirmation popup and the guest wishlist page. As a result, shoppers get a consistent experience from the first save to the wishlist page.
- Your earlier choice carries over: Already set this option to No for the popup? After you update, the guest wishlist page follows it too.
- Easy to bring back: Set the option back to Yes and the link returns. On a fresh install, it’s shown by default.
- Included in the free version: This setting is part of SaveTo Wishlist Lite, so every 1.1.6 store has it.
Change the link text instead
Prefer to keep the link but change what it says? Version 1.1.5 added Guest Wishlist Title and Guest Wishlist Description fields in the same tab. We walk through those in our guide to customizing your guest wishlist page.
I’d suggest a quick test before you decide. If guest saves often lead to sign-ups on your store, the link is earning its spot. Otherwise, a cleaner page keeps the focus on the products. Either way, our post on WooCommerce guest wishlists covers why letting guests save items matters in the first place.
Helpful New Improvements
Along with the new guest setting, version 1.1.6 brings three refinements to the shopper side of your wishlist. Each one gives you, or your customers, more confidence in how the wishlist behaves.
Set your button spacing for phones and tablets
The Button Spacing setting controls the gap between the Add to Cart button and the wishlist button. Your chosen value now applies on every device, including phones and tablets.
To adjust it, go to SaveTo Wishlist > Settings > Button Placement & Styles. Set the product page Button Placement to “Inline with the Add to Cart Button”, then enter your gap in pixels.
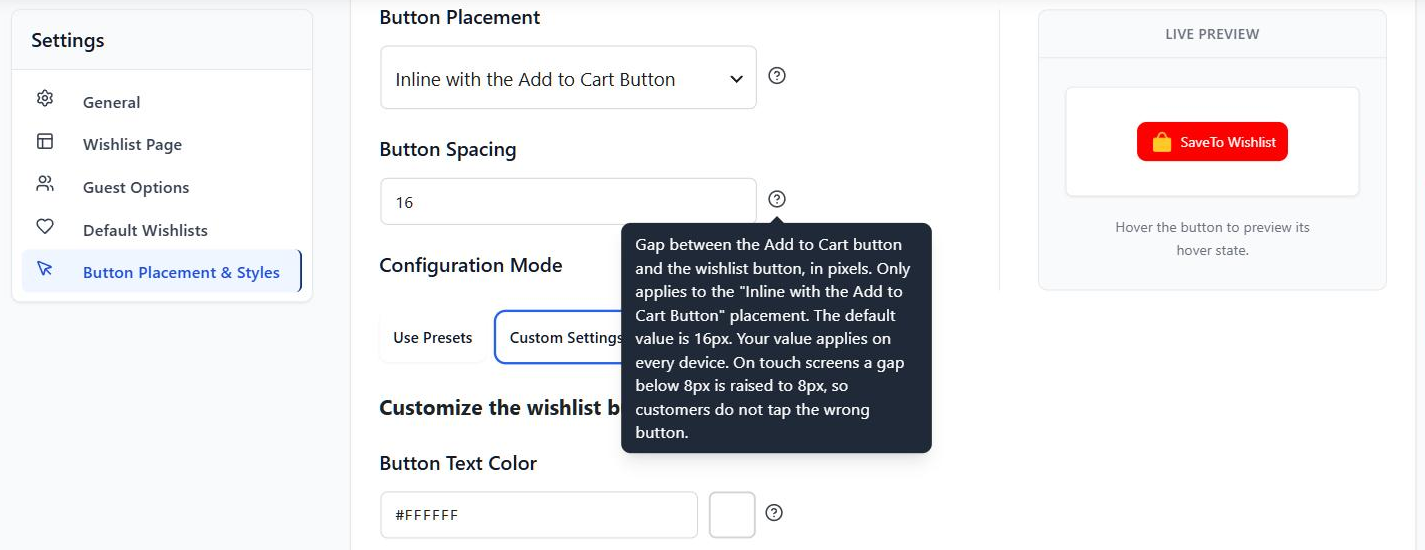
- Same gap everywhere: Set 20px or 40px, and shoppers see that same spacing on desktop and on touch screens.
- A safe minimum on touch screens: If you pick a gap below 8px, touch screens raise it to 8px. That way, customers don’t tap the wrong button by accident.
- Sensible limits: The default is 16px, and the largest gap you can set is 60px.
- Clear tooltip: The setting’s tooltip now explains exactly how your value behaves on touch devices.
Since so much shopping happens on phones, this means the layout you design is the layout mobile shoppers actually see.
Translate more of your wishlist page
If you run a multilingual store, 20 more wishlist page strings are now translatable. You can translate them with WPML String Translation or any other gettext-based translation tool. New to running a store in several languages? Wholesale Suite has a helpful guide to translating a WooCommerce store.
For example, here are some of the labels you can now translate:
- Cart buttons and messages: “Add All to Cart”, “Add Selected to Cart” and “Items added to cart.”
- Notifications: The “Success” and “Error” titles, plus “Failed to add items to cart. Please try again.”
- Layout controls: “Grid view”, “Table view”, “View mode”, and the “Increase quantity” and “Decrease quantity” labels
- Gift registry labels: “Convert to Registry”, “View Registry” and the “Registry” badge
- Table headers: The “Image” column header in the wishlist product table
These strings are also in the plugin’s translation template (.pot) file, so translators can find them. Meanwhile, your wishlist names and the description you write stay exactly as you or your shoppers entered them.
Let shoppers retry add to cart right away
Sometimes a store can’t add an item from the wishlist to the cart. For example, a shopper might ask for 5 units when only 1 is left. Similarly, stock can run out after the page loads, or a quantity rule can block the order.
Now, when that happens, the shopper sees an error notification and the button returns to “Add to Cart”. They can change the quantity and try again straight away, with no page reload.
- Works for everyone: This applies to logged-in customers and to guests on the guest wishlist.
- Saved items stay saved: If a guest’s add to cart doesn’t go through, the item stays on their wishlist.
- Connection hiccups covered: If the request can’t reach your store, shoppers see “Failed to add items to cart. Please try again.” and the button is ready for another try.
- Honest confirmations: A success message appears only when the store confirms the item was added to the cart.
This pairs nicely with stock-based follow-ups. If an item sells out, see our guide to WooCommerce restock notifications to win that shopper back later.
Frequently Asked Questions
How do I hide the login link on the WooCommerce guest wishlist page?
Go to SaveTo Wishlist > Settings > Guest Options and set Show Login/Create Account Link to No. Then save your changes. The login line disappears from the guest wishlist page and the guest confirmation popup.
Can I hide the login link on the page but keep it in the popup?
Not from the settings screen. One setting, Show Login/Create Account Link, controls both places, so shoppers get the same experience in each. If you need different behavior on the page only, a developer can use the plugin’s stwlite_show_login_create_link_on_wishlist_page filter.
Are these updates in the free version of SaveTo Wishlist?
Yes. Everything in this article ships in SaveTo Wishlist Lite 1.1.6, the free version of the plugin. Update from your WordPress dashboard to start using it.
Conclusion
That wraps up SaveTo Wishlist Lite 1.1.6! You can start using everything here by updating the plugin from your WordPress dashboard.
Here’s what we covered:
- Hiding the guest wishlist login link with the Show Login/Create Account Link setting
- Button spacing that applies on phones and tablets, with an 8px minimum on touch screens
- 20 more translatable wishlist page strings for WPML and other translation tools
- Add to cart that lets shoppers retry right away when an item can’t be added
Need a hand with your guest settings? Browse our knowledge base for setup guides.
If you’re ready to give guests a cleaner wishlist page, update or download SaveTo Wishlist Lite today. And when you want automations, analytics and more, take a look at SaveTo Wishlist Pro.