
 Reviewed by
 Your customers are telling you exactly what they want to buy. Every time someone saves a product to a wishlist, they hand you a clear signal of intent. Still, most stores never act on it. That signal sits in the wishlist table and never reaches the email tool.
That gap is expensive. Baymard Institute puts the average documented cart abandonment rate at 70.22%, and wishlist saves are the step before that. Meanwhile, Litmus reports email returning $36 for every dollar spent. As a result, the channel is rarely the weak link.
The channel works. It just needs to know what happened.
The SaveTo Wishlist integration with Mail Mint closes that gap, and it needs no configuration at all. We built it so that activating both plugins is the whole setup. This guide covers that setup, your first automation, and the one behavior we’ve seen trip store owners up.
Jump to:
- What Does The SaveTo Wishlist And Mail Mint Integration Do?
- How To Set Up Your Mail Mint WooCommerce Wishlist Emails
- How To Build Your First Wishlist Automation
- Why The Tags Pile Up And How To Use That
- Four Automated Mail Mint WooCommerce Wishlist Emails Worth Building
- What The Integration Does Not Do
- FAQs: Mail Mint WooCommerce Wishlist Emails
What Does The SaveTo Wishlist And Mail Mint Integration Do?
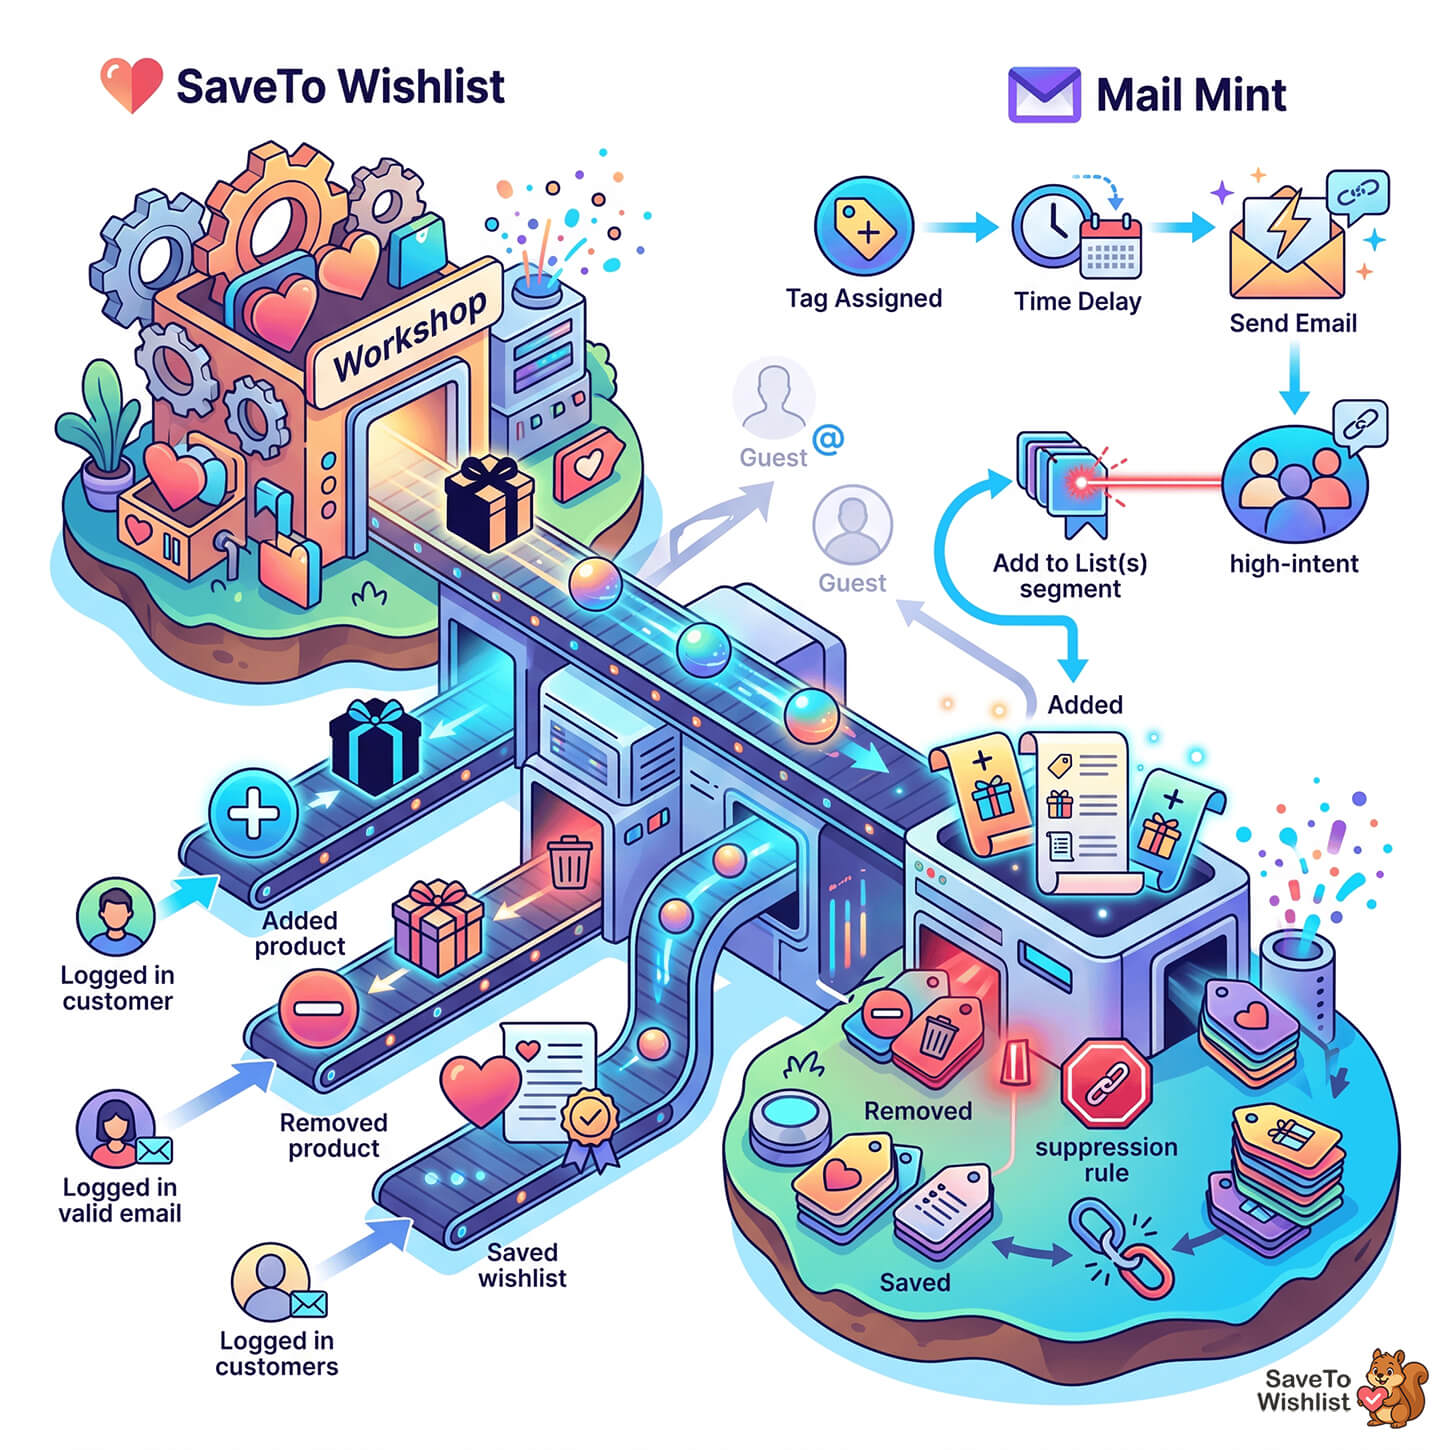
The integration watches three wishlist events and turns each one into a Mail Mint tag on the customer’s contact record. In short, that is the whole mechanism, and it runs server-side without any setup screen.
Here is what happens when a logged-in customer acts on a wishlist:
| Wishlist event | Tag applied in Mail Mint |
|---|---|
| Adds a product to a wishlist | Wishlist - Product Added |
| Removes a product from a wishlist | Wishlist - Product Removed |
| Saves a wishlist | Wishlist - Saved |
If the contact doesn’t exist yet, SaveTo Wishlist creates it. It uses the customer’s email, first name, and last name, with a status of subscribed. Likewise, if the tag doesn’t exist yet, it’s created on the first event. So you don’t have to pre-build anything.
Two details are worth knowing up front. First, everything runs locally through Mail Mint’s own contact helpers, so there’s no external API call slowing the page down. Second, the integration registers nothing at all unless Mail Mint is active. That means if Mail Mint is ever deactivated, it won’t interfere with your store’s operations.
How To Set Up Your Mail Mint WooCommerce Wishlist Emails
The SaveTo Wishlist and Mail Mint integration has no setup, in the literal sense. No settings tab, no API key, no connect button. Activating both plugins is the entire configuration step, and the sync starts immediately.
Instead, what you should do is verify that events are landing. In total, that is three steps:
Step 1: Activate both plugins
First, install and activate SaveTo Wishlist and Mail Mint. The wishlist integration shipped in SaveTo Wishlist Lite 1.0.9, so update if you’re running anything older.
Step 2: Trigger a test event
Log in as a test customer, not as an admin browsing anonymously, then add any product to a wishlist. The account needs a valid email address on it. That email is what the integration uses to find or create the Mail Mint contact.
Step 3: Confirm the tag was created
In your WordPress dashboard, go to Mail Mint → Contacts → Tags. You should see the wishlist tags listed. If you only added a product, expect to see Wishlist - Product Added on its own. Tags are created as they’re first used.
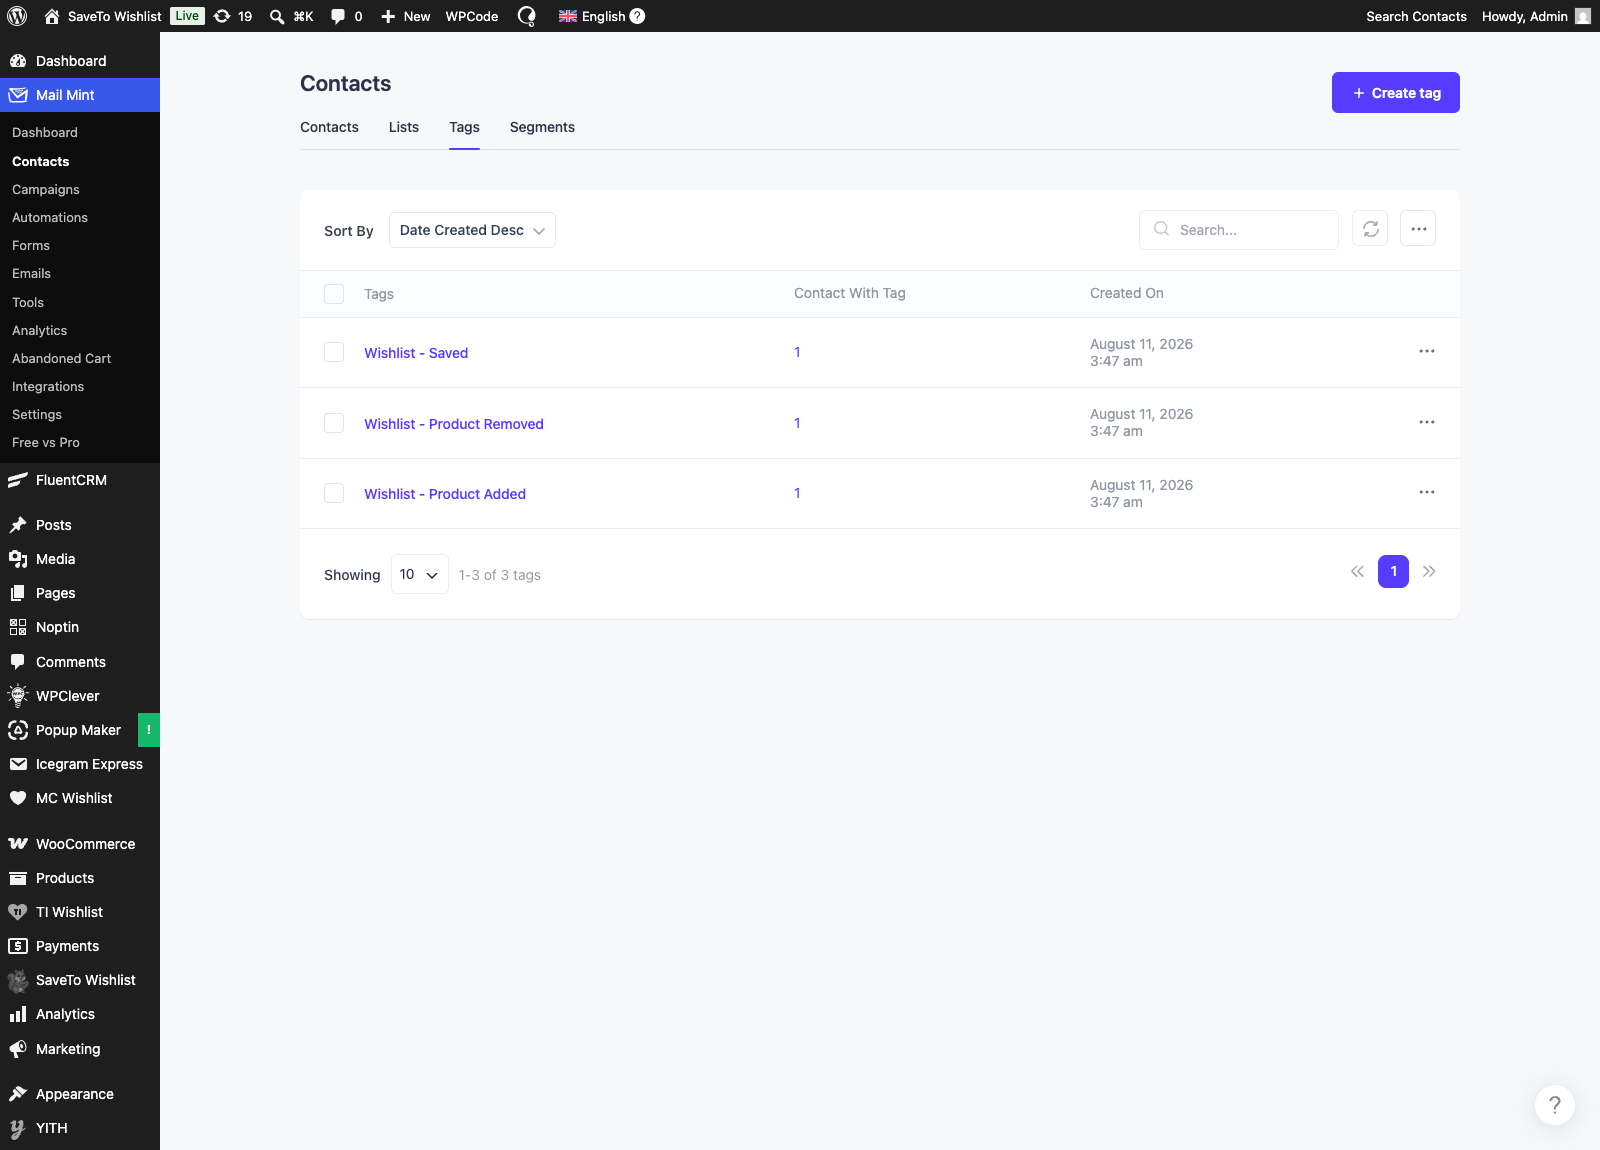
If nothing appears, the usual cause is that the test ran while logged out. Guest wishlist activity is skipped by design, which we cover further down.
How To Build Your First Wishlist Automation
Tags on their own do nothing. In practice, the value comes from a Mail Mint automation that starts when one of those tags is applied. So that automation is the piece worth getting right.
In Mail Mint, go to the Automation tab, choose + New Automation, then Select A Starting Point. The trigger you want is Tag Assigned. Mail Mint describes it as activating when you have assigned a tag to any user or contact. Then pick Wishlist - Product Added as the tag.
From there, add your steps. In practice, a two-step sequence is enough to start:
- Delay: wait three days.
- Send An Email: a short reminder that the saved item is still waiting, linking back to the wishlist.
Mail Mint gives you plenty more to work with. You can also assign tags, add contacts to lists, send a whole sequence, remove tags, and stop an automation. That said, start with one working automation before you build a branching flow.
Why The Tags Pile Up And How To Use That
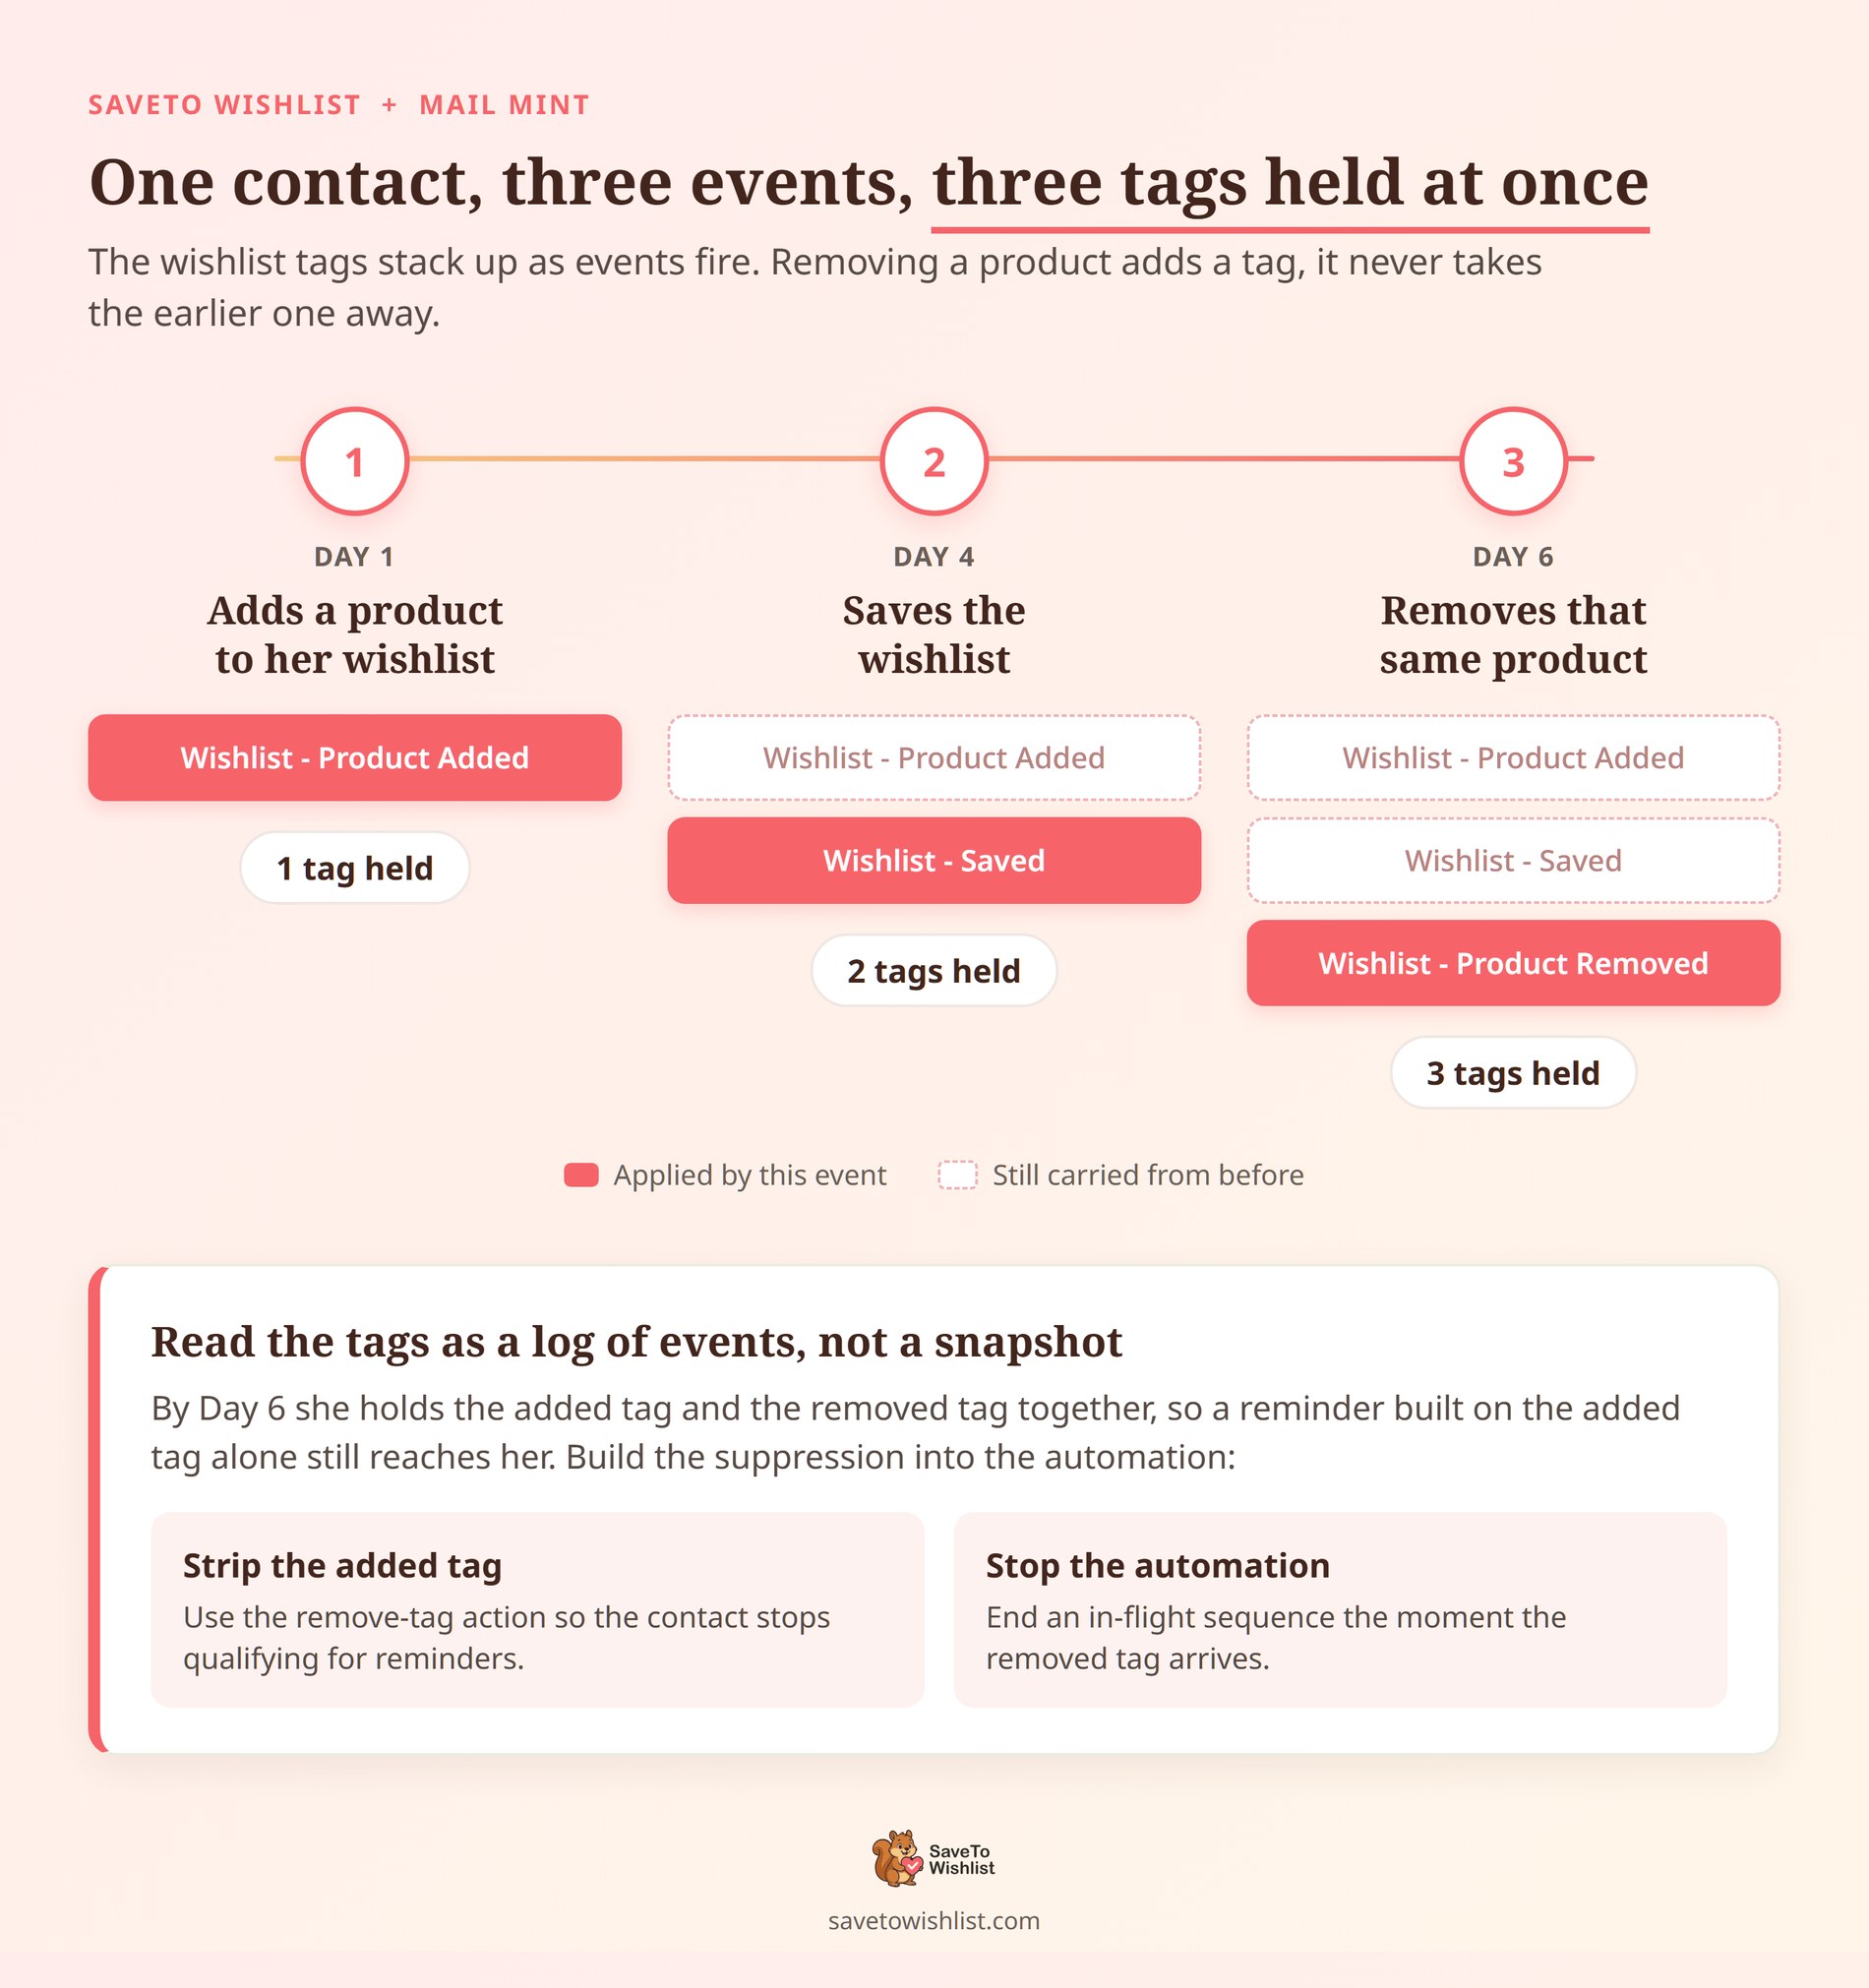
This is the behavior that surprises people, and it changes how you should design automations. The wishlist tags accumulate. They don’t toggle.
When a customer removes a product, SaveTo Wishlist applies Wishlist - Product Removed. However, it doesn’t strip Wishlist - Product Added. So a contact who added an item and later removed it holds both tags at once.
Treat the tags as a log of events, not a snapshot of what is currently on the wishlist. Assume a tag means the item is on their list right now, and your reminders will drift. Eventually they reach people who already changed their mind.
Fortunately, the fix is straightforward once you know. Build suppression into the automation itself:
- Use the remove-tag action: strip the added tag first, so the contact stops qualifying for reminders.
- Use Stop Automation: end an in-flight sequence when the removed tag arrives. Nobody gets chased for a deleted item.
- Keep delays short: a three-day wait leaves less room for the list to change than a three-week one.
Four Automated Mail Mint WooCommerce Wishlist Emails Worth Building
Once the connection works, the next question is what to actually send. For example, In our experience, these four cover most of the value for a typical WooCommerce store.
- The saved-item nudge: triggered by
Wishlist - Product Added, sent after a short delay. The lowest-effort automation here, and usually the first one to pay for itself. - The high-intent segment: use the add-to-list action on the added tag to build a standing audience of proven product interest. That list beats your whole database as a launch-email target.
- The suppression rule: triggered by
Wishlist - Product Removed, using the remove-tag and stop-automation actions. Not a campaign, but it protects every other campaign from looking careless. - The planner welcome: triggered by
Wishlist - Saved. Someone saving a list is planning a purchase. A short email about sharing that list fits the moment better than a discount.
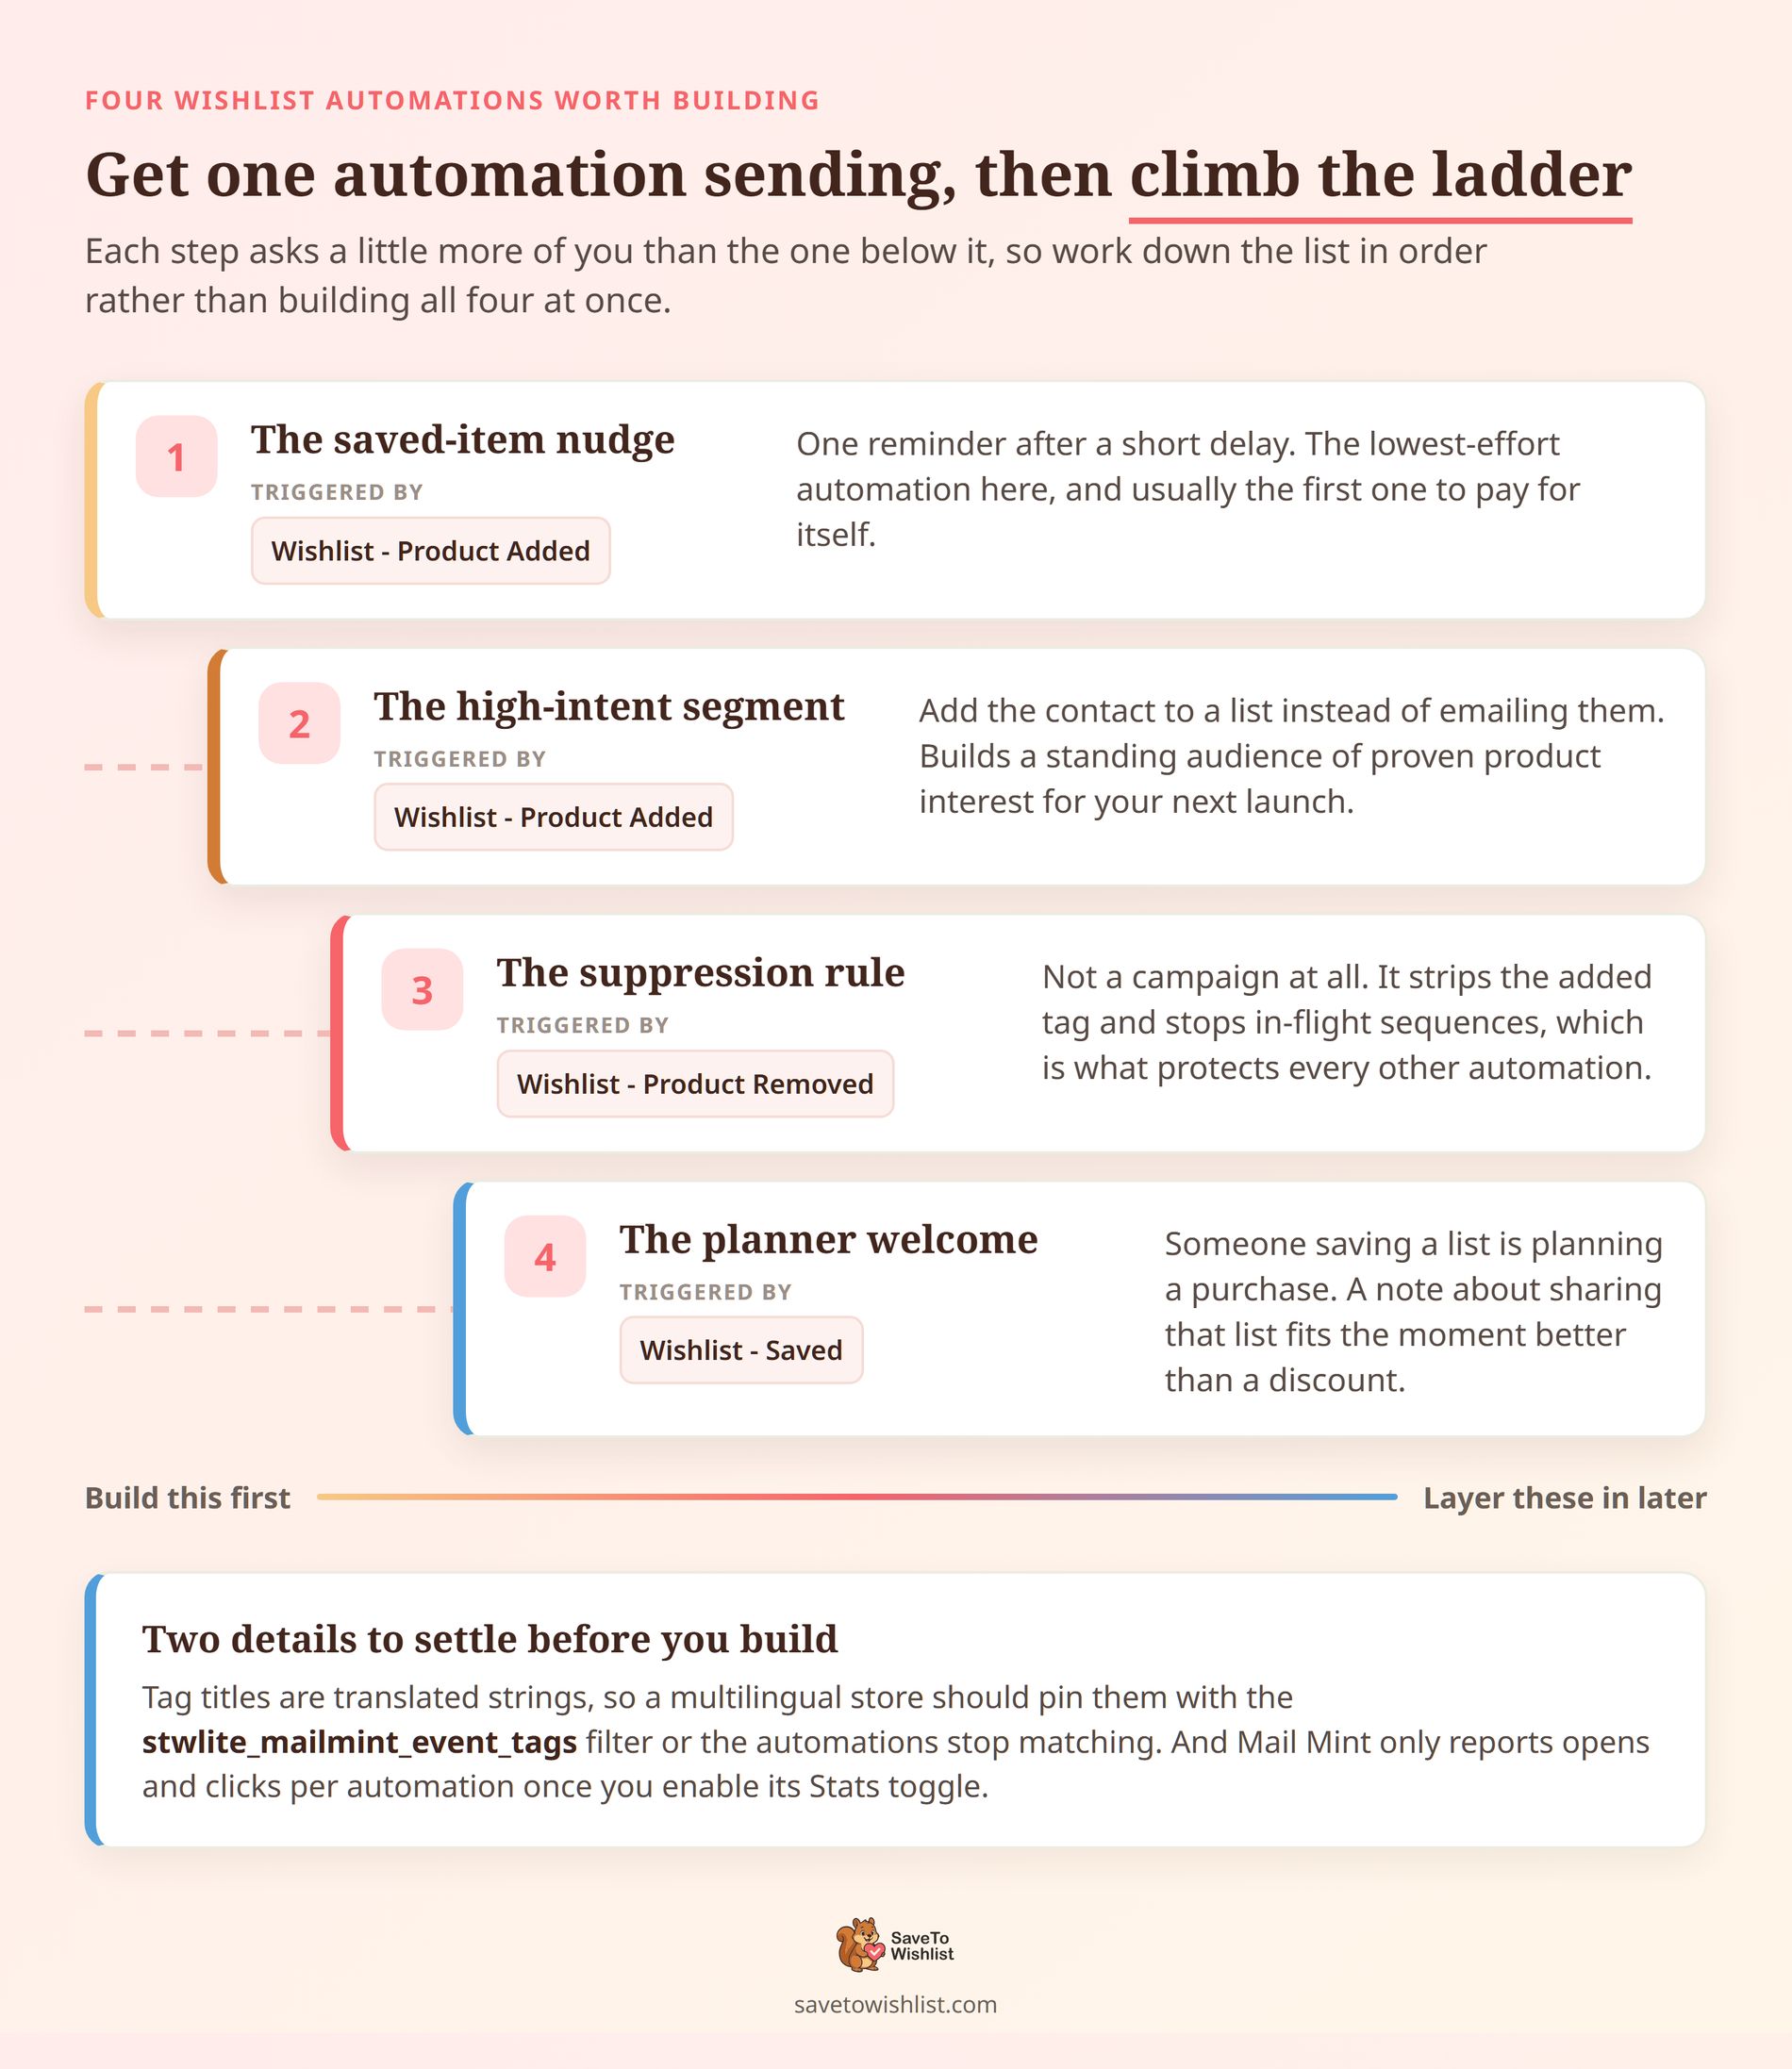
One naming tip before you build. The tag titles are translated strings, so a site running a different admin language can produce differently named tags. So if you run a multilingual store, pin the titles with the stwlite_mailmint_event_tags filter. Your automations then keep matching.
As for knowing whether any of it works, keep the measurement simple. Mail Mint reports open and click rates per automation once you enable its Stats toggle. Compare the wishlist ones against your regular broadcasts.
Because the audience is self-selected by intent, they should perform better. If they don’t, the delay is usually too long.
For a wider view of what to send and when, our guide to wishlist email marketing goes deeper.
What The Integration Does Not Do
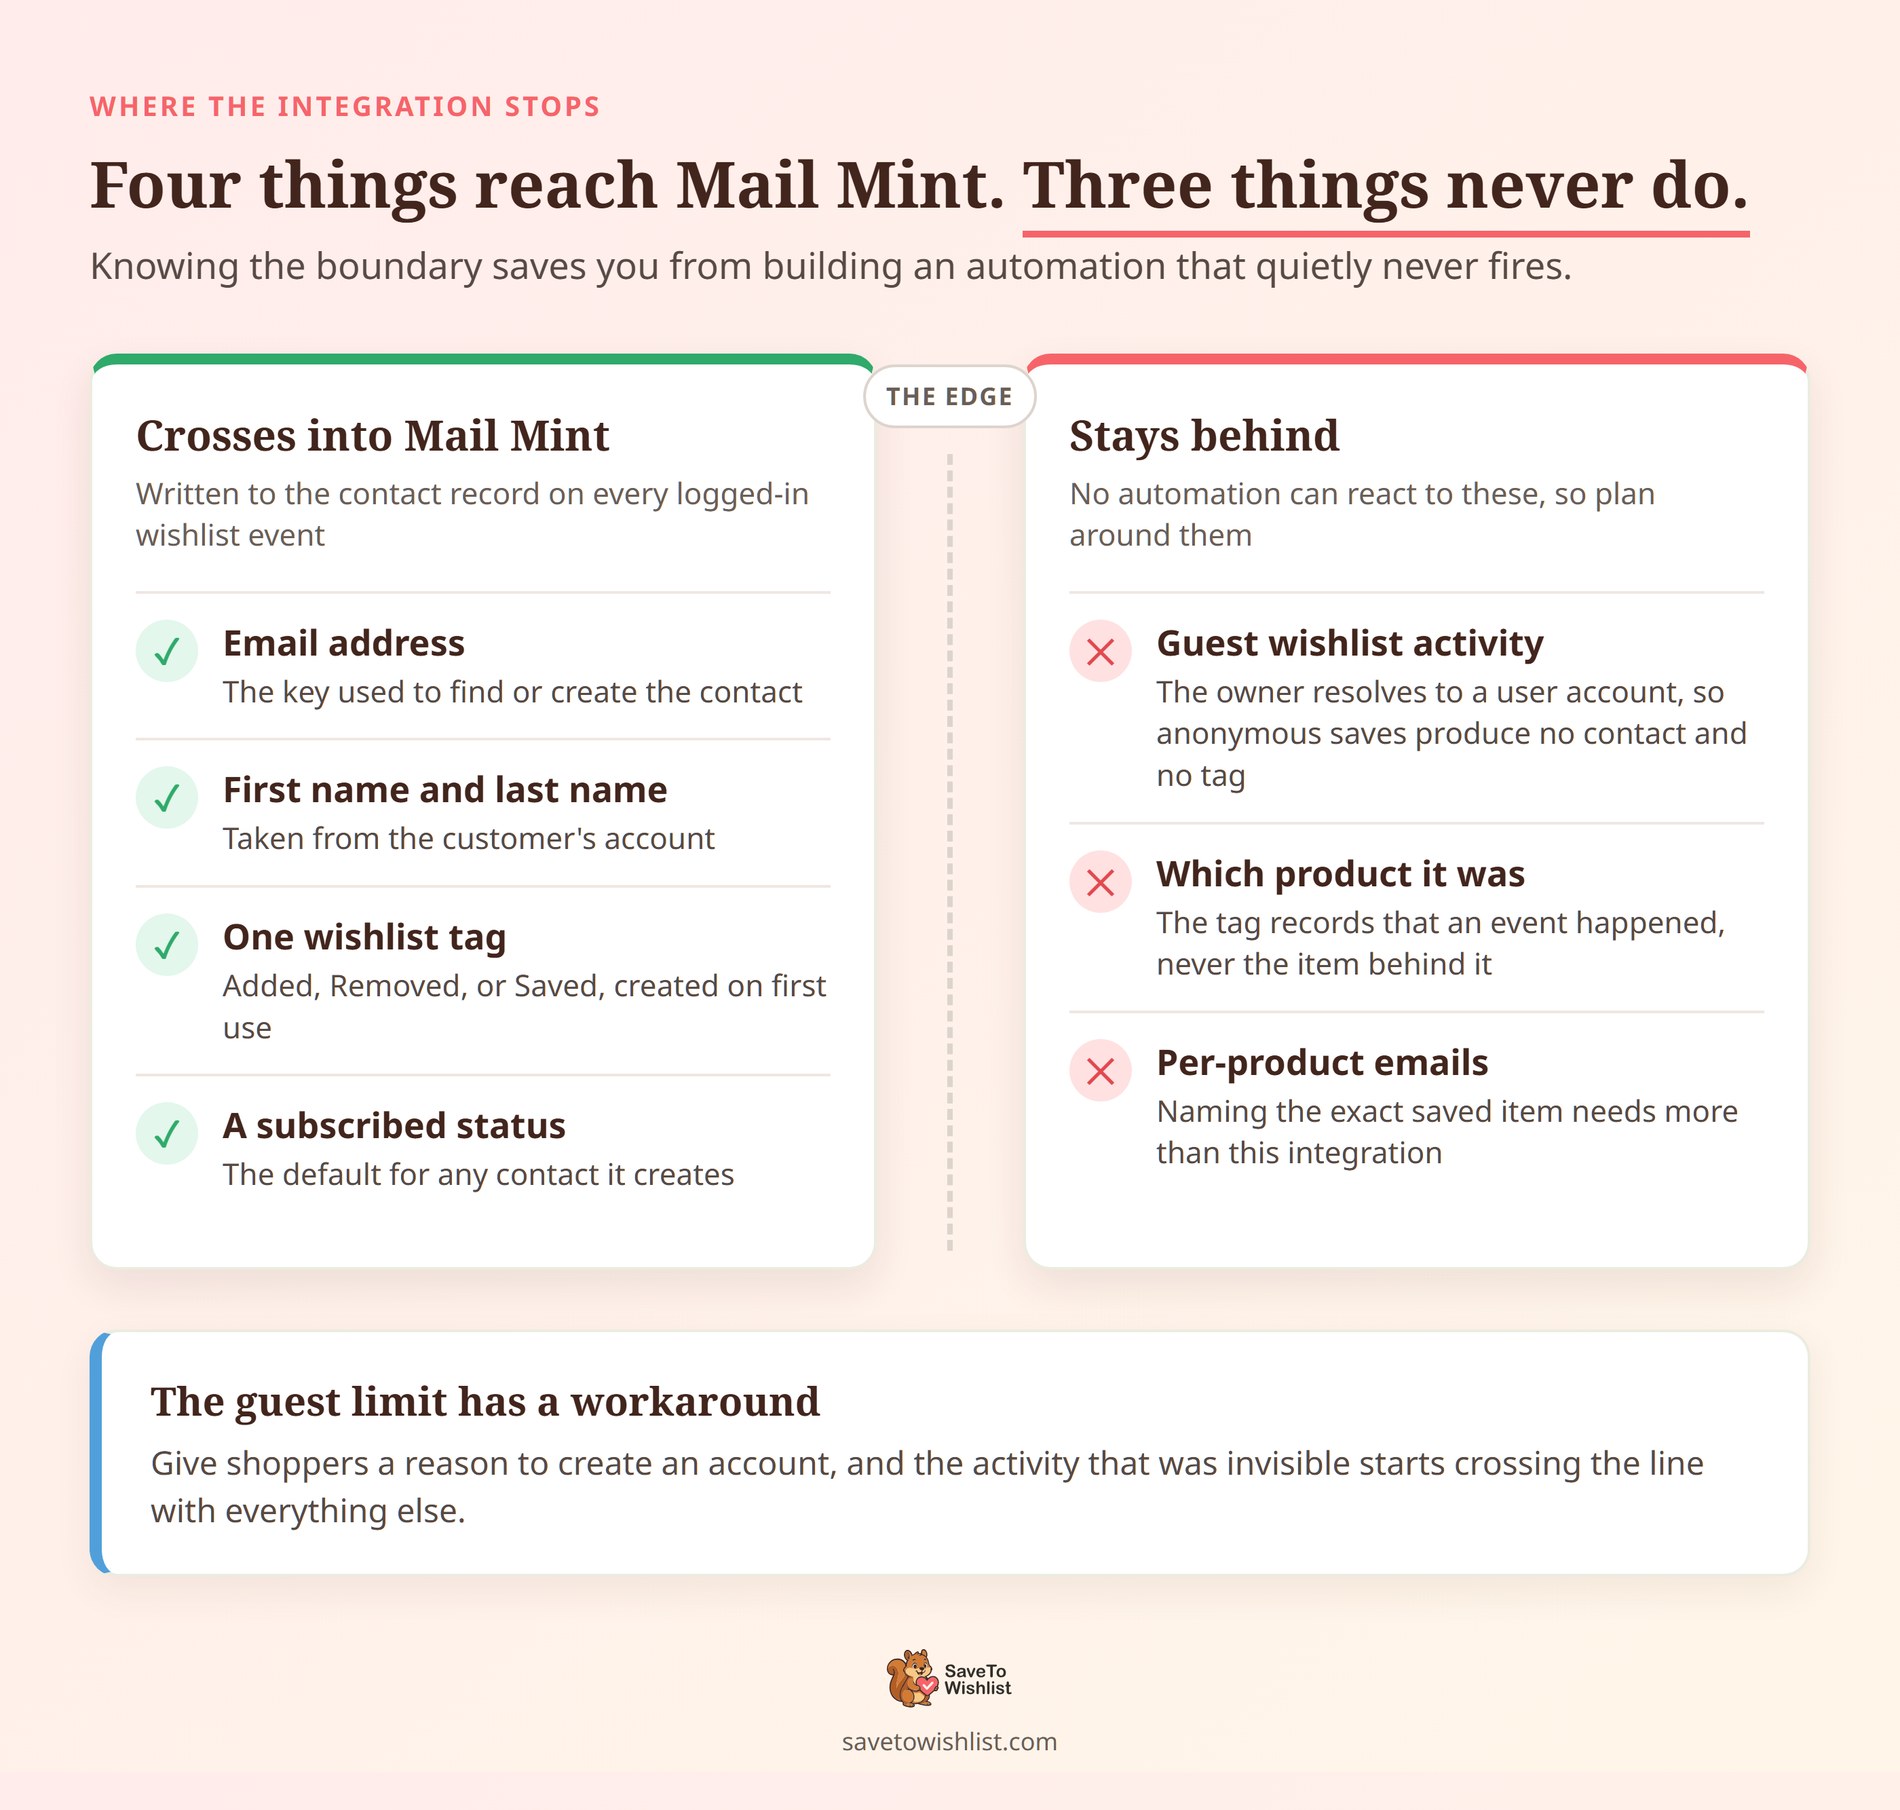
Knowing the boundaries saves you from building an automation that quietly never fires. In total, three limits matter here.
- Guests are skipped: the integration resolves the wishlist owner to a user account. Anonymous wishlist activity produces no contact and no tag.
- No product details are sent: the tag records that an event happened, not which product it was. Mail Mint receives an email address, a first name, a last name, and a tag.
- No per-product emails: the product is not passed. Naming the exact saved item needs more than this integration.
Still, the guest limitation has a workable answer. Give shoppers a reason to create an account, and that anonymous activity becomes something you can follow up on. It is worth reading about alongside wishlist conversion rate more broadly.
FAQs: Mail Mint WooCommerce Wishlist Emails
Do I need SaveTo Wishlist Pro for the Mail Mint integration?
No. The Mail Mint integration ships in the free SaveTo Wishlist Lite plugin from version 1.0.9 onward. In other words, both plugins active is the only requirement.
Why are no tags appearing in Mail Mint?
The most common cause is testing while logged out, since guest activity is skipped. First, check that both plugins are active. Then confirm you’re logged in as a customer with a valid email, and that you’ve actually triggered an event. Tags are created on first use, so an untriggered event has no tag yet.
Can I rename the wishlist tags?
Yes, using the stwlite_mailmint_event_tags filter, which takes an array keyed added, removed, and saved. Plus, it’s how you align the tags with a naming convention you already use in Mail Mint.
Will this slow my store down?
It shouldn’t. The integration calls Mail Mint’s contact helpers directly on your own site. It makes no external HTTP request, so there’s no third-party server to wait on. We’ve also speed tested the wishlist plugin itself.
What status do new contacts get?
New contacts are created as subscribed. If your store needs a different default, the stwlite_mailmint_contact_status filter changes it. That said, make sure whatever you choose matches how you collected consent.
Start With One Automation
The appeal of this integration is how little it asks of you. There’s no field mapping to maintain and no connection to babysit. Activate both plugins, and the wishlist signal you were already collecting starts reaching the tool that can act on it.
So here is what to do next:
- Activate both plugins and fire a test event as a logged-in customer.
- Build one Tag Assigned automation on
Wishlist - Product Added. - Add a suppression step so removed items stop receiving reminders.
- Layer in a second automation only once the first is sending.
If you want the step-by-step version with the exact menu paths, our knowledge base setup guide covers it. Ready to start? Get the free SaveTo Wishlist plugin and turn wishlist activity into automated follow-up.