
 Reviewed by
 If you sell gift-worthy products in WooCommerce, you’ve probably watched shoppers add items to a cart, then vanish before checkout. A shared wishlist in WooCommerce fixes a big slice of that problem. Many of those shoppers weren’t ready to buy alone.
They were planning a wedding, a birthday, or a group present, and they needed other people to help choose or purchase gifts. Without a way to share their picks, they leave and forget. That’s lost revenue, and it’s lost referral traffic from friends who never see your store.
The fix is letting customers build a wishlist, then share it with others. You could even convert it into a fully tracked public gift registry. A shared registry lets guests view and buy gifts while the owner manages its contents. A collaborative wishlist lets invited contributors add and remove products together.
Table of Contents
- Why Offer A Shared Wishlist In WooCommerce
- Collaborative Vs Shared Wishlists: What's The Difference
- Powering Group Gifting, Weddings, And Team Buys
- How To Set Up A Collaborative And Shared Wishlist In WooCommerce
- Best Practices For Promoting Group Gifting On Your Store
- Frequently Asked Questions: Shared Wishlist In WooCommerce
- Putting Shared Wishlists To Work
Why Offer A Shared Wishlist In WooCommerce

Shared WooCommerce wishlists can turn one shopper’s saved products into a group shopping opportunity, potentially bringing additional visitors and purchases to your store. When someone plans a gift or event, the decision rarely sits with one person. Parents, friends, and coworkers all want a say, and they all want to avoid buying the same thing twice.
Baymard research puts cart abandonment at about 70.22%. The same research finds 43% of US online shoppers have abandoned a cart because they were just browsing. A shared wishlist gives those not-ready shoppers a place to park their picks. It also loops in the people who actually decide. Instead of immediately losing track of those products, shoppers can save them while the group decides what to purchase.
There’s a referral angle too. Every time a customer shares a wishlist link, a new person lands on your product pages. Often that’s someone who has never heard of your store. That’s warm, word-of-mouth traffic you didn’t pay for.
One thing we commonly see is a single wedding or baby registry pulling in dozens of first-time visitors. Several of them decide to create multiple wishlists for their own upcoming events.
Collaborative Vs Shared Wishlists: What’s The Difference
When a wishlist is shared, others can view and buy from the list. On the other hand, a collaborative wishlist also lets others add and edit items on it. Both matter, and they serve different moments in a group purchase.
Let’s take a closer look at both types:
Shared wishlist
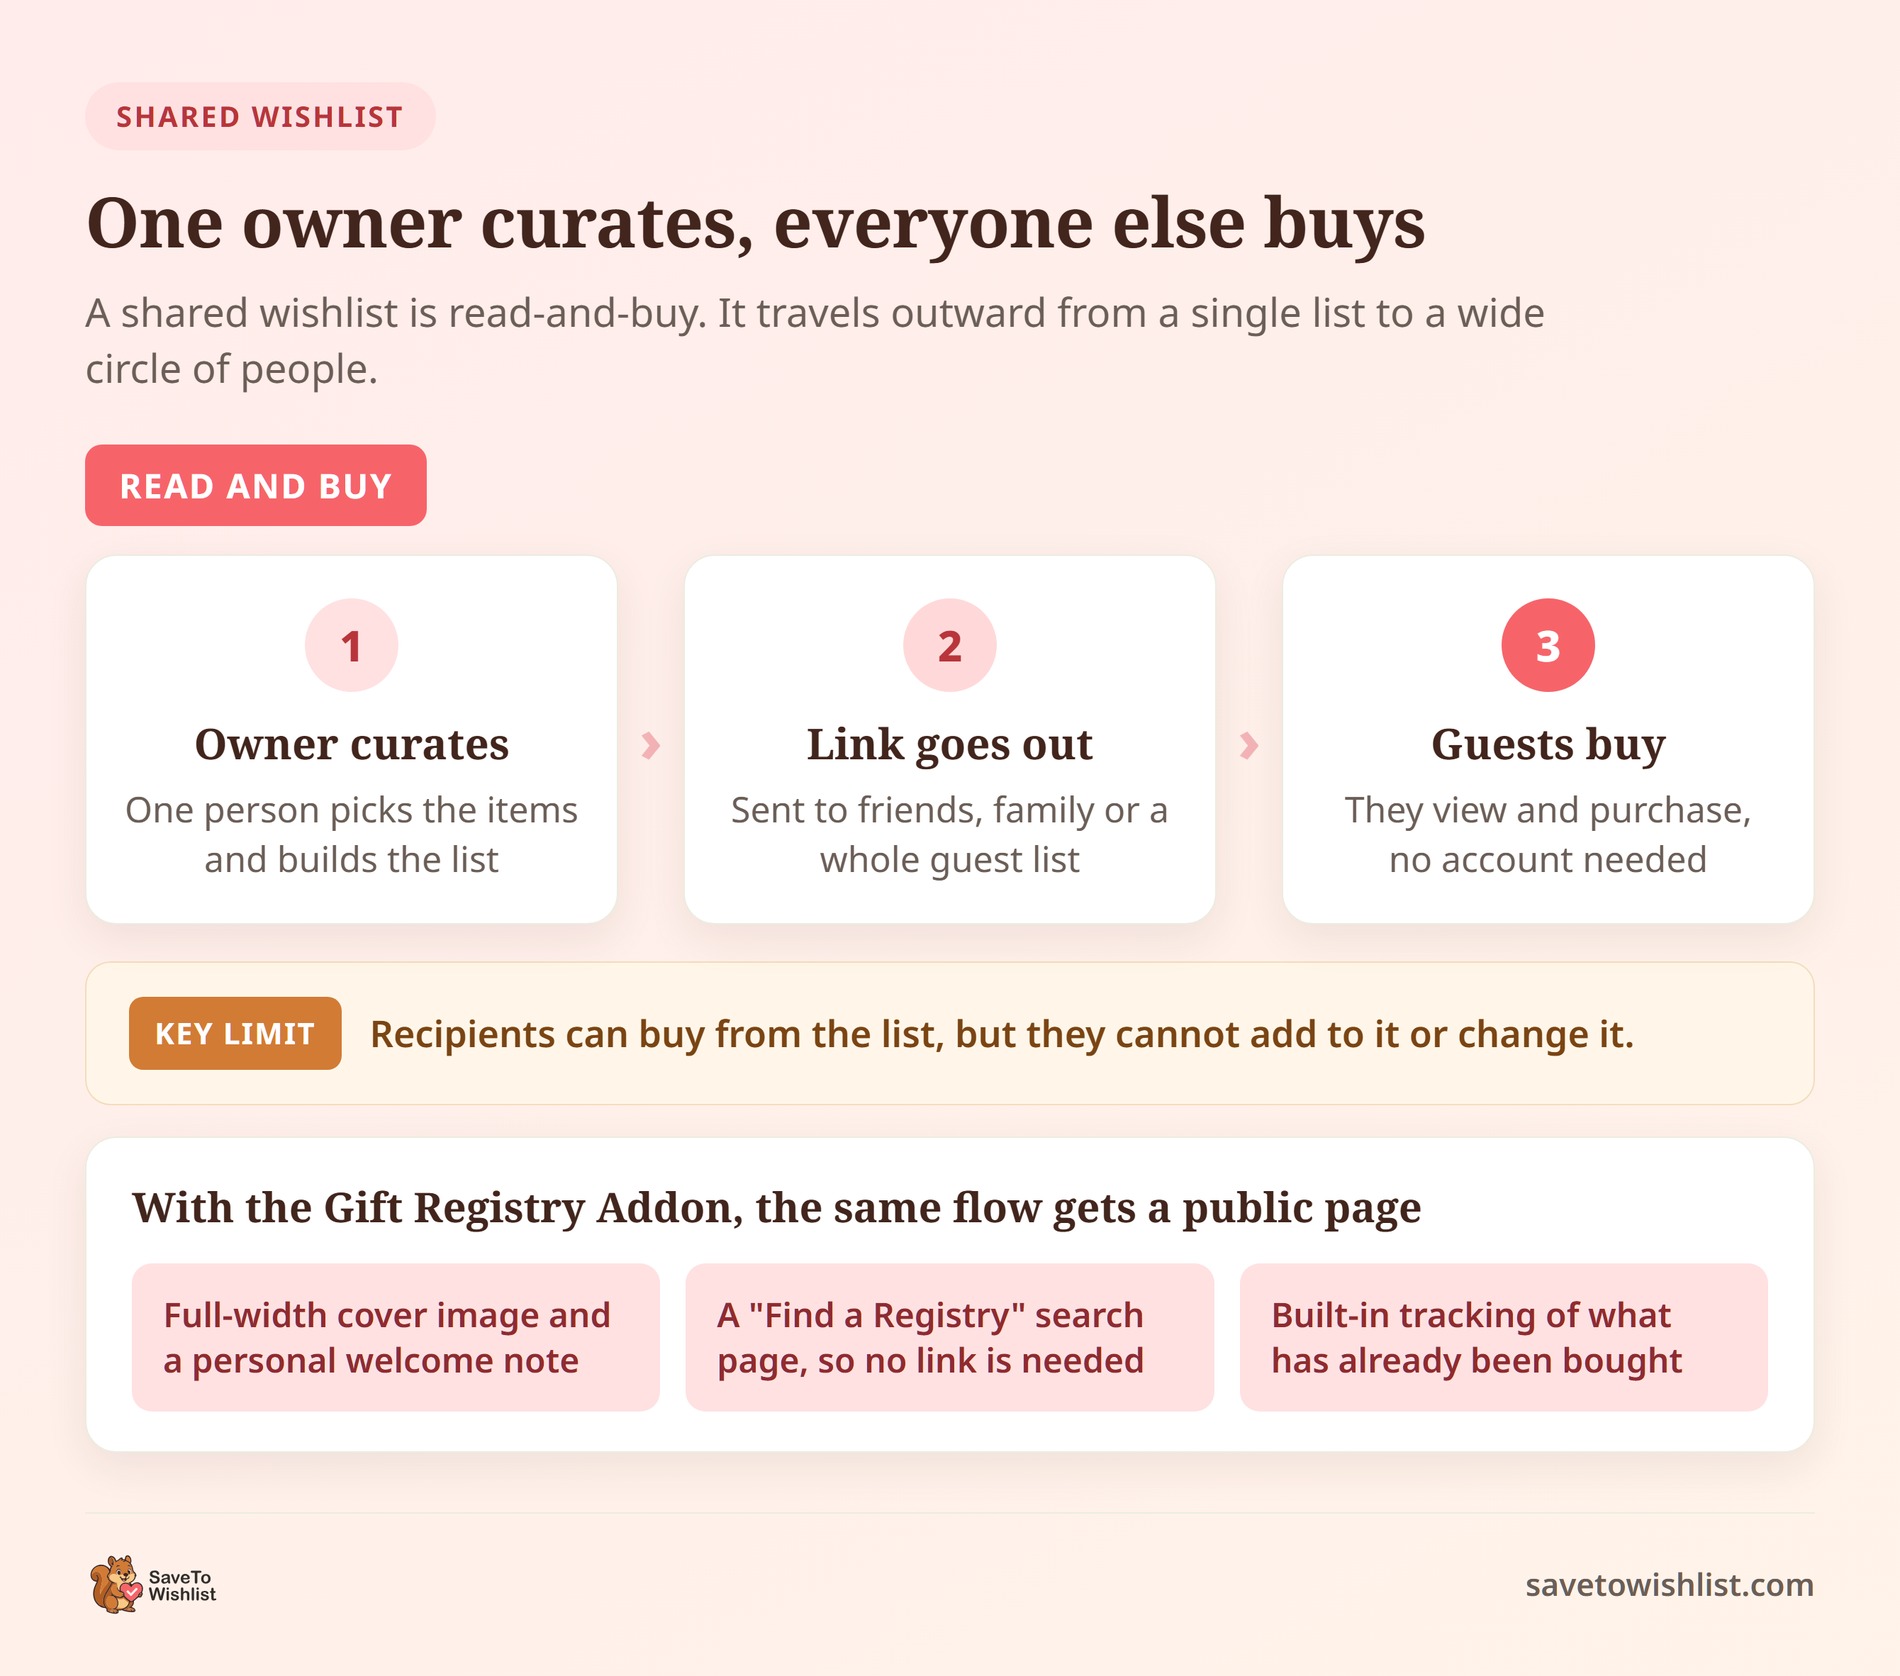
A shared wishlist is read-and-buy. The owner curates the items, sends a link, and friends or family purchase from it.
This is the classic gift registry flow. When customers use the Gift Registry Addon (bundled with the SaveTo Wishlist Plus and Business plans), this read-and-buy experience gets a massive visual upgrade.
Instead of a basic list, shoppers get a dedicated, customizable public page with an optional responsive cover image and optional personal welcome note. Guests don’t even need the direct link; they can look up the registry using a built-in “Find a Registry” search page.
Collaborative wishlist
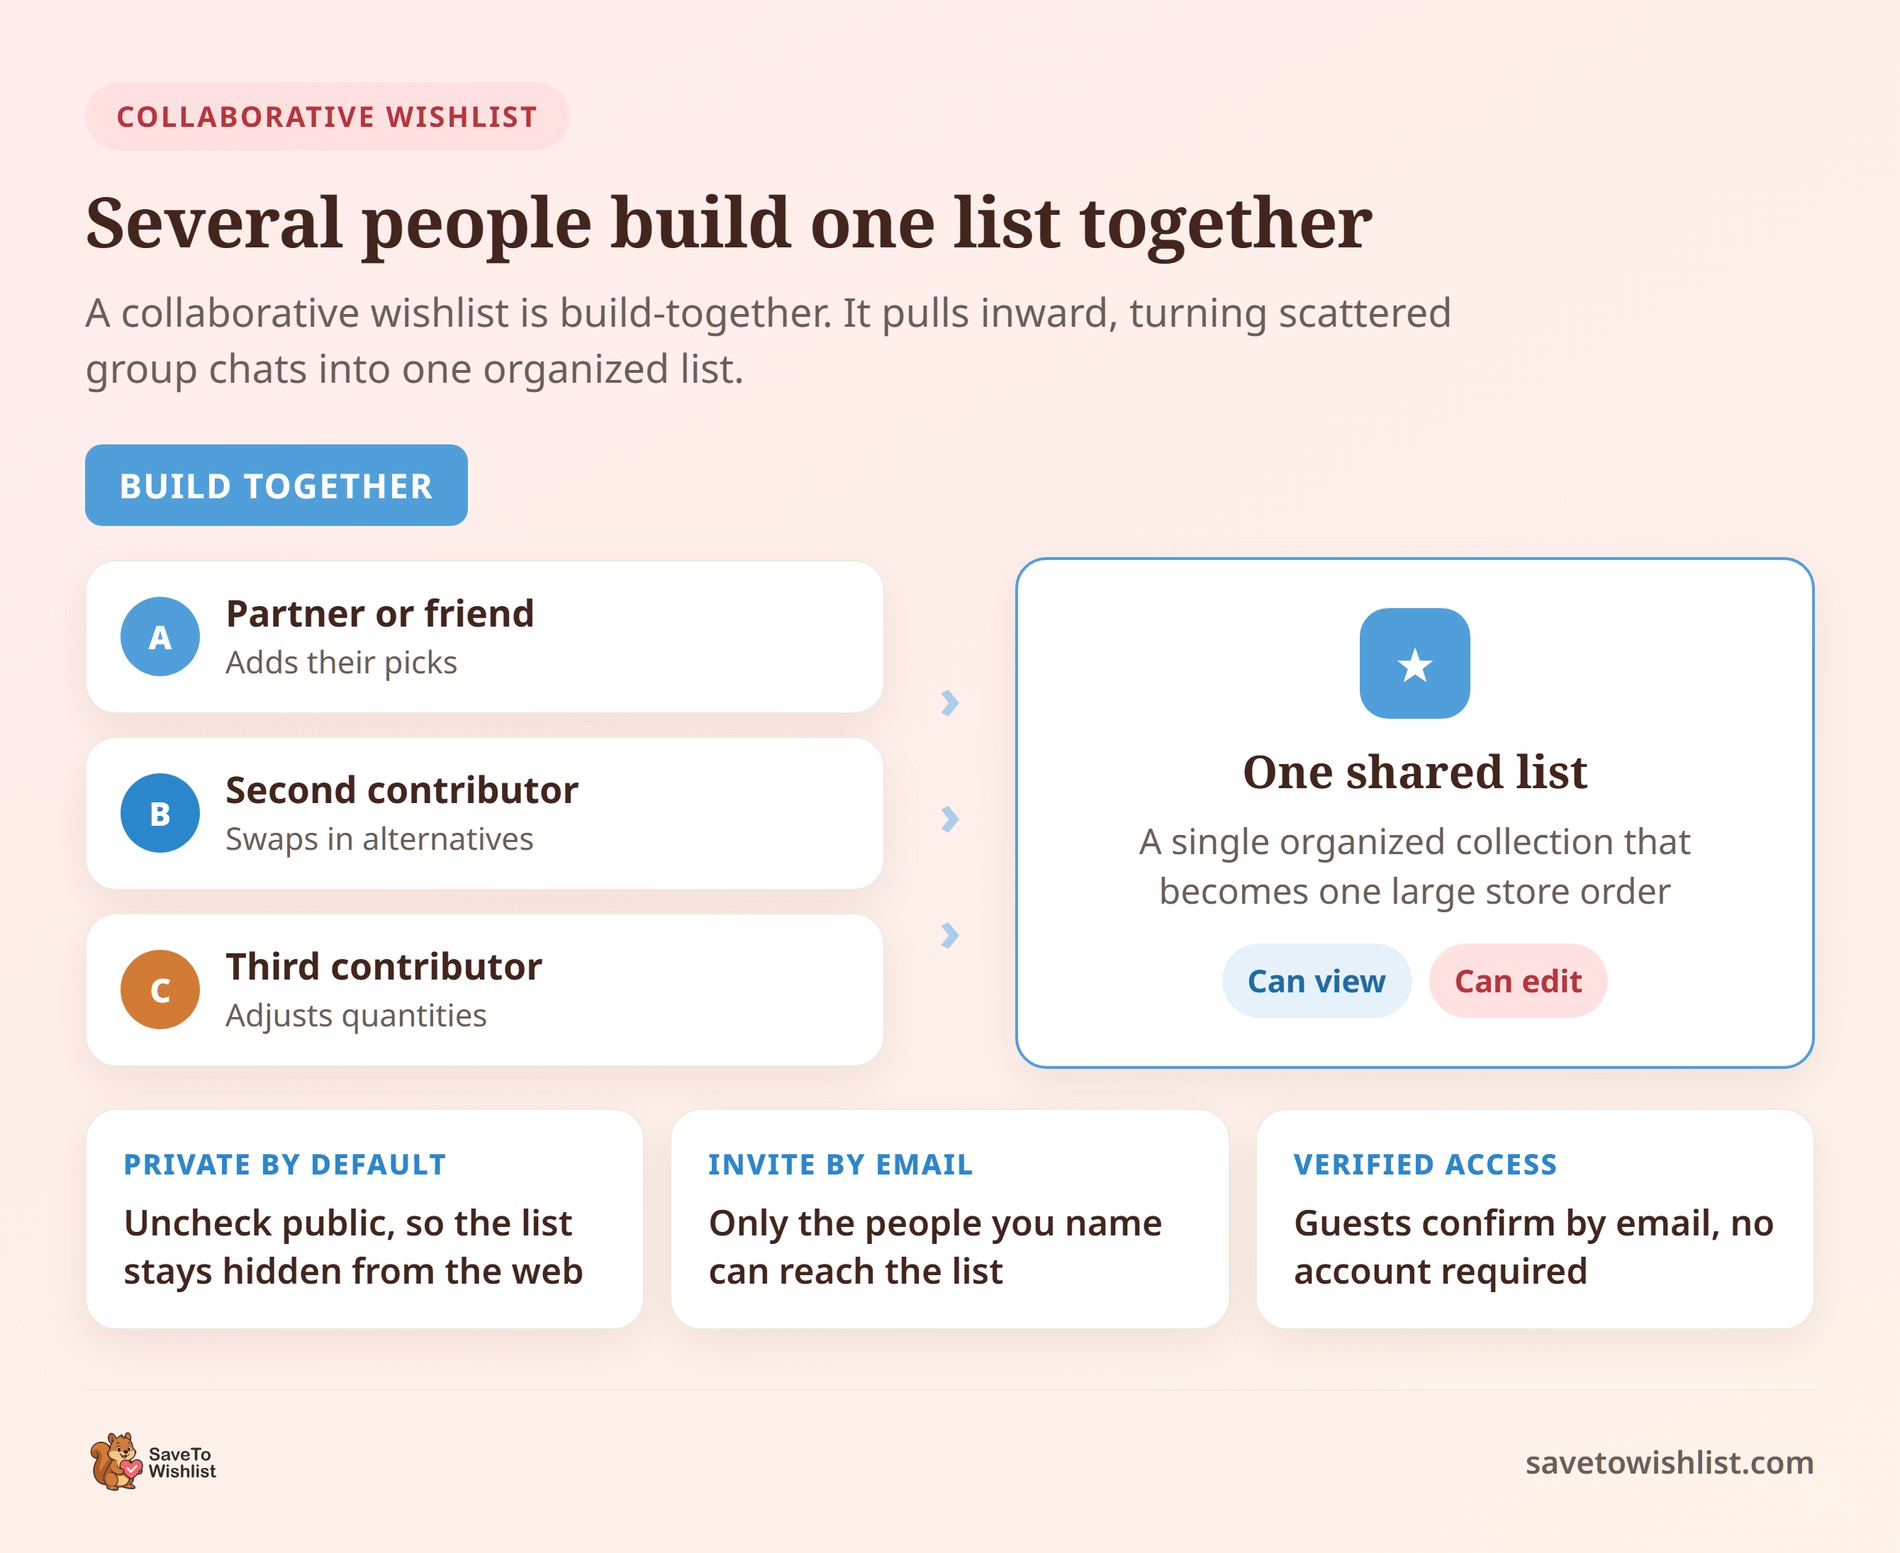
A collaborative wishlist is build-together, designed for moments when decision-making is a true group effort. Instead of a single list owner curating the products, several people can actively use the Add to Wishlist button to suggest items, swap feedback, and shape the list as a team.
Think of a couple planning a home refresh, an office choosing new equipment, or friends pooling ideas for a joint purchase. By inviting contributors via email, it replaces messy group chats and scattered links with a single, highly organized collection. This creates a unified destination where multiple contributors can coordinate product choices before one or more participants place orders through the normal WooCommerce checkout.
SaveTo Wishlist covers both. The free version gives logged-in customers shareable links for their public wishlists, so basic read-and-buy sharing works immediately. Browser-based guest wishlists do not have persistent shareable links. SaveTo Wishlist Pro adds Advanced Sharing and Permissions and enables collaborative editing by email.
And for major life events, the SaveTo Wishlist Plus and Business plans include the complete Gift Registry Addon.
Powering Group Gifting, Weddings, And Team Buys
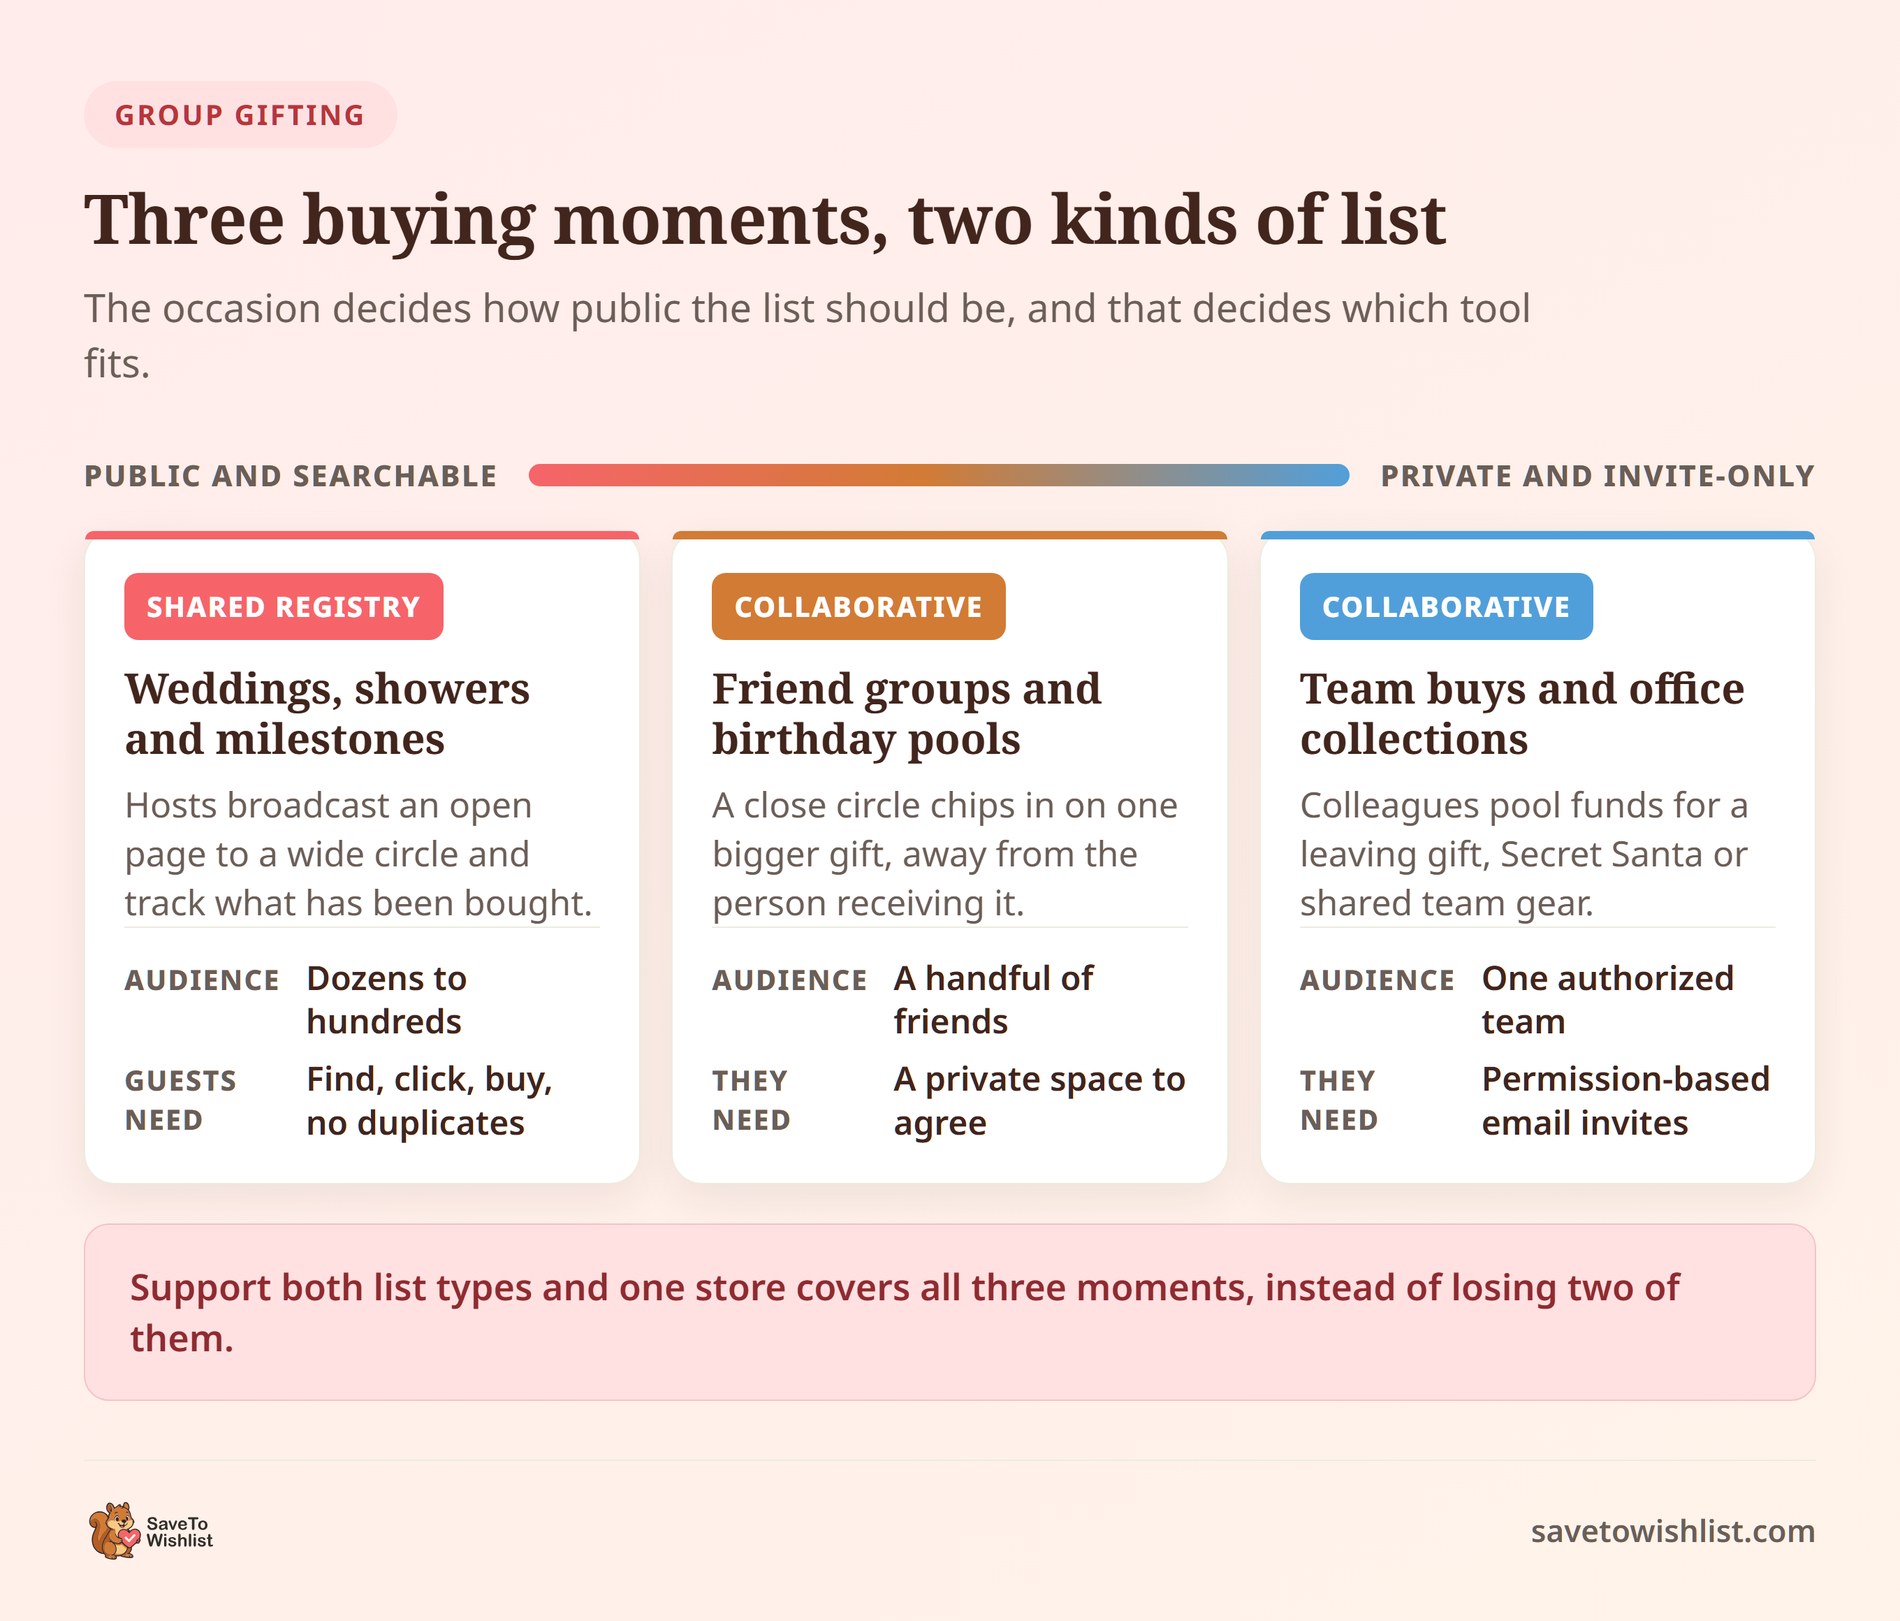
Group gifting isn’t a one-size-fits-all scenario. Different shoppers have completely different privacy needs, coordination styles, and purchasing patterns depending on the occasion. By supporting both public event registries and private collaborative WooCommerce wishlists, your store can easily capture three major buying behaviors:
- Weddings, baby showers, and major milestones (shared registries): For large public events, hosts need an open, searchable registry page they can broadcast to dozens (or hundreds) of extended family members, colleagues, and acquaintances. Guests want a simple “find, click, and buy” experience that tracks completed purchases to reduce duplicate gifts. However, simultaneous checkouts can still exceed the requested quantity, and the hosts need built-in tracking to organize thank-you notes after the big day.
- Friend group gifts and birthday pools (collaborative wishlists): When a close circle of friends wants to coordinate the selection and purchase of a high-ticket gift—like a peer’s milestone birthday or a friend’s housewarming—they don’t need a public event page. They need a private workspace. Collaborative wishlists let them swap product ideas, adjust quantities, and agree on the perfect item away from prying eyes before deciding which products to purchase and who will place the order.
- Team buys and office collections (collaborative wishlists): Group purchases in professional settings demand tight privacy controls. Whether co-workers are coordinating a boss’s retirement gift, organizing an internal Secret Santa, or curating gear for a team event, permission-based email invites limit access to visitors who enter an address on the authorized list.
By tailoring your store tools to these specific moments, you can reduce buyer friction and position your catalog as the natural go-to destination whenever people decide to shop together.
How To Set Up A Collaborative And Shared Wishlist In WooCommerce
Getting started is straightforward when you choose the right WooCommerce wishlist plugin. However, your exact setup depends on whether your customers need a collaborative workspace to build a list together, or a full-scale public event registry. Here’s how to roll out both experiences on your store using SaveTo Wishlist:
1. Setting up a shared wishlist in WooCommerce using SaveTo Wishlist Gift Registry Addon
For major life events like weddings, baby showers, housewarmings, or birthdays, shoppers need a public, read-and-buy event page rather than a basic list.
To turn standard wishlists into dedicated, fully tracked event registries, you need the Gift Registry Addon. This runs on top of SaveTo Wishlist Lite and WooCommerce. It’s bundled exclusively with the SaveTo Wishlist Plus ($99.50 first year; $199 renewal) and Business ($199.50 first year; $399 renewal) plans.
Once you have the Gift Registry Addon, simply follow the steps below:
i. Initial store setup and configuration
Once activated, Gift Registry Addon handles the heavy lifting. Basically, it automatically creates database tables and publishes two core pages: Find a Registry and Registry.
To finish configuring the backend:
- Verify page assignments & cart behavior: Go to
SaveTo Wishlist → Settings → Gift Registry → Generalto confirm landing pages. Here, you can also toggle whether guests are redirected straight to the cart page after adding a gift. Take note that registries live at/registry/ABC12345/by default; renaming the page’s WordPress slug togift-registryautomatically updates all public registry URLs. - Curate event types: Under the
Event Typestab, edit default events (Wedding, Baby Shower, Birthday, Housewarming, Other) or add store-specific options (e.g., Engagement, Graduation). - Match your store’s branding: Use the
Appearancetab to customize typography (inherit theme default or set specific sizes), colors (heading, body, accent, background), and button styling (labels, icons, and hover colors). - Configure email notifications: Turn on automated alerts under
Email Notificationsto notify owners on new gift purchases or refunds, and receive admin alerts when new registries are created. Test them using the built-in Send test email buttons.
ii. How customers create and manage their registry
The customer journey builds seamlessly on existing wishlist behavior:
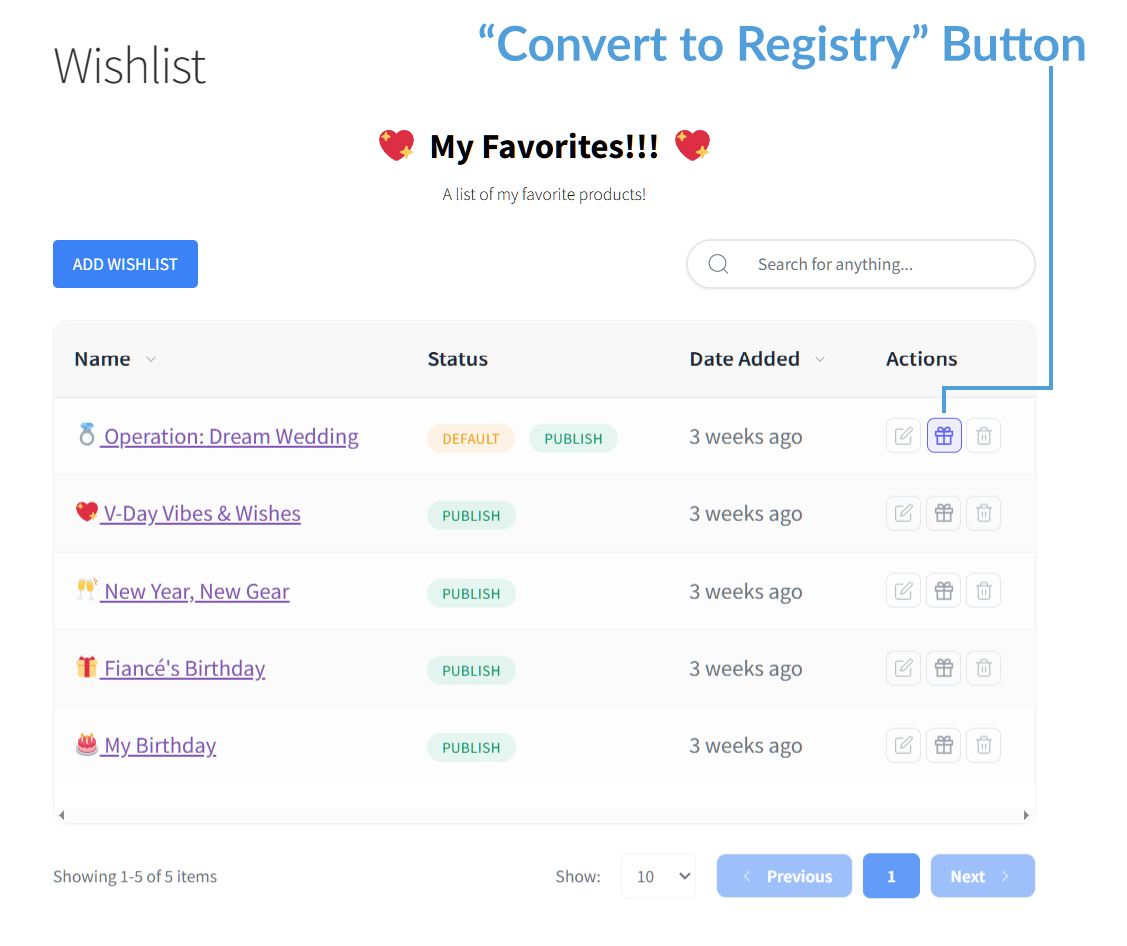
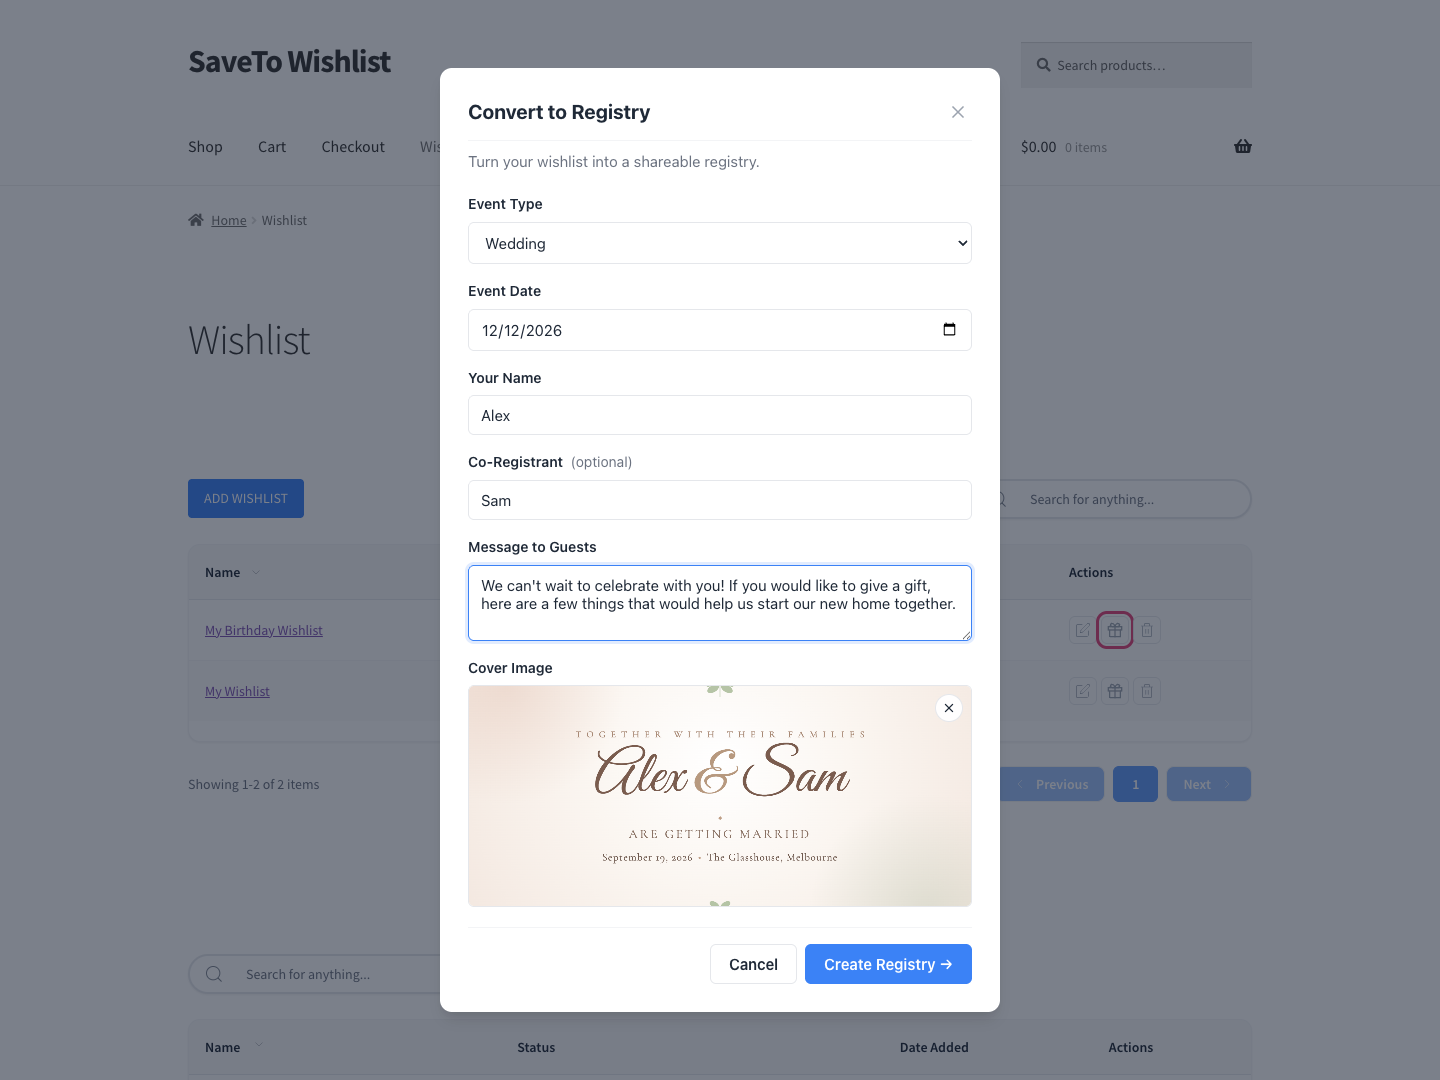
- Conversion: On the wishlist collection page, the customer clicks the gift-box Convert to Registry action beside an eligible wishlist they own. They fill in the event details: event type, event date, registrant name(s), an optional welcome message, and an optional cover image (JPG, PNG, or WebP up to 5 MB; a wide image works best in the registry’s responsive cover area).
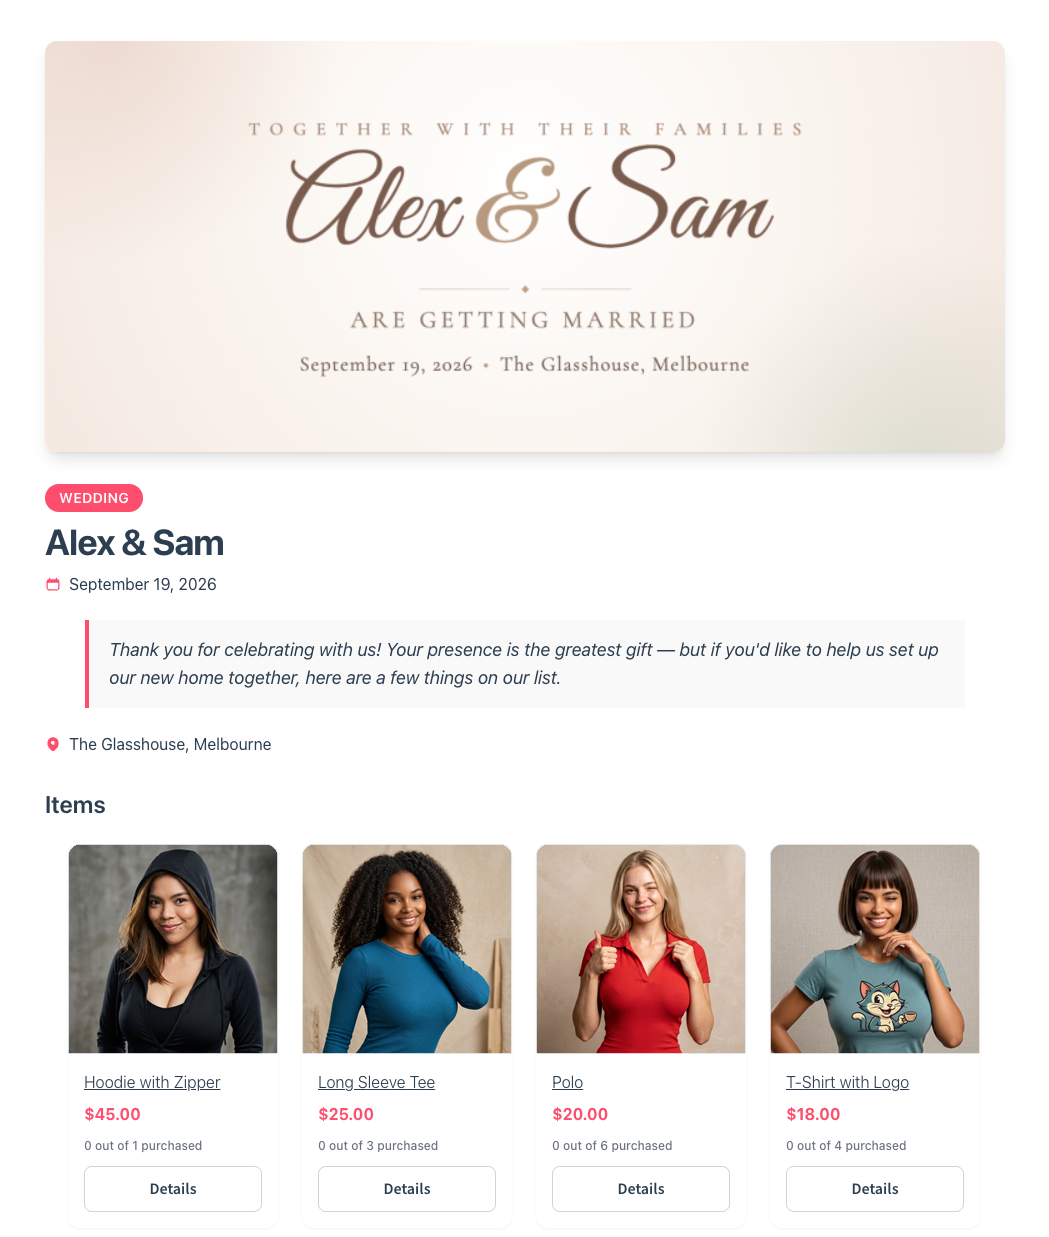
- Public page & sharing: The registry goes live at its unique URL with a full-width cover banner or tasteful color gradient if no photo is uploaded. An owner-only Share button appears at the top, allowing the registrant to copy the link or share via email, Facebook, X, or WhatsApp.
- Ongoing management: Registrants can use the Add an item search on their registry page to add more products, adjust requested quantities without reducing them below the quantity already purchased, and drag items to reorder them. Once an item has been purchased by a guest, the delete button is safely greyed out with an explanatory tooltip to preserve order records.
- The Thank-You tracker: Registrants get a private dashboard under
My Account → Gift Registries(/my-account/gift-registries/). It displays buyer names, emails, order numbers, purchase dates, and a toggle to mark thank-you notes as sent with optional private notes.
iii. How guests find & buy gifts
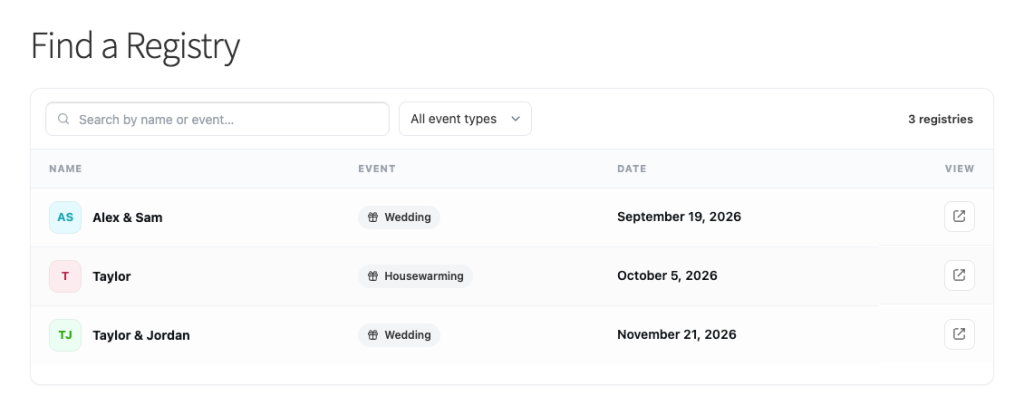
- Public search: Guests without a direct link can use the built-in Find a Registry search page to look up registries by registrant name and narrow results using the event type dropdown. Search results only return published registries and never expose private buyer or owner email details.
- Purchasing: guests see a running count such as “2 out of 5 purchased,” showing how many units have been purchased out of the quantity requested. By default, adding a gift redirects the guest to the standard WooCommerce cart, from which they proceed through the store’s normal checkout. The cart redirect can be disabled in the registry settings. No account is required to view a registry. Guests can also purchase without an account if WooCommerce guest checkout is enabled.
- Automated purchase and order tracking: The item count updates when an order first enters a WooCommerce paid status, normally Processing or Completed. This includes offline-payment orders only when their gateway moves them into a paid status. When the requested quantity has been fully claimed, the item shows the full purchased count, such as “5 out of 5 purchased,” and no longer accepts another normal claim. Refunds or cancellations automatically add items back to the available pool.
- Catalog protection: If you discontinue or delete a product, the registry falls back to a saved copy of its title, SKU, and image so the registry page can still display the item. The deleted product can no longer be purchased.
iv. Managing registries from the store admin
Store owners get complete oversight via SaveTo Wishlist → Registries:
- Admin controls: View public pages, edit details on a customer’s behalf (logged for accountability), or convert a customer’s wishlist into a registry for them from the backend.
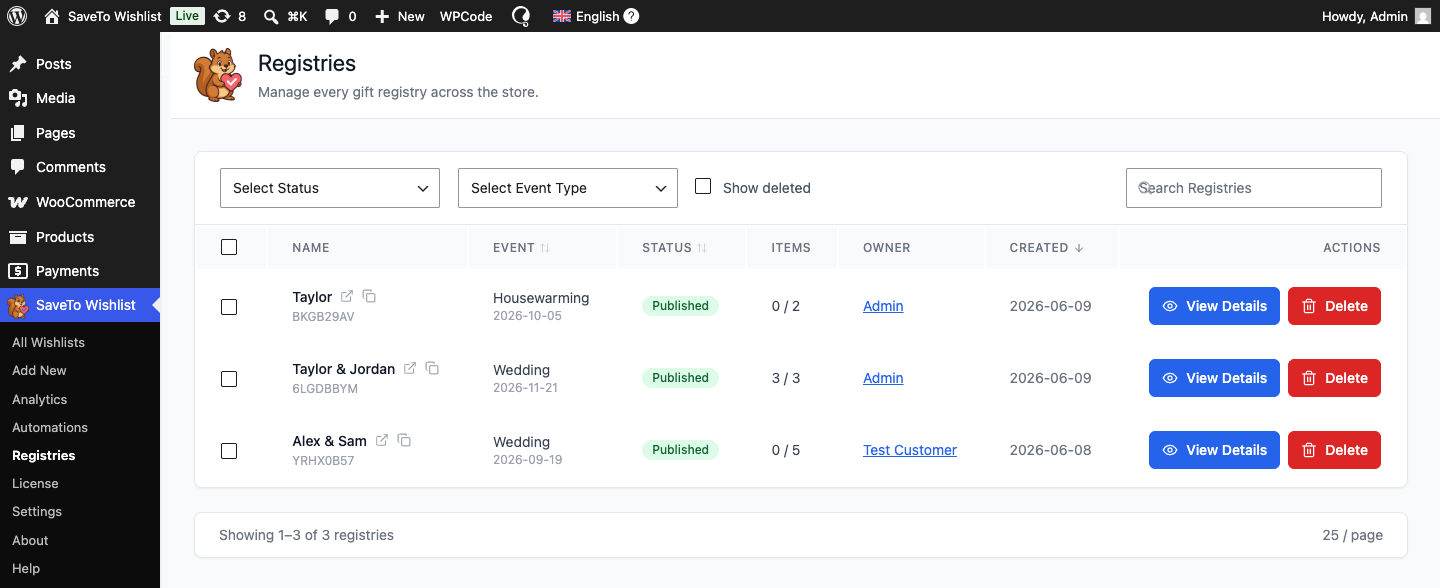
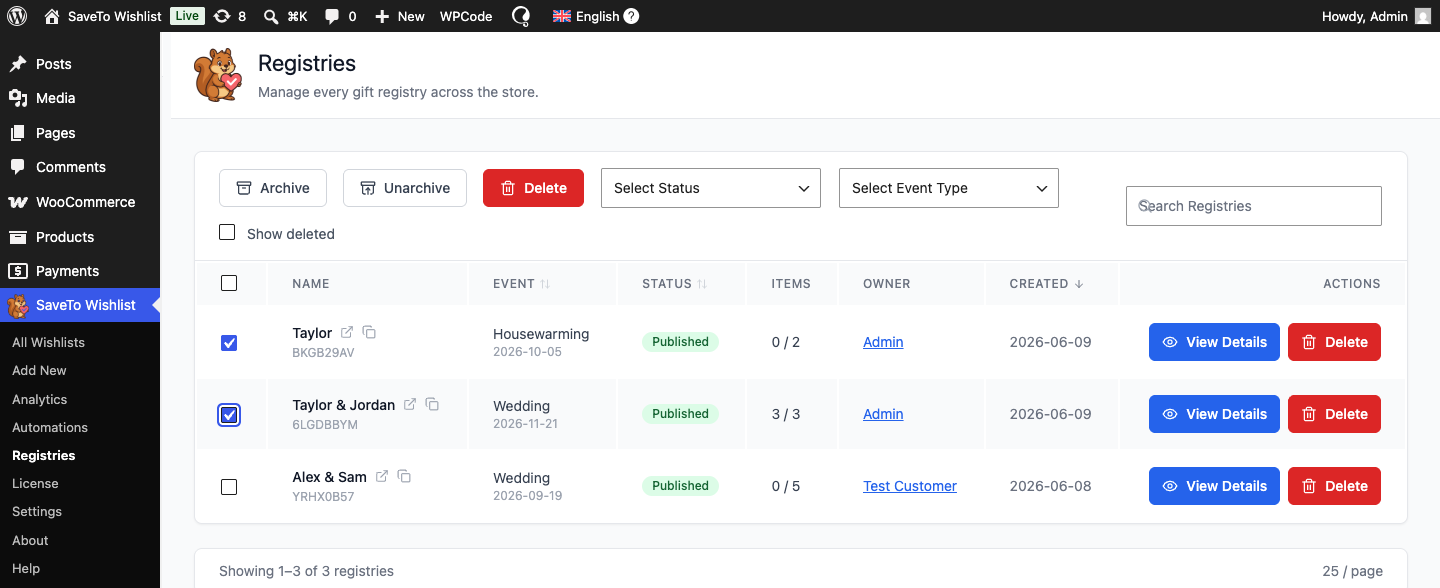
- Archiving and soft deletion: Archive registries after an event passes so old links gracefully show a “no longer accepting purchases” notice. Deleting a registry performs a soft delete, hiding it publicly while retaining its purchase records for 90 days. During that period, an administrator can enable Show deleted and click Restore.
The Gift Registry Addon provides built-in setup pages and settings designed to simplify configuration in the admin panel, but it gives your store tools for hosting registries for major life events. Once configured, shoppers can manage their own registries, and their guests can visit your store and purchase gifts through the normal WooCommerce checkout.
2. Setting up a collaborative wishlist in WooCommerce using SaveTo Wishlist Pro
Collaborative wishlists are built for moments when decision-making is a group effort, like friends pooling ideas for a joint present, a couple planning a house refresh, or a team choosing office gear. Instead of sharing open public links, SaveTo Wishlist Pro lets customers privately invite specific people by email and choose exactly who can view or edit the list.
Here’s how shoppers set up and manage a collaborative wishlist:
i. Switch to private sharing
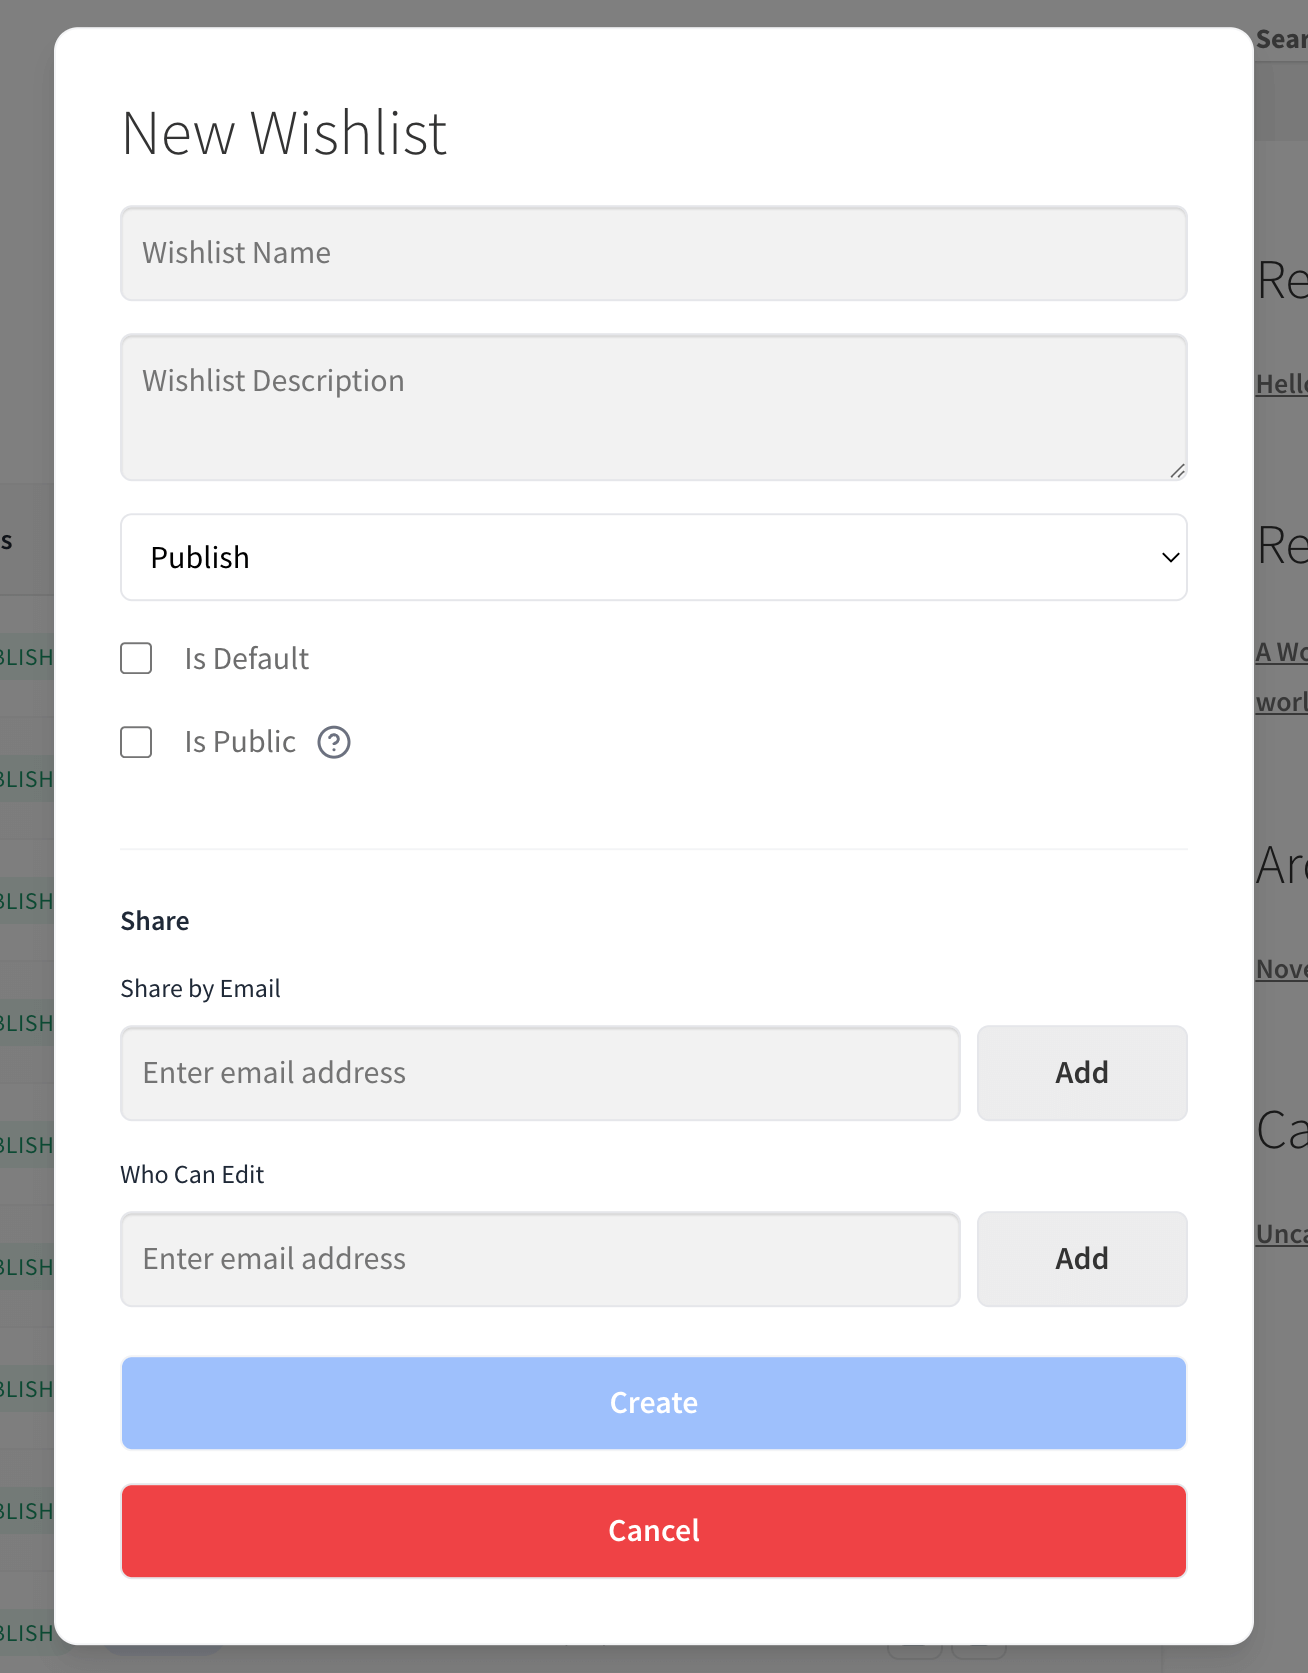
The customer opens their wishlist, clicks Edit, and unchecks the Public option to make the list private. With Pro active, they can then use Share by Email and Who Can Edit to grant specific people access.
ii. Invite contributors by email
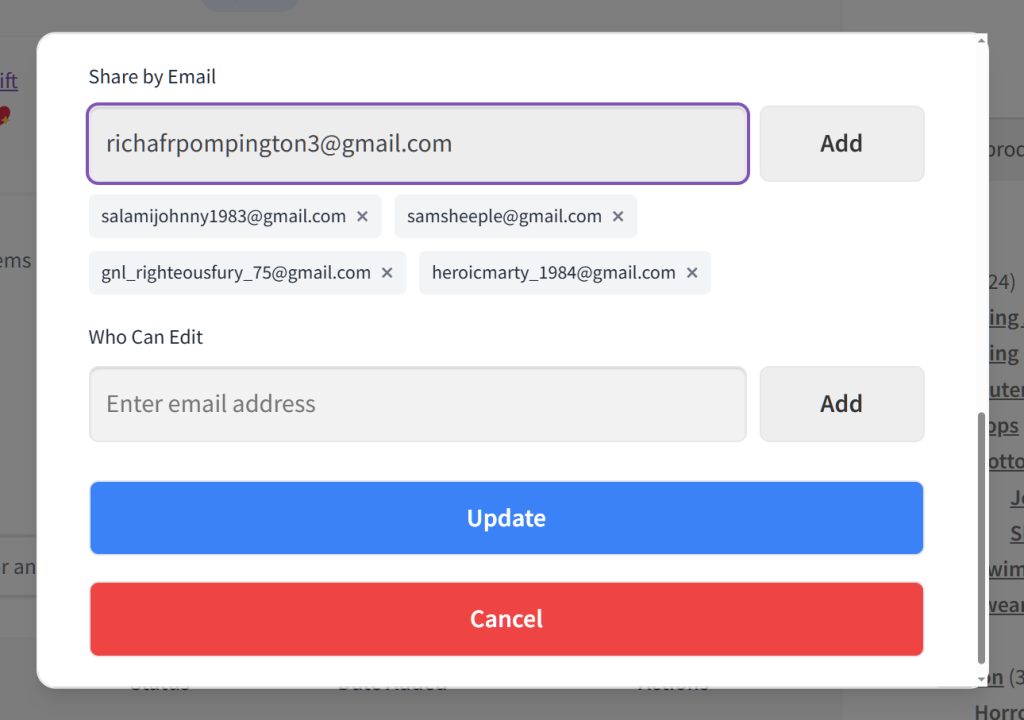
In the Share by Email field, the customer types a friend’s email address, clicks Add, and can repeat this for as many people as they want to invite. If they change their mind, clicking the X next to a name removes the invite before saving.
iii. Set view vs. edit permissions
Customers have total control over the mix of permissions. They can allow all friends to edit, make it view-only for everyone, or give some friends full editing powers while others can only view.
- To grant editing abilities, the customer enters their friends’ email addresses into the Who Can Edit field, clicks Add, and then clicks Update.
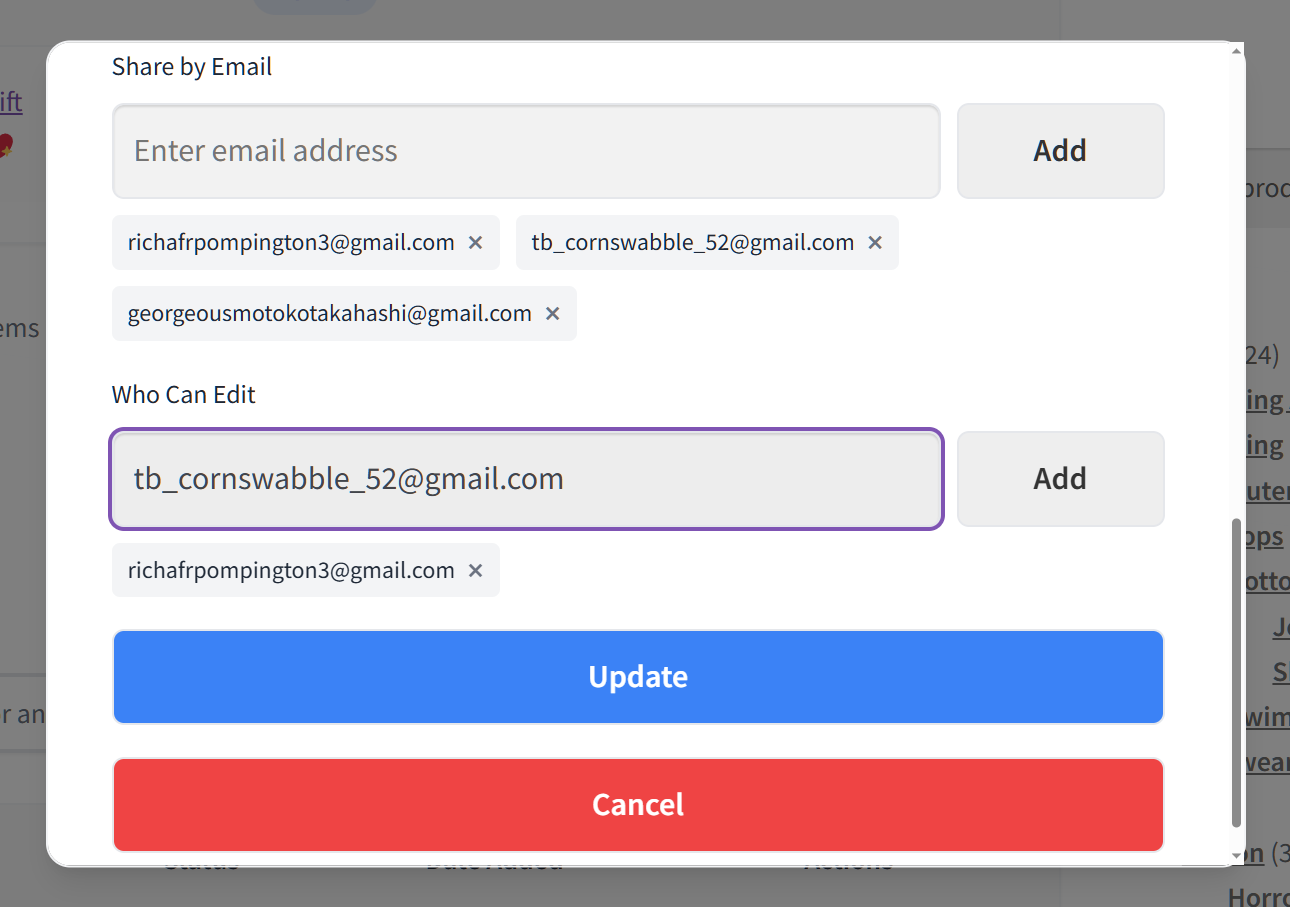
- To ensure a friend can’t edit the list, the customer simply leaves their email out of this field.
Permissions aren’t permanent, either. Customers can give editing powers to as many people as they need, and they can easily revoke them at any time by clicking the X button beside a friend’s email.
iv. Private guest access through an email allowlist
When an invited guest opens a private wishlist, an access popup asks them to enter their email address. The plugin checks that address against the wishlist’s view or edit allowlist before revealing the products. Guests don’t need a store account to view the list, but they must enter an email address that appears on the wishlist’s access list. This adds an access gate, although it does not verify ownership of that email address.
Collaborative wishlists turn group chats and scattered product links into a single, organized product list on your store. By giving shoppers granular control over who can see and edit their lists, you give invited contributors one place to coordinate their product choices.
Best Practices For Promoting Group Gifting On Your Store
Having group gifting tools available on your store is only half the battle. After all, your customers also need to know these features exist and how to use them.
Whether you’re targeting shoppers planning a major milestone registry or a group of friends coordinating a birthday present, a few strategic store updates can drive adoption and boost overall order values.
Here are the most effective ways to promote group gifting across your WooCommerce store:
1. Highlight privacy for surprise planning
Emphasize the privacy benefits of collaborative wishlists in your product page microcopy, marketing emails, and banner ads. Remind shoppers that they don’t have to make their lists public to gather feedback, making it the ideal solution for secret gift pools, surprise parties, and office collections.
2. Feature “Find a Registry” in your navigation
Make sure guests coming to your site can locate their host’s page immediately. Add your Find a Registry link to your primary header menu, footer navigation, or a seasonal site banner during peak event seasons (e.g., spring wedding season or early holiday shopping).
3. Emphasize no-account guest purchasing
Friction kills gift conversions. In your store FAQs and promotional banners, explain that invited guests can view a private wishlist without an account and can purchase a registry gift without registering when WooCommerce guest checkout is enabled.
4. Update store FAQ and help documentation
Give shoppers clear instructions on how private wishlist sharing works. A quick section in your Help Center or FAQ explaining the private “Share by Email” workflow and email-allowlist access step helps users understand how access is controlled.
5. Leverage seasonal campaign triggers
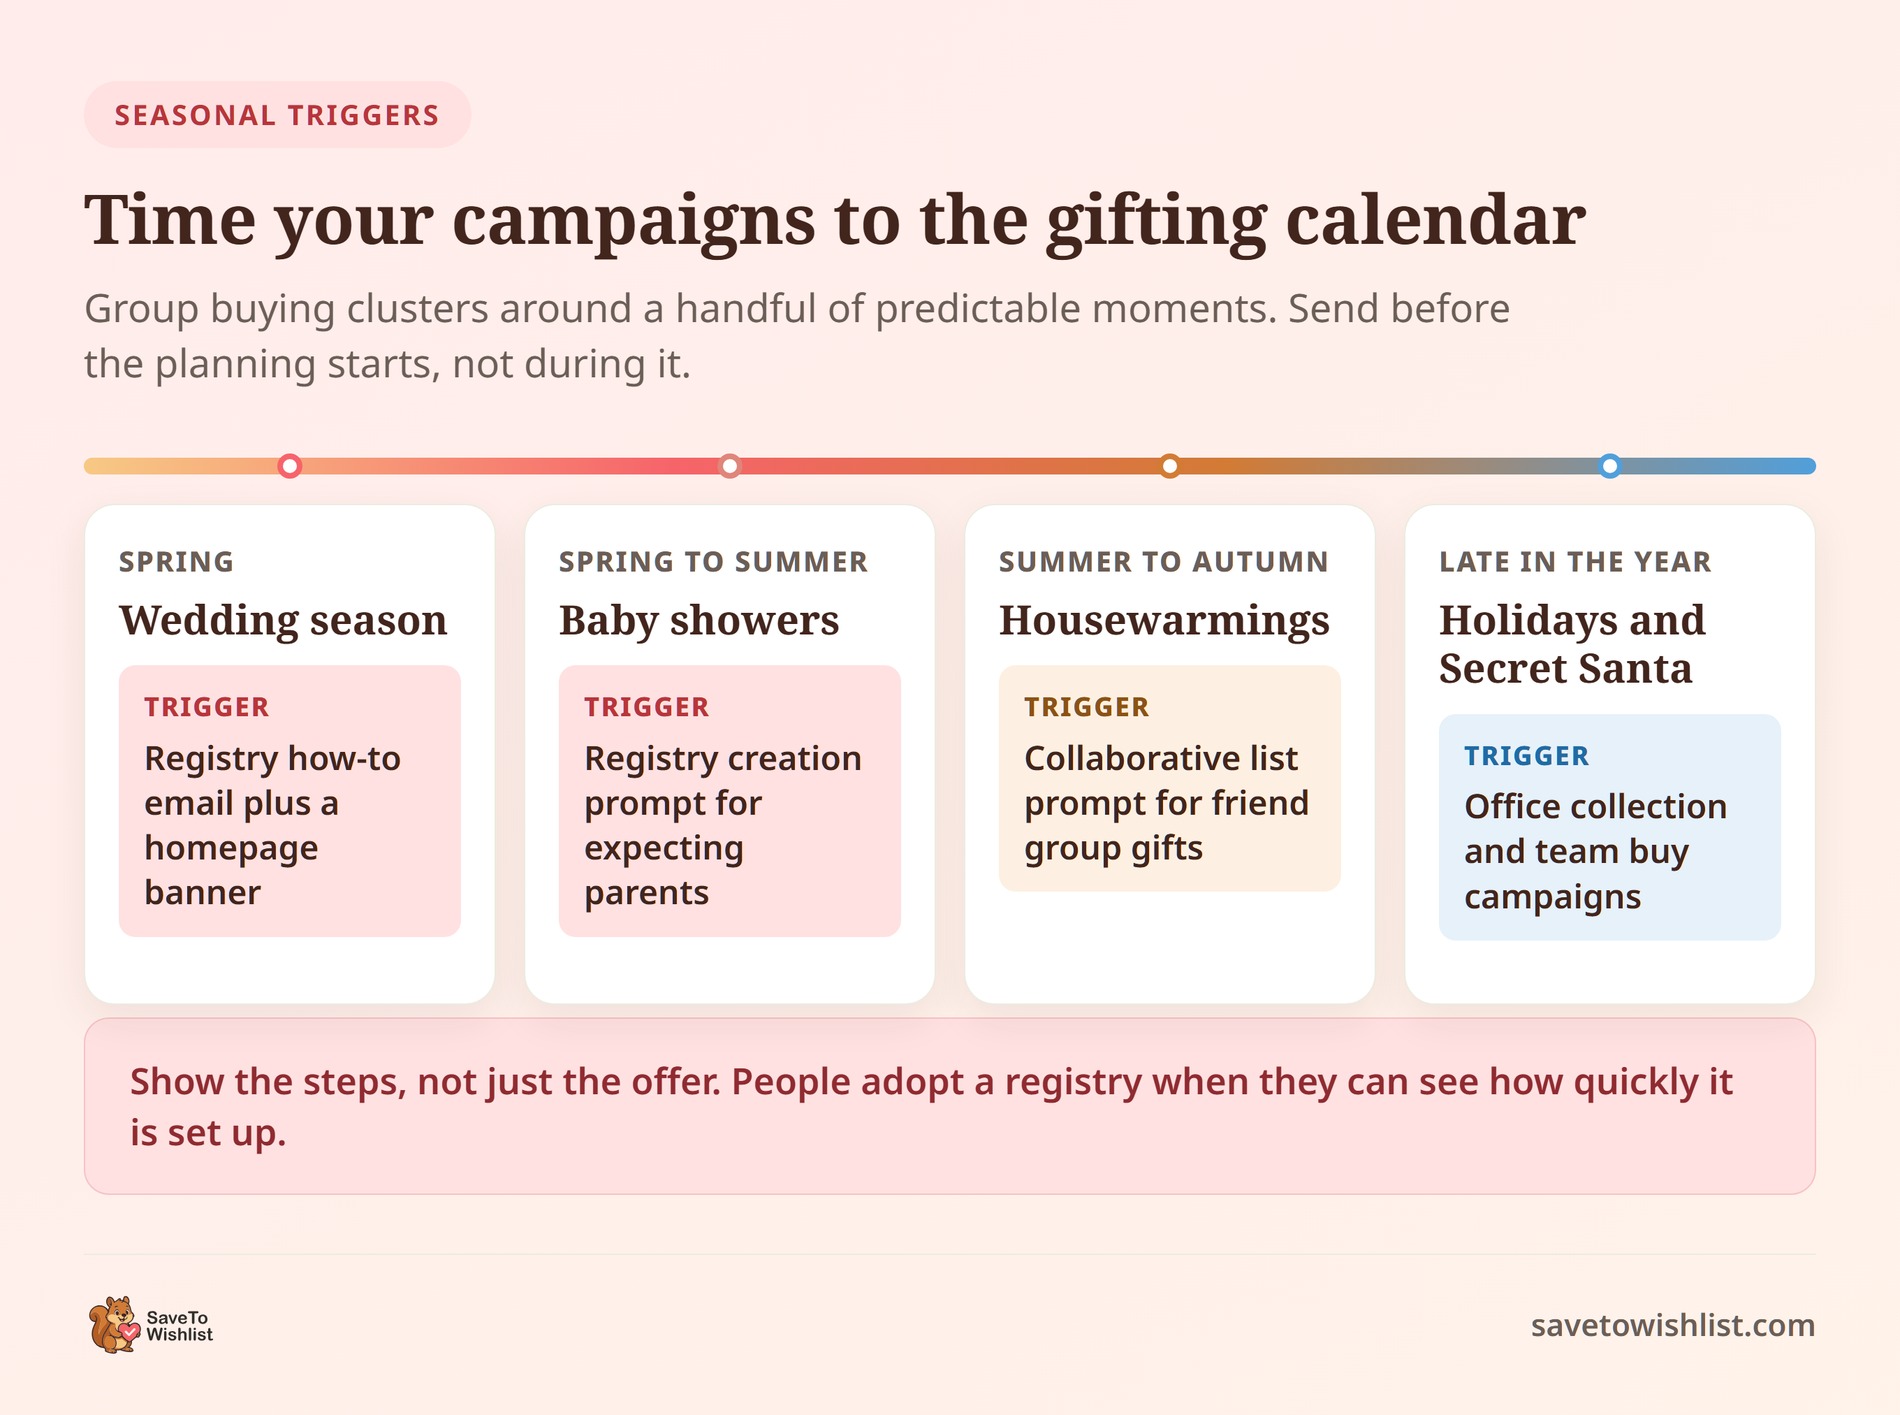
Time your email newsletters and homepage hero banners around major gifting moments throughout the year. Run dedicated campaigns for weddings, baby showers, housewarmings, and holiday secret santas, showing customers step-by-step how easy it is to create a registry or collaborate with friends.
By positioning group gifting as a convenient way to shop together, you can encourage customers to create and share lists, potentially bringing additional referral traffic and purchases to your store.
Frequently Asked Questions: Shared Wishlist In WooCommerce
What’s the difference between sharing and collaborative editing?
Sharing lets other people view and purchase from a list. Collaborative editing lets invited people add and change items on it. Sharing suits read-and-buy lists where the owner curates the products. Collaborative editing suits group gifts and team buys where several people contribute. While the free version handles basic link sharing, SaveTo Wishlist Pro enables private collaborative editing, and the Gift Registry Addon upgrades sharing into a fully tracked public event page.
Can I control who sees a customer’s wishlist?
Yes, via the Advanced Sharing and Permissions in SaveTo Wishlist Pro. Customers can uncheck the “Public” setting to remove a wishlist from public access. With Pro, they can then invite specific contributors by email, who must enter an address on the wishlist’s access list.
Will shared wishlists bring new visitors to my store?
Often, yes. Shared links can bring people to your product pages, including potential first-time visitors. That’s referral traffic from real word-of-mouth. For example, group events like weddings tend to spread one list across a wide circle. In short, a single registry can introduce your store to dozens of potential first-time buyers.

Putting Shared Wishlists To Work
Offering shared and collaborative wishlists can help generate referral traffic and make group purchases easier to coordinate. By giving your customers the tools they need to collaborate, you turn a solitary shopping experience into a social, conversion-driven event.
Whether shoppers need a public event registry or the email-allowlisted access controls of a private collaborative wishlist, your store can support many common group-shopping scenarios directly on your site.
To review any part of this guide, click the links below to jump back to a specific section:
- Why offer a shared wishlist in WooCommerce?
- What’s the difference between collaborative and shared wishlists?
- Powering group gifting, weddings, and team buys
- How to set up group gifting on your store
- Best practices for promoting group gifting on your store
Ready to stop losing group purchases to third-party platforms? Download SaveTo Wishlist Lite today to unlock basic group gifting.
When you’re ready for maximum power, upgrade to the SaveTo Wishlist Pro to allow advanced sharing and permissions. Or, step up to the Plus or Business Plan—which include the Gift Registry Addon—so your customers can plan, share, and buy together without ever leaving your store. All plans come with a money back guarantee, so you can try out these advanced features completely risk-free.