
 Reviewed by
 The SaveTo Wishlist Lite v1.1.5 update is officially live! It gives you more say over your guest wishlist page, and a wishlist button that fits more theme setups.
Picture a shopper who saves a few products without logging in. The page they land on is a chance to invite them back, so its wording matters. Now you can write it yourself.
Plus, this release brings several button and page refinements for block themes, presets, and theme builders. In this article, we’ll cover each update and where its setting lives.
So, let’s get started!
Jump to:
1. Customize The Guest Wishlist Heading
Shoppers who save products without logging in get their own guest wishlist page. Now you can decide what that page says, right in the free plugin.
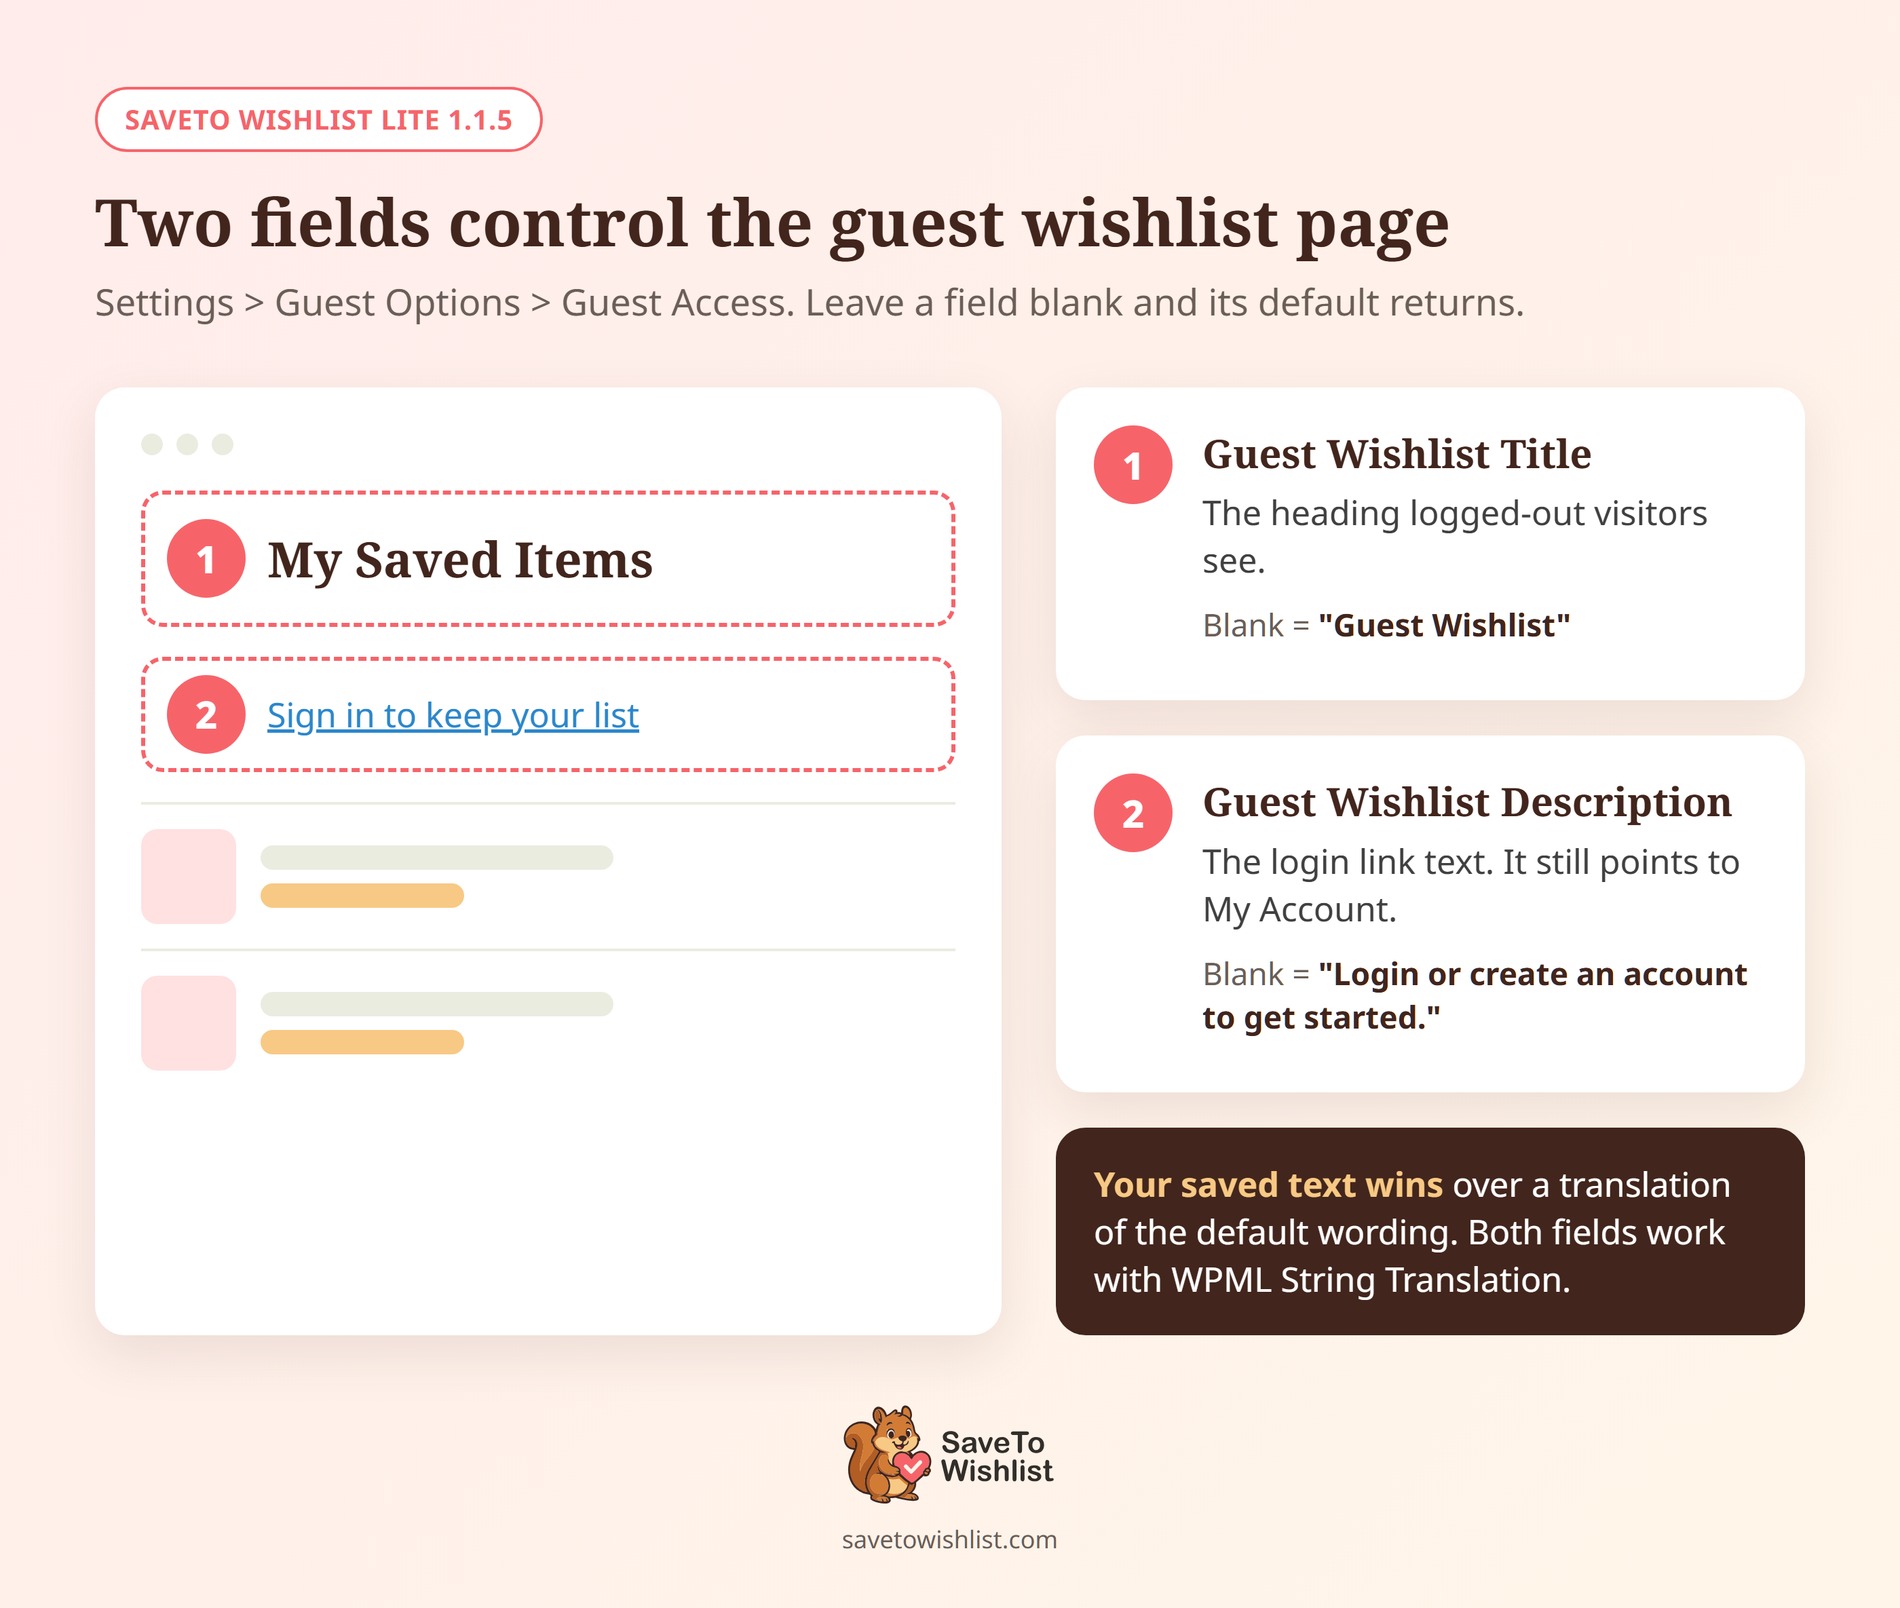
Go to SaveTo Wishlist > Settings > Guest Options. In the Guest Access section, you’ll find two new fields:
- Guest Wishlist Title: The heading guests see on the wishlist page. It defaults to “Guest Wishlist”.
- Guest Wishlist Description: The text of the login link under that heading. It defaults to “Login or create an account to get started.” and still points to My Account.
Each field shows its default as placeholder text, so you always know what a blank field means. Leave one empty and the default returns.
A few details worth knowing:
- No translation plugin needed: You can rename both lines straight from the settings screen.
- Multilingual stores are covered: Both fields register with WPML String Translation.
- Your saved text comes first: A filled-in field takes priority over any translation of the default wording.
- They appear when guest wishlists are on: Set Disable Guest Wishlist to No to see both fields.
- Logged-in customers keep their own heading: They still see the title and description from your Wishlist Page settings.
My suggestion: use the description as a gentle nudge. A line like “Sign in to keep your list” gives guests a reason to create an account.
2. A Wishlist Button That Fits Your Theme Setup
Lite 1.1.5 also brings several storefront refinements. Each one makes the wishlist button look and behave exactly the way your settings say.
Presets that apply in full
When Configuration Mode is Use Presets, the button takes its style, colors, and icon from your preset. The Style Presets description now says so, too. It reads: “The Button Style, Icon and Color settings do not apply while this mode is active.”
Switching modes keeps your custom work safe. Change back to Custom Settings and your saved style, colors, and button icon return. One tip, though: clicking a preset card and saving writes that preset’s style and colors over your custom ones.
Also, if you’ve never saved a Configuration Mode, your existing custom styling carries on after the update. And Theme Default mode shows a clean button with no icon.
Settings that match your storefront
On a fresh install, both Button Placement dropdowns now read Top Right of the Product Image. That applies to Shop Page and Product Page, and it’s exactly where the button appears. So clicking Save Changes or Reset to Default keeps it right where shoppers expect it.
One button per product on block themes
Block themes like Twenty Twenty-Five now show one wishlist button per product on shop and category pages. This works across all six shop placements on WooCommerce 9.5 and later. Meanwhile, classic themes carry on as before.
Each placement attaches to a block in your product template. For example, the top-right placement sits on the Product Image block. So if you remove a block from the template, pick a placement tied to a block you kept.
Flush alignment when there’s no Add to Cart button
The Inline with the Add to Cart Button placement uses your Button Spacing gap. Now, when a product has no Add to Cart button, the wishlist button sits flush instead.
That covers products with no price, catalog mode, out-of-stock items, and anything that can’t be purchased. It holds on phones and desktops, and in all three Frontend CSS Loading modes.
3. Wishlist Links And Account Pages That Route Correctly
Two routing refinements round out the Lite update. Neither needs a setting, and existing sites pick up both on their own.
Wishlist links that load as your wishlist page
Single wishlist links, such as /wishlist/your-code/, now load as your wishlist page. As a result, theme builder templates recognize the page correctly.
For example, an Elementor Pro archive template set to Archives > Posts keeps applying to your blog posts page. Meanwhile, the wishlist renders normally at its own link. If you build with Elementor, our Elementor wishlist button guide covers the rest of the setup.
My Account pages that work with or without a wishlist page
Every WooCommerce My Account page now loads normally, even before you choose a wishlist page in the Redirect page setting. That includes Orders, Downloads, addresses, and account details.
It follows your account page’s slug, too, so a renamed account page works the same way. Plus, anyone who opens a wishlist link that no longer exists lands on your wishlist page or My Account.
Frequently Asked Questions
Is this update free?
Yes. Everything in this article ships in SaveTo Wishlist Lite 1.1.5, the free plugin. Update it from your WordPress dashboard to get it.
Can I translate the guest wishlist heading?
Yes. Both Guest Wishlist fields register with WPML String Translation. If you leave them blank, any translation of the default wording still applies.
Which WooCommerce version does the block theme update need?
The one-button-per-product update works on WooCommerce 9.5 and later. Classic themes are not affected, because they do not build the shop page from blocks.
Conclusion
That covers the new Lite updates. So you can start using them now by updating SaveTo Wishlist Lite from your WordPress dashboard.
Here’s what we covered:
- A customizable guest wishlist heading and login link text.
- Button refinements for presets, placement defaults, block themes, and spacing.
- Routing refinements for wishlist links and My Account pages.
My suggestion: start with the guest heading. A friendly line like “Sign in to keep your list” takes a minute to write.
If you’re ready to go further with wishlists, compare what SaveTo Wishlist Pro adds on our pricing page.
If you haven’t tried wishlists on your store yet, download SaveTo Wishlist Lite for free today.