When a guest buys a gift from a registry, you want to be sure the purchase counts toward the right registry. SaveTo Wishlist Registry labels registry gifts in the cart and at checkout, so the guest can check the details before paying. This guide shows what the guest sees, what is saved with the order, where you see it on the order, and how to match a registry gift to its purchase.
Before you begin
- WooCommerce and SaveTo Wishlist Lite installed and active
- SaveTo Wishlist Registry installed, with an active license (see How to manage your SaveTo Wishlist Registry license)
- At least one published registry with products in it (see How to convert a wishlist into a gift registry)
Step 1: Add a registry gift to the cart
Registry details only attach to an item when the guest adds it from the registry page. If they add the same product from your regular shop or product page, it goes into the cart as a normal item and doesn’t count toward the registry.
- Open the registry’s public page.
- Click Details on the product you want to buy. A quick view window opens.
- Enter Your name and Your email. Both are required.
- Set the Quantity.
- Click Buy gift.
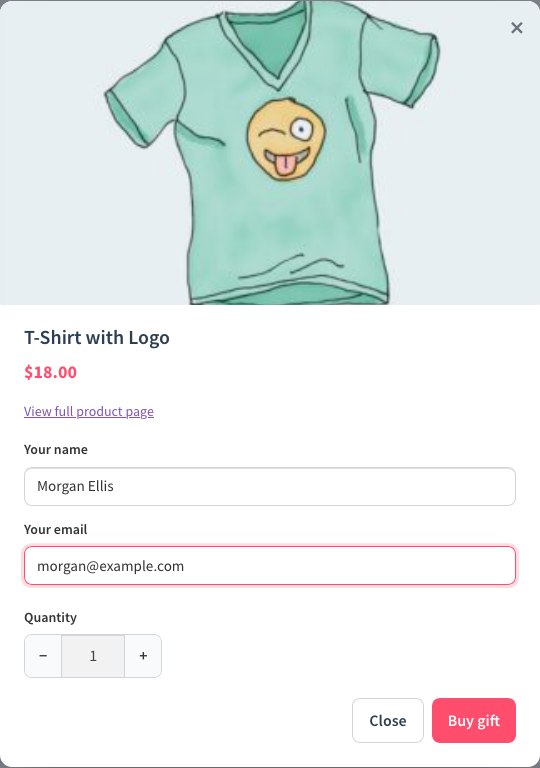
The Buy gift button stays greyed out until both fields are filled in and the email looks valid. By default, the guest goes straight to the cart page after adding a gift. You can change this with the Redirect to cart after adding a gift setting (see Step 3). If it’s turned off, the guest stays on the registry page and sees Product added to cart successfully. in the window.
The Details and Buy gift labels are the defaults. If you’ve changed them in the registry landing page appearance settings, or switched to icon-only buttons, your guests see your version instead.
Step 2: Check the registry details in the cart and checkout
Each registry gift in the cart shows three details under the product name. They appear on both the cart page and the checkout page. On the WooCommerce cart and checkout blocks the details show on one line, separated by slashes. On a classic cart they show on separate lines.
| Detail | What it shows |
|---|---|
| Gift Registry | Always Yes. Marks the item as a registry gift. |
| Registry Code | The registry’s short code. It’s the same code at the end of the registry’s public link, so the guest can confirm they’re buying for the right registry. |
| Buyer Name | The name the guest typed into Your name. |
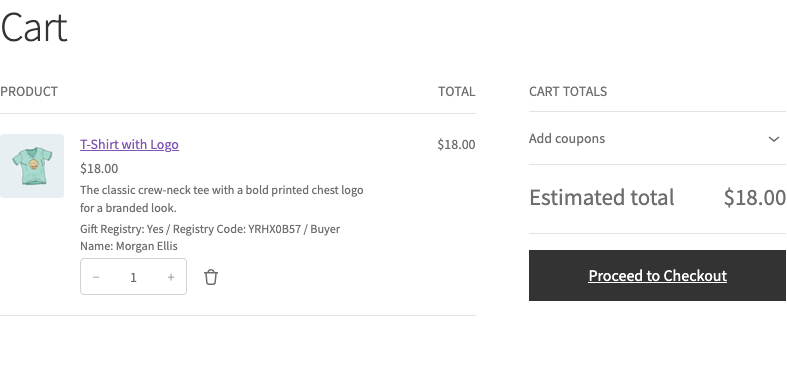
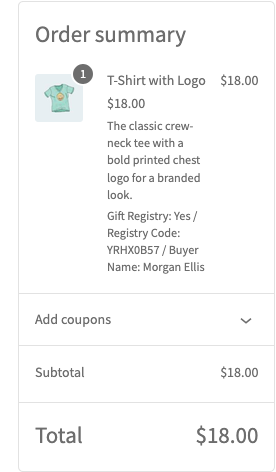
The guest’s email is saved with the item too, but it isn’t shown in the cart. The registry owner uses it later to send a thank-you note.
If the guest adds the same gift again with the same name and email, the quantity on the existing line goes up. A different name or email creates a separate line, so each buyer gets their own credit.
Step 3: Choose what happens after a guest adds a gift (optional)
- Go to SaveTo Wishlist → Settings.
- Open the Gift Registry tab, then General.
- Under Cart Behavior, turn Redirect to cart after adding a gift on or off. It’s on by default.
- Save your changes.
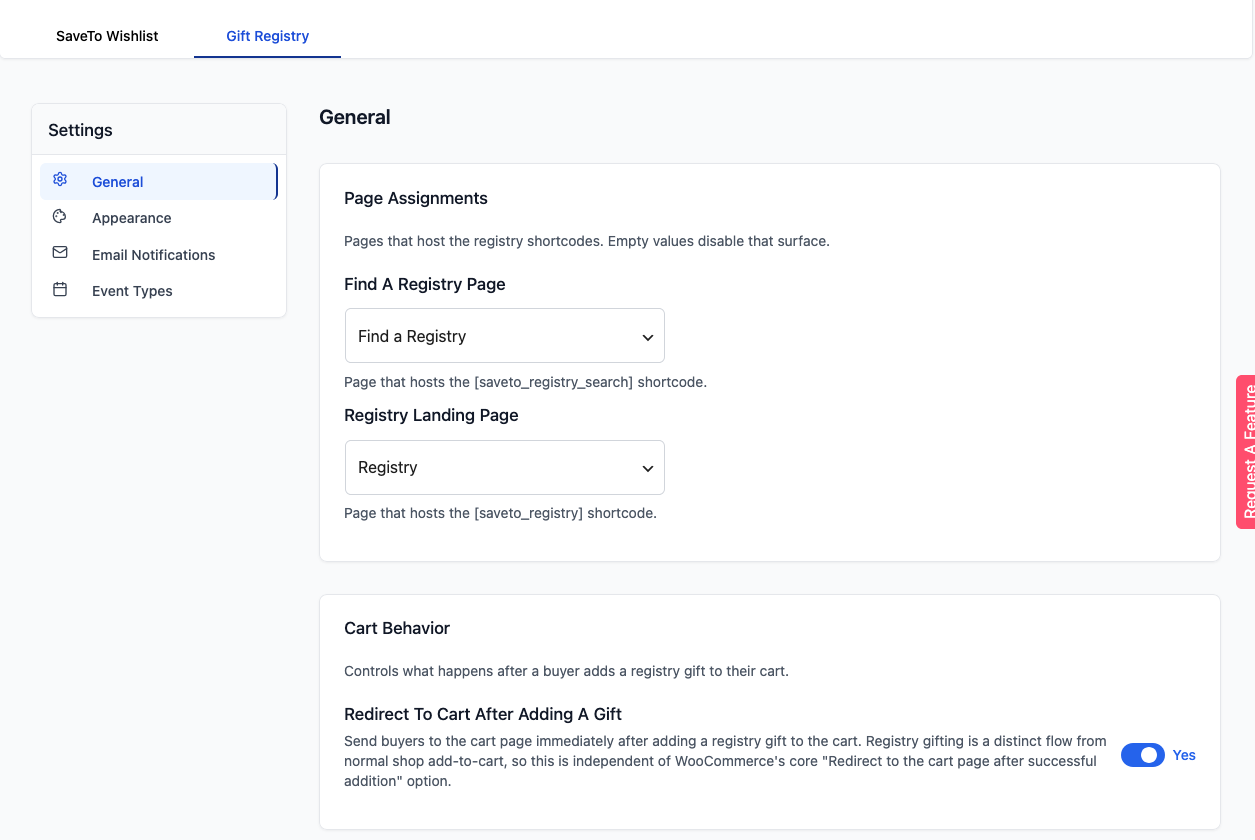
This setting only affects registry gifts. It works separately from WooCommerce’s own “Redirect to the cart page after successful addition” option, which still controls your normal shop buttons.
Step 4: Match a registry gift to its order
As the registry owner
- Go to My account and open the Gift Registries tab.
- Find the registry and click Manage.
- Check the Order column for each gift.
Store admins and shop managers see the order number as a link to that order in your store admin. Other registry owners see it as plain text. For more on this screen, see How to view gift purchases and send thank-you notes.
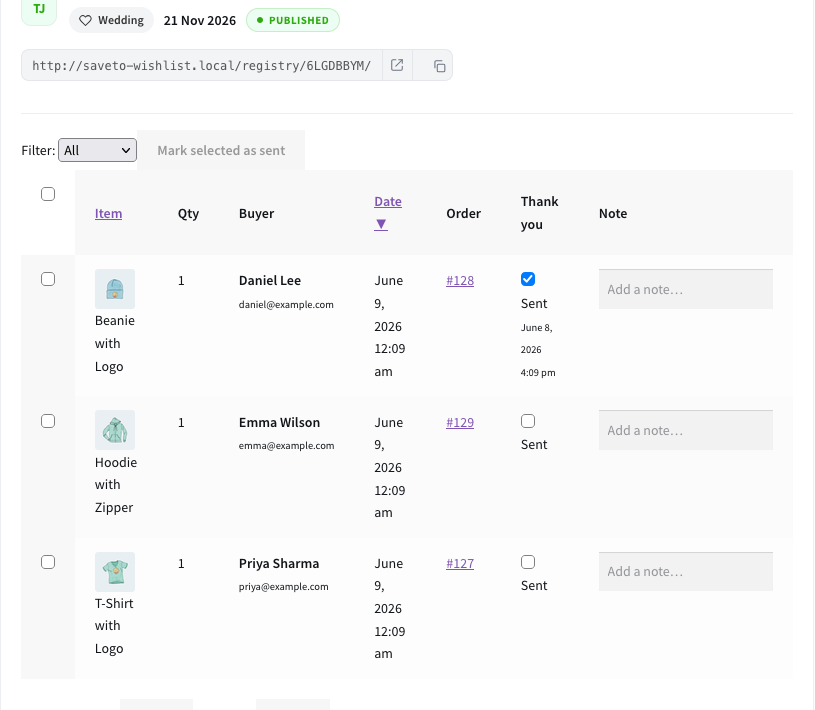
As a store admin
To see which registry an order belongs to:
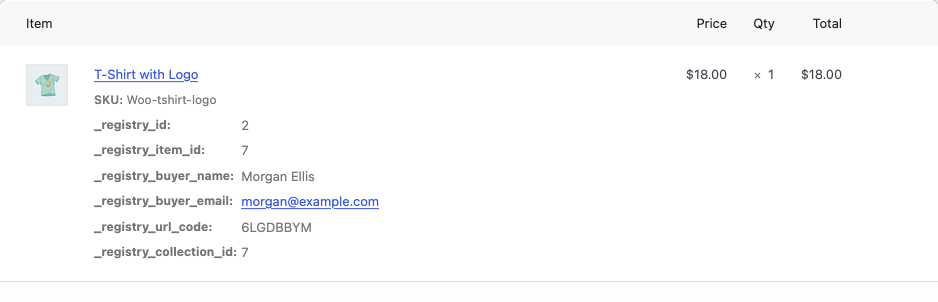
- Go to WooCommerce → Orders and open the order.
- Under the gift, read the
_registry_url_coderow. It matches the code at the end of the registry’s public link.
To check how many of each gift have been bought:
- Go to SaveTo Wishlist → Registries.
- Click View Details next to the registry.
- Check the Products list to see how many of each gift have been bought.
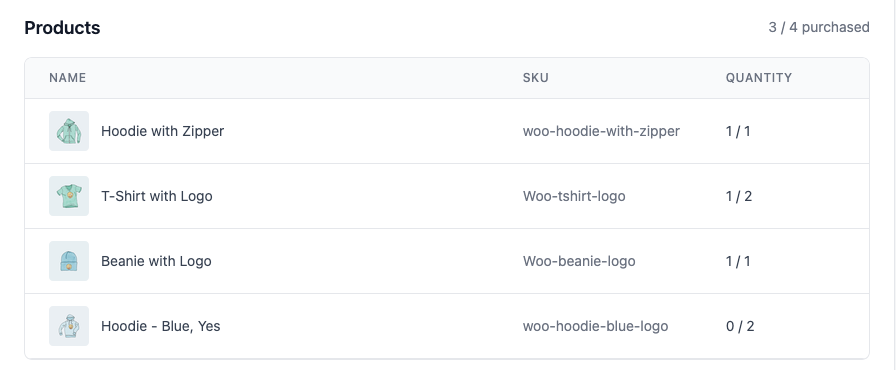
This admin screen shows purchased counts, not order numbers. To find the order for a gift, use the registry owner’s purchase list above, which links each gift to its order. For more on this screen, see How to manage gift registries as a store admin.
What’s saved with the order
When the guest checks out, the registry details move from the cart to the order. Each registry gift’s line on the order keeps the registry ID, the registry item ID, the buyer’s name and email, the registry code, and the collection ID. These details stay with the order even if the registry is deleted later.
Customers don’t see these details. WooCommerce hides them on the customer’s order page and in order emails. You see them as a store admin, on the order edit screen, under the item. They show with these raw names: _registry_id, _registry_item_id, _registry_buyer_name, _registry_buyer_email, _registry_url_code (the registry code), and _registry_collection_id.
The registry counts the gift as purchased once the order is paid. That’s when it moves to Processing or Completed (or any other status your store treats as paid). Adding a gift to the cart doesn’t count it as purchased. Neither does placing an order that’s still waiting for payment.
Troubleshooting
The guest sees “Only 2 remaining for this registry item.”
The quantity they chose, plus any of that gift already in their cart, is more than the registry still needs. Ask them to lower the quantity. The number in the message is how many more they can add.
The guest sees “This registry is no longer accepting purchases.”
The registry has been archived or deleted. Archived registries don’t show an add-to-cart button, so guests usually only see this on a page that was open before the change. If the registry should still take gifts, unarchive it.
The guest sees “Please provide your name and a valid email address to add this gift registry item to your cart.”
The name or email was missing, or the email wasn’t in a valid format. Ask them to fill in both fields again.
A registry gift in the cart has no Gift Registry detail
The product was added from the regular shop or product page, not from the registry page. Remove it from the cart and add it again with the registry’s Details button.
A customer asks where the registry code is on their order
Customers don’t see it. WooCommerce hides the registry details on the customer’s order page and in order emails. You can see them on the order edit screen, under the item, in the _registry_url_code row (see Step 4).
Frequently asked questions
Does adding a gift to the cart reserve it?
No. The registry only counts a gift as purchased once the order is paid. Until then, another guest can still add the same gift.
Can a guest buy more than the registry asks for?
No. The cart blocks any quantity over what’s still needed for that gift.
Does the buyer’s email show at checkout?
No. Only Buyer Name appears in the cart and at checkout. The email is saved with the order for thank-you notes.
What happens to the registry if the order is refunded or cancelled?
The purchase is voided and the gift becomes available again. Partial refunds lower the purchased quantity. See How to view gift purchases and send thank-you notes for details.
Need help?
- Premium users: Open a support ticket
- Free users: Visit our community forum