
Got a customer planning a wedding, baby shower, or birthday? They can turn one of their wishlists into a public gift registry that friends and family buy from, with no duplicate gifts and no guesswork. This guide shows you (or your customers) how to convert a wishlist into a registry, add the event details, and share the link. It uses SaveTo Wishlist Registry.
Prerequisites
- SaveTo Wishlist Lite installed and active. The Registry extension runs on top of it.
- The SaveTo Wishlist Registry extension installed and active (see Getting started with SaveTo Wishlist Registry).
- You’re signed in and viewing a wishlist you own.
Step 1: Open the Convert to Registry window
- Go to your wishlist page and find the wishlist you want to convert.
- Click the Convert to Registry icon (the gift box) on that wishlist.
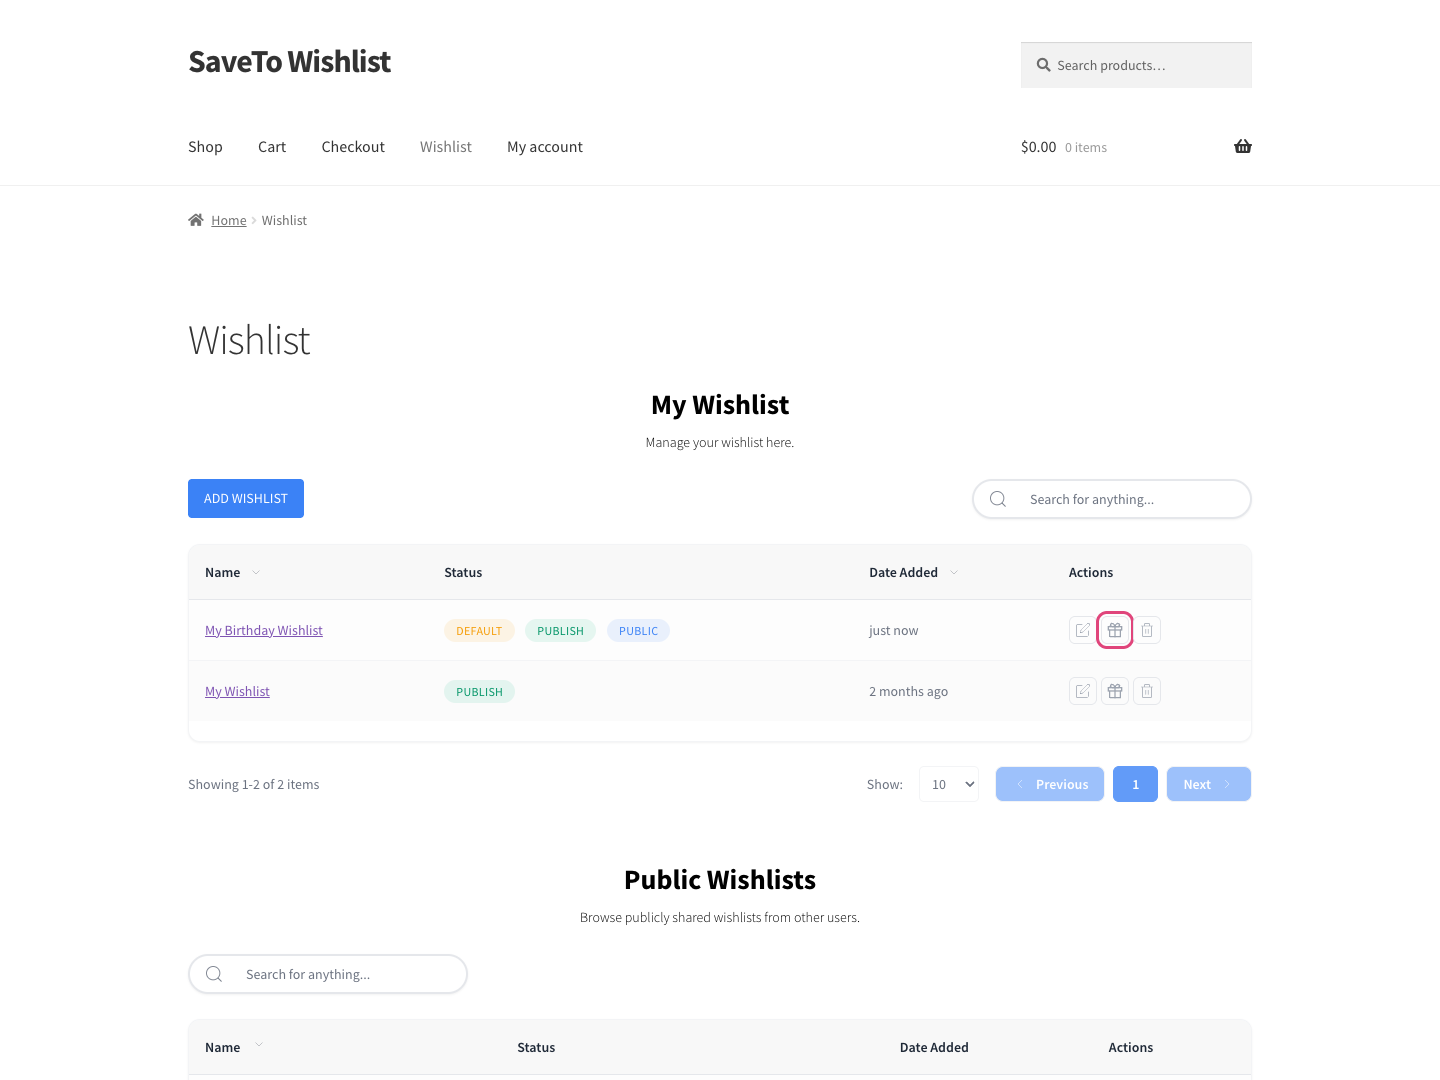
The gift-box icon only appears on wishlists you own that aren’t registries yet. Once a wishlist becomes a registry, the same spot shows a View Registry link instead.
Step 2: Add your event details
The Convert to Registry window opens. Fill in the event details:
- Choose an Event Type (such as Wedding or Baby Shower).
- Pick an Event Date.
- Enter Your Name.
- (Optional) Add a Co-Registrant name for a partner or second host.
- (Optional) Write a Message to Guests.
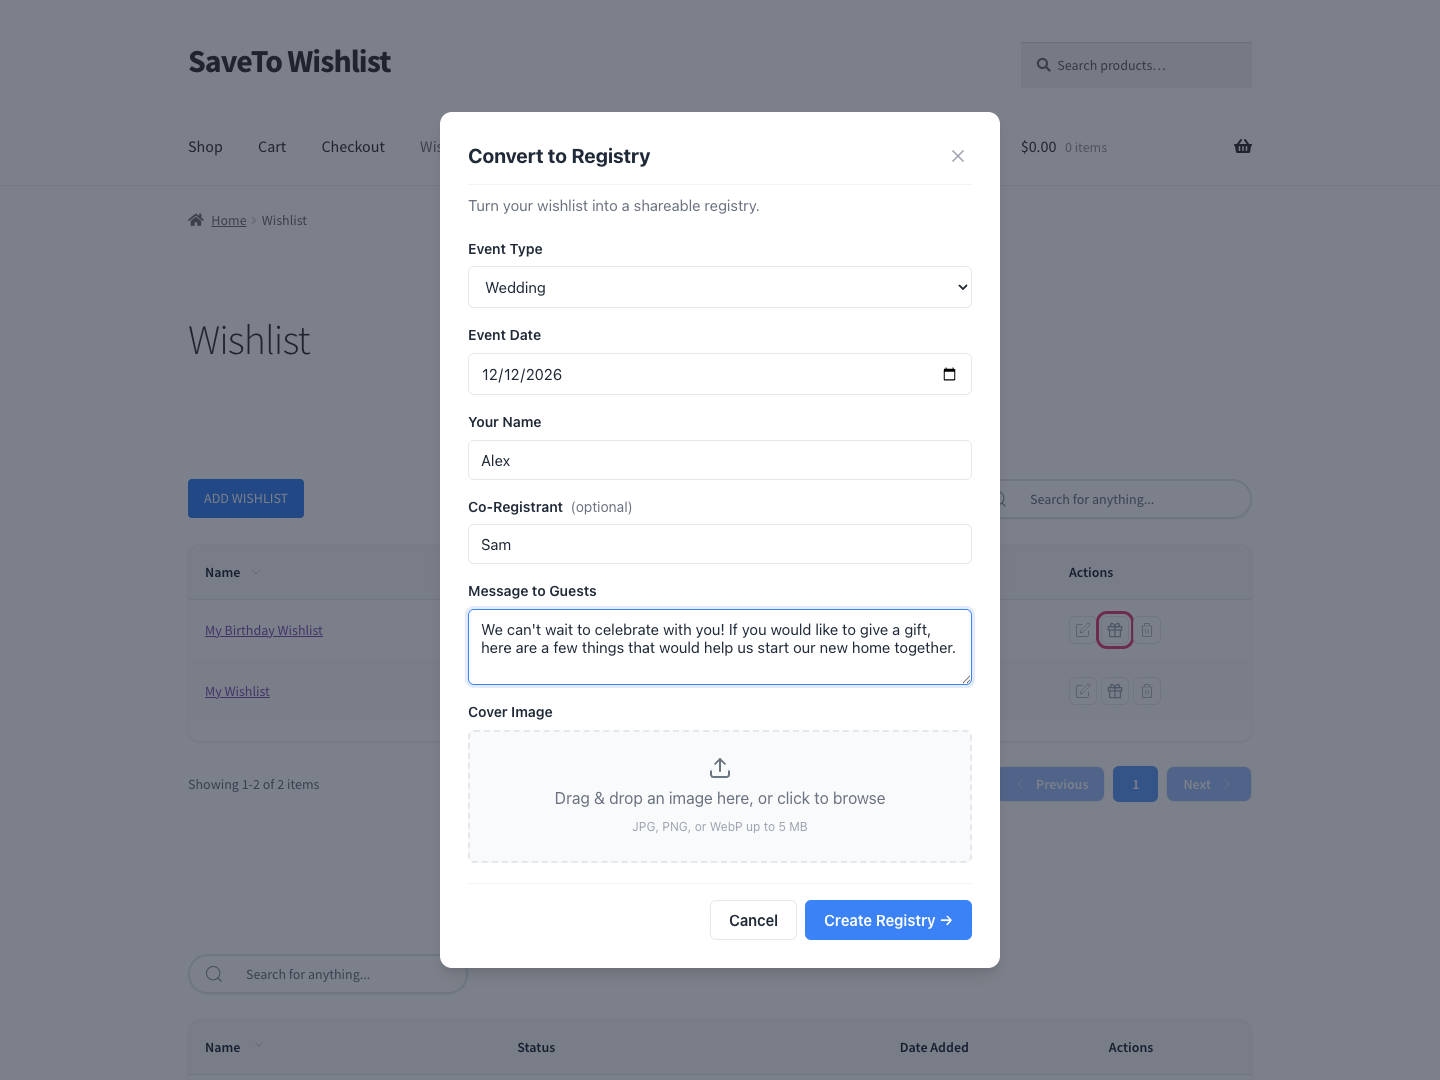
Event Type, Event Date, and Your Name are required. The event date can’t be in the past, and names are limited to 80 characters. The Create Registry button stays greyed out until those three fields are filled.
Step 3: Add a cover image (optional)
- Under Cover Image, drag an image onto the drop zone, or click it to browse your computer.
- Choose a JPG, PNG, or WebP file up to 5 MB.
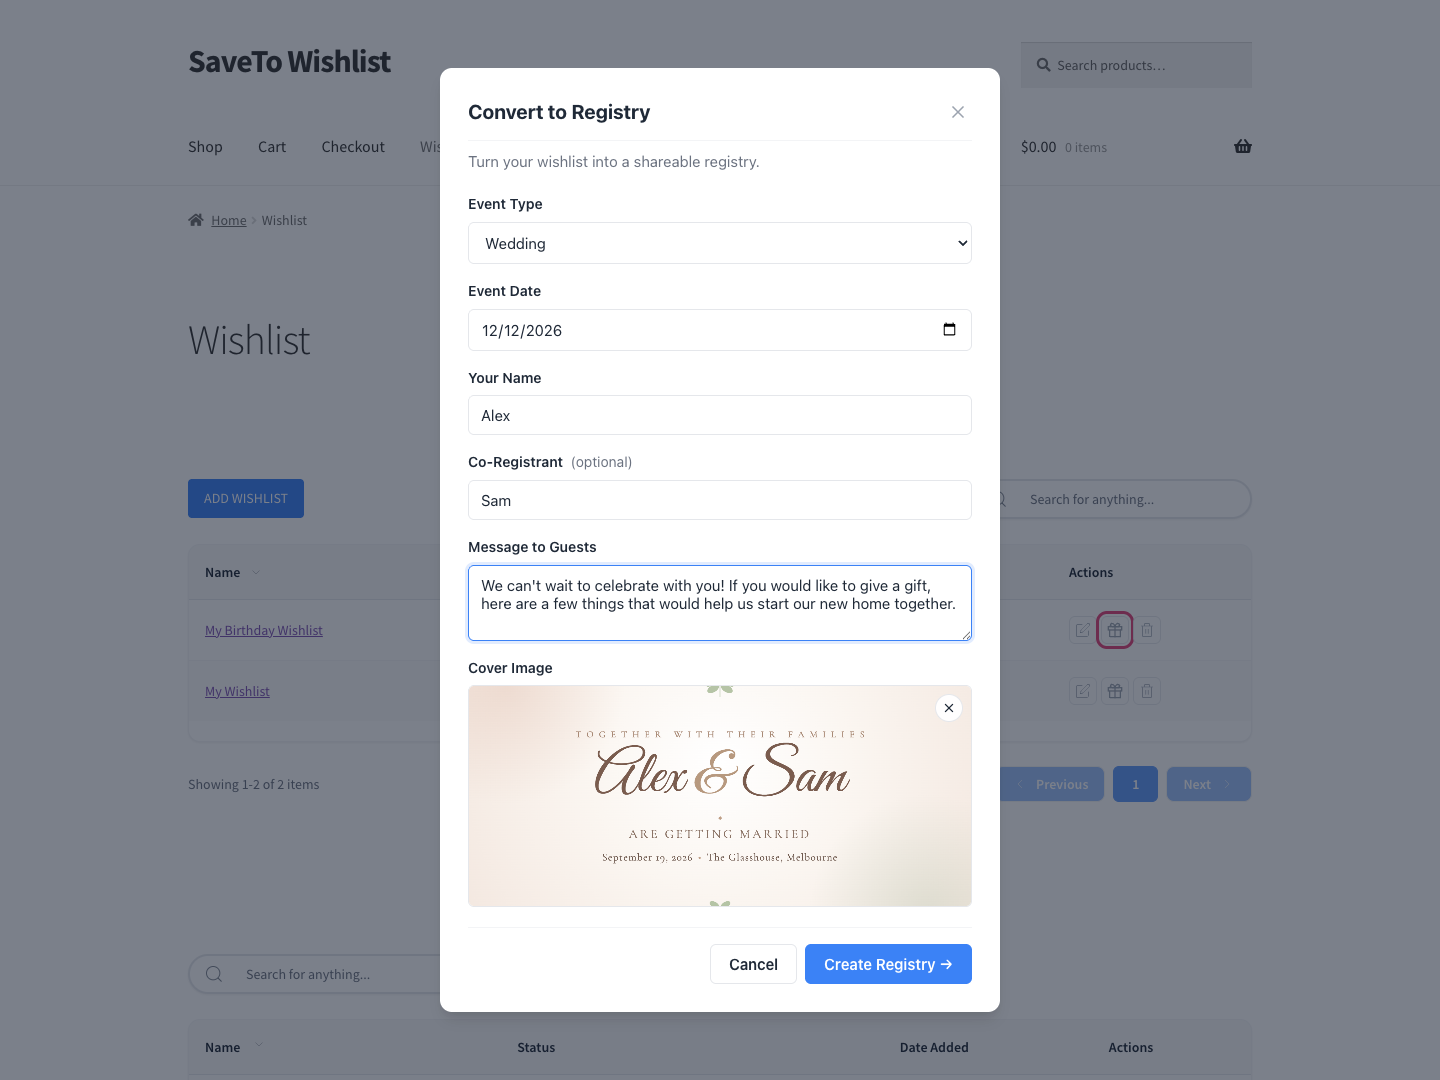
The cover image sits at the top of the public registry page. To swap it, remove the current image with the × button and upload a new one.
Step 4: Create and share the registry
- Click Create Registry →. The new registry’s public page opens in a new browser tab on its own.
- Copy the page link from that tab to share with guests.
If the new tab doesn’t open, a popup blocker likely stopped it. That’s fine, the gift-box icon on the wishlist now works as a View Registry link, so click it to open the registry page.
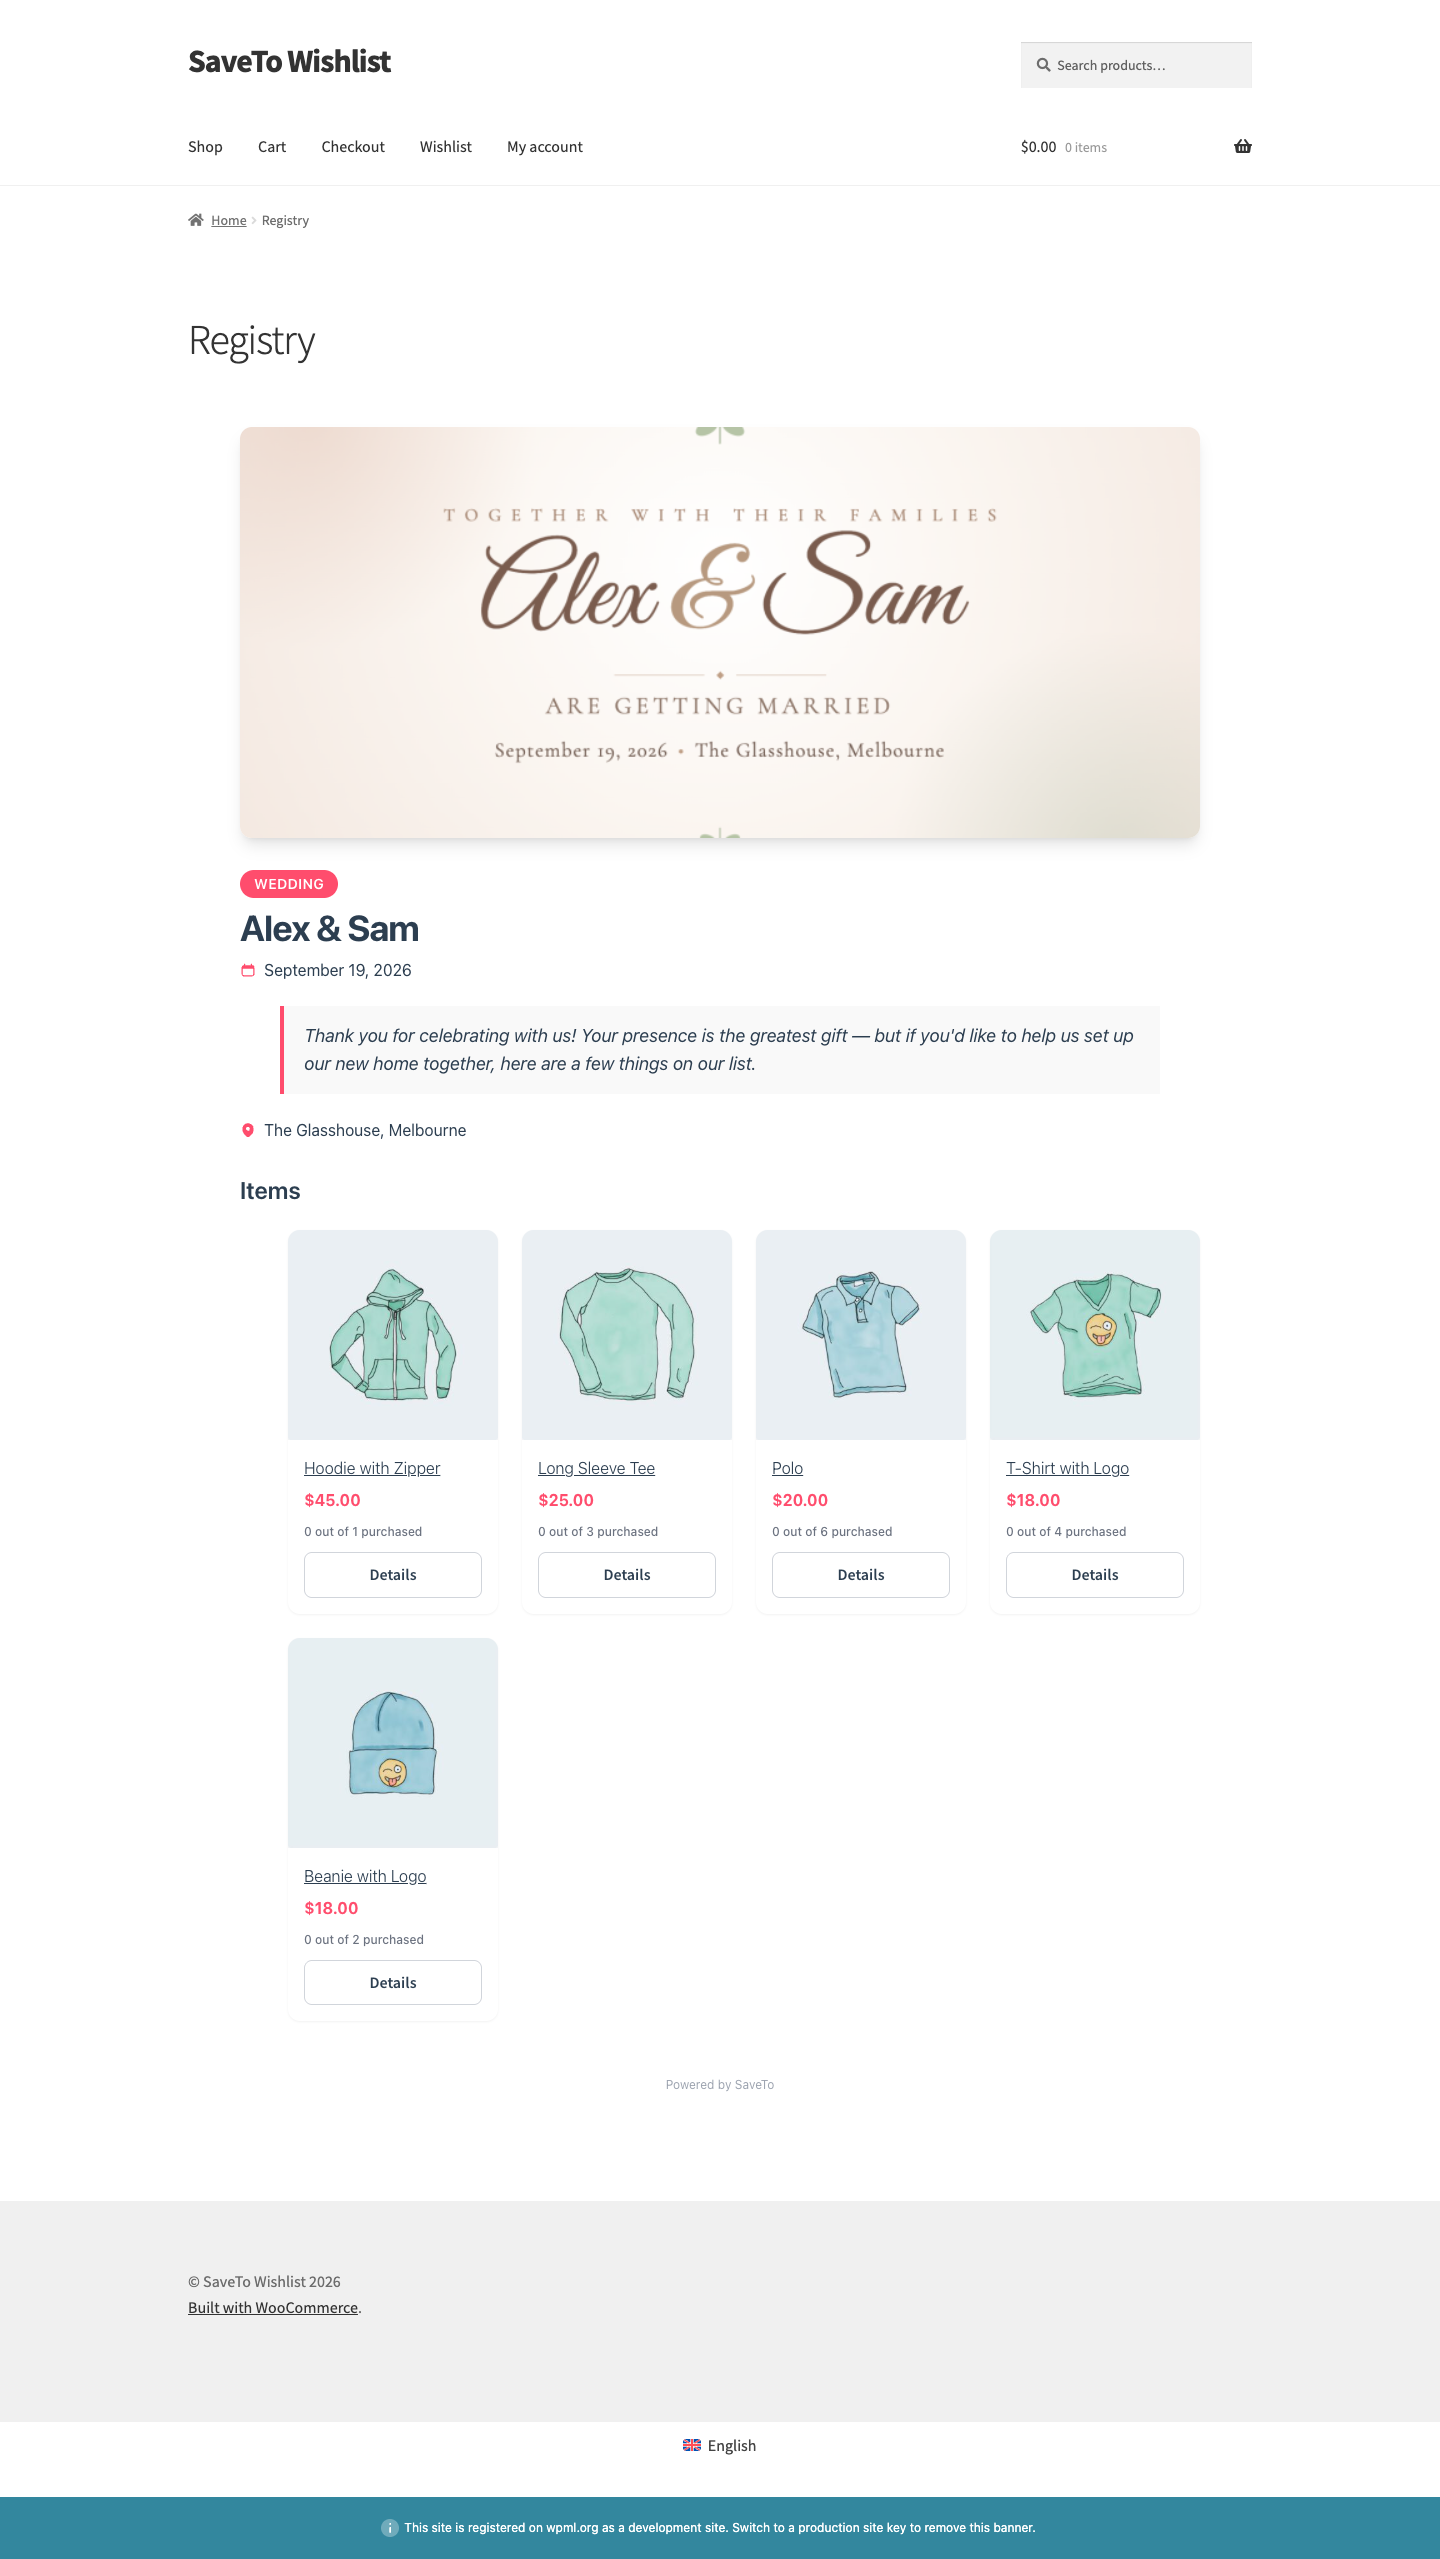
The wishlist becomes a public registry, and its gift-box icon changes to View Registry. Anyone with the link can view the registry without an account. Guests enter their name and email when buying a gift, and whether checkout itself needs an account depends on your store’s WooCommerce guest checkout setting. While you’re signed in, you can edit the event details, message, location, cover image, and item quantities right on the registry page, and track who bought what from the Gift Registries tab under your account.
What guests see on the registry page
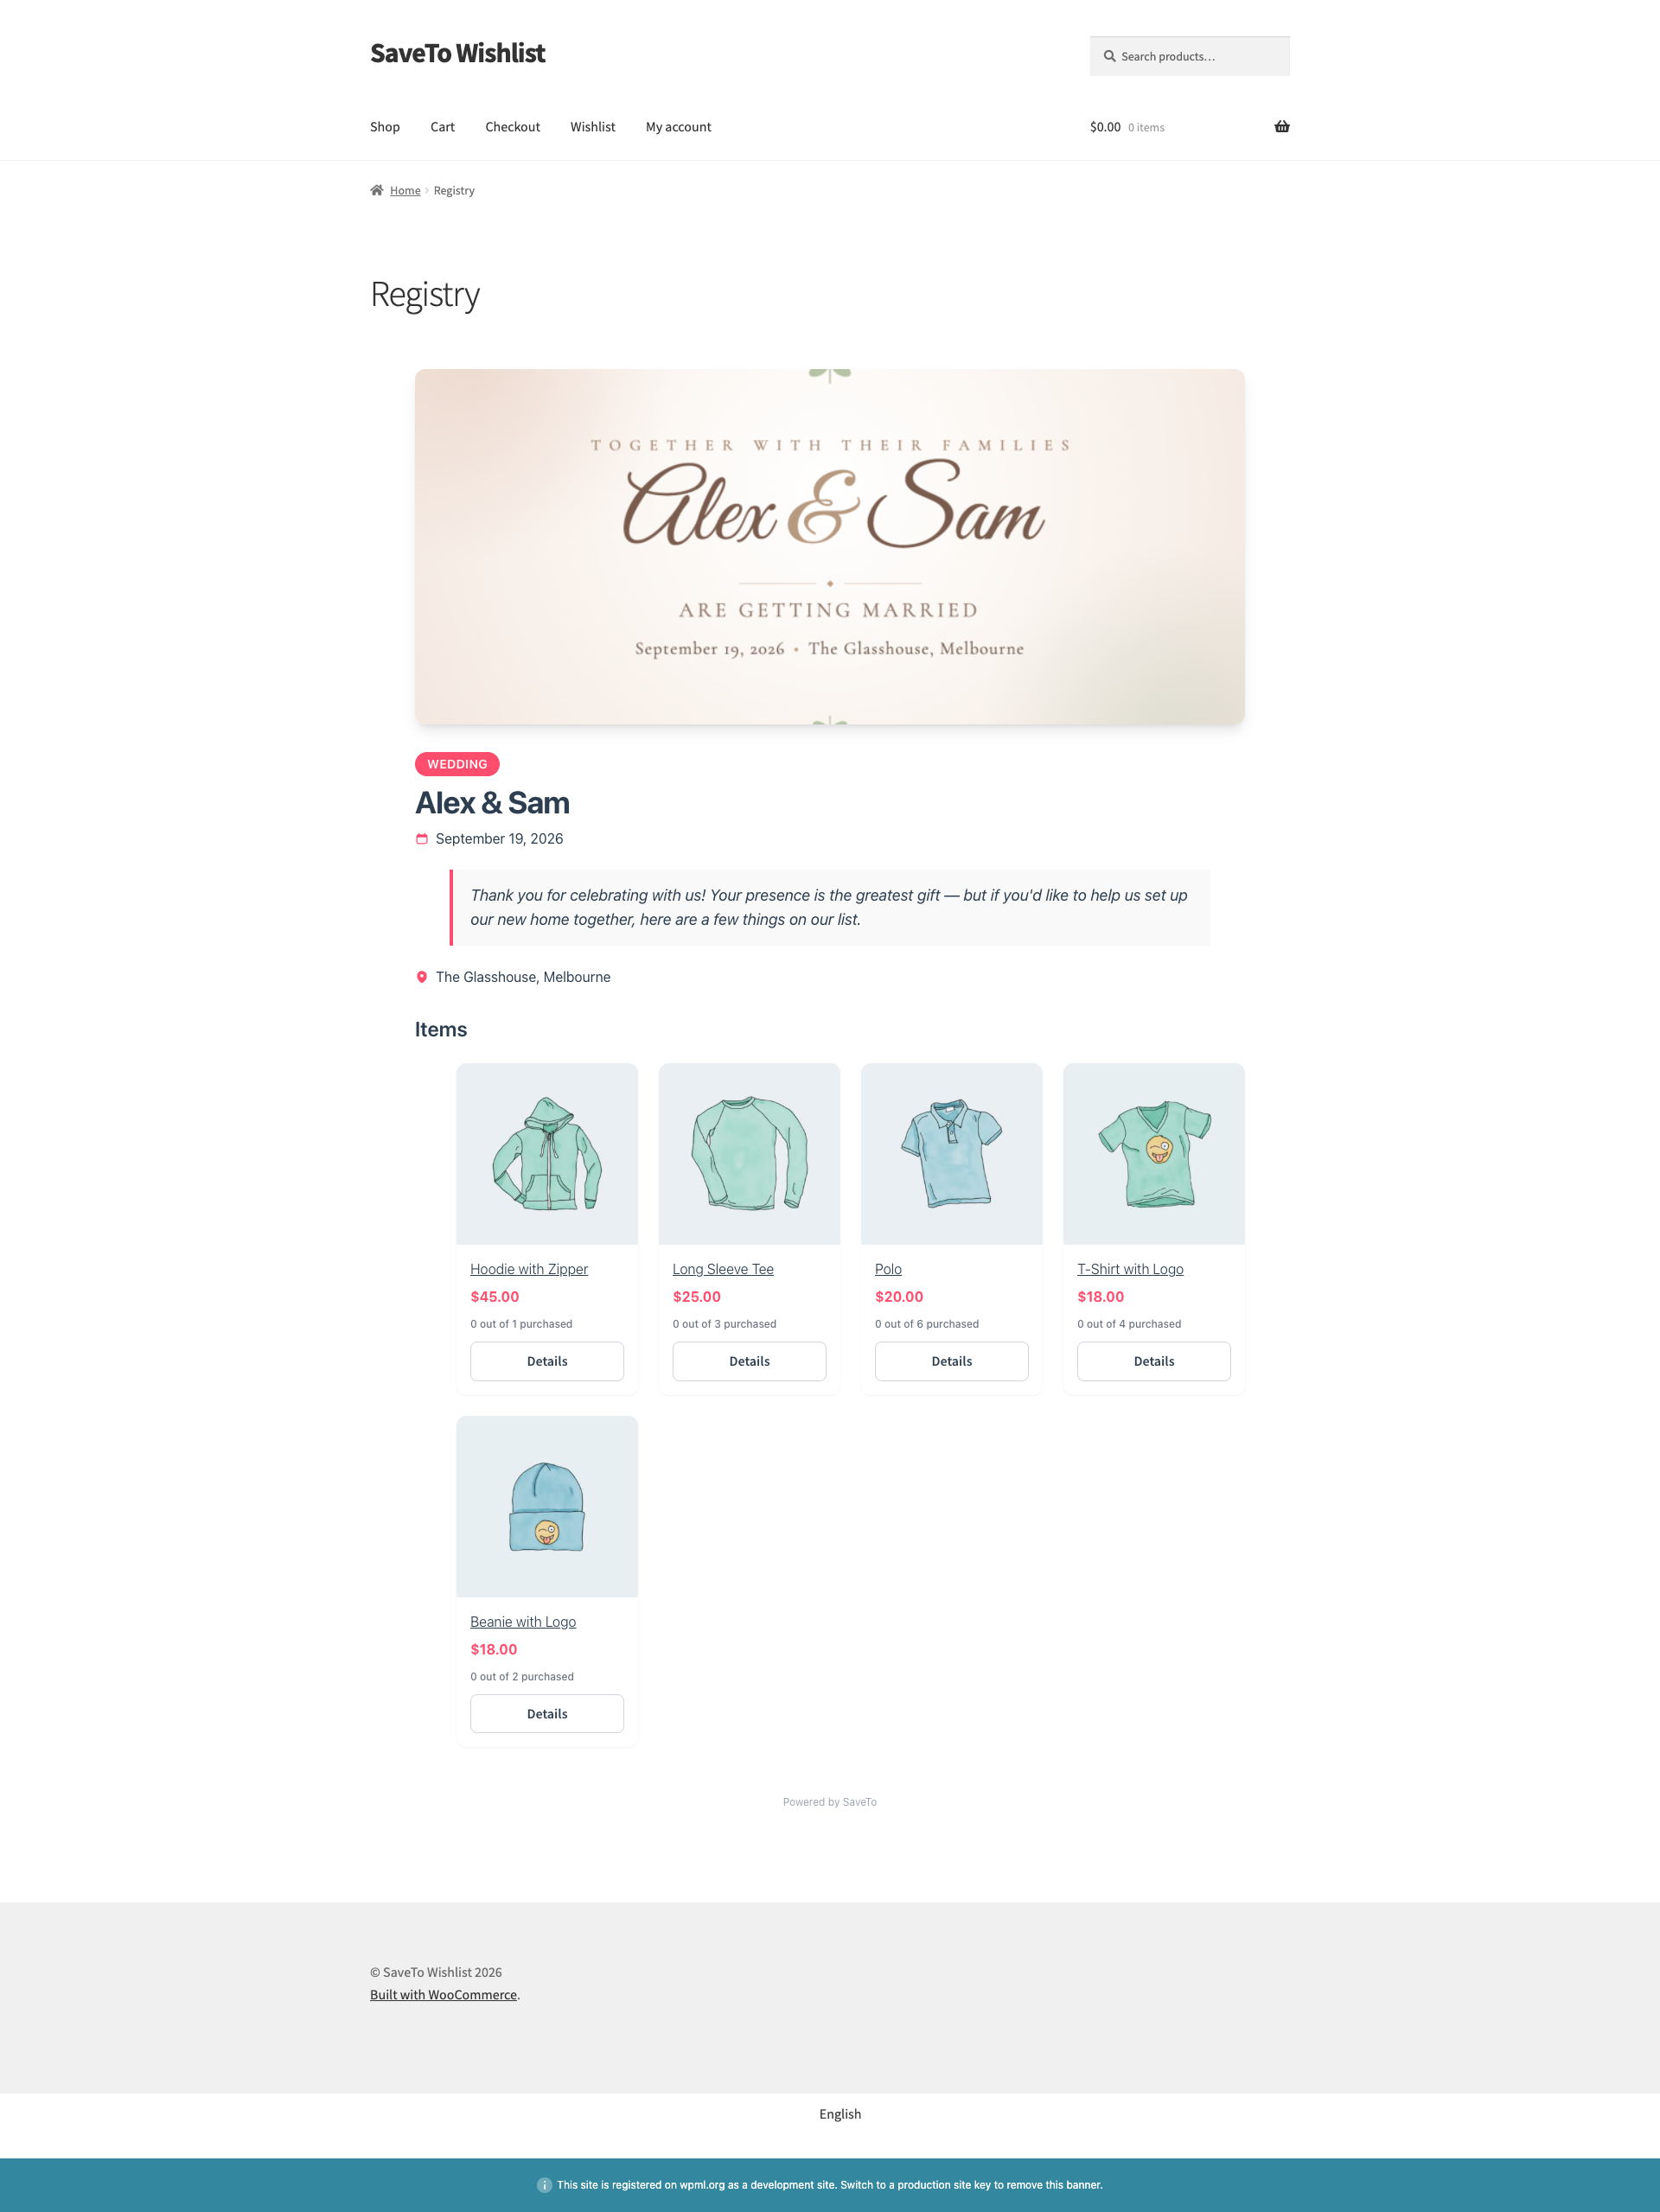
The public page opens with the cover image across the top, followed by the event type, the registrant names, and the event date. If you wrote a message to guests, it appears below the names, along with the event location if you added one.
Below that sits the gift grid. Each gift shows its photo, name, price, a running count such as 2 out of 5 purchased, and a Details button.
Clicking Details opens a quick view of the gift with its photo, price, and a link to the full product page. Guests fill in Your name and Your email, choose a quantity, and click Buy gift to add the gift to their cart. By default the guest is then taken straight to the cart page. You can turn this off with the Redirect to cart after adding a gift switch under SaveTo Wishlist → Settings → Gift Registry → General. Every registry purchase goes through this window, so each gift is matched to the right buyer.
The button label is Buy gift by default and can be changed under SaveTo Wishlist → Settings → Gift Registry → Appearance, in the Buttons section under the Primary Button Label field.
How gift quantities update
Each gift on a registry has a requested quantity, and its card shows a running count, such as 2 out of 5 purchased, so guests can see what’s still needed.
When a guest’s order goes through, the purchased amount is recorded against that gift and the available count goes down. If someone tries to add more than what’s left, the store blocks it and shows how many remain. Once a gift is fully claimed, its count shows the full amount purchased, for example 5 out of 5 purchased. If an order is later refunded or cancelled, those units are released back to the registry.
Troubleshooting
The Convert to Registry icon isn’t showing
Make sure the registry extension is active, you’re viewing your own wishlist, and the wishlist hasn’t already been converted. If it has, you’ll see a View Registry link in the same spot.
It says “This wishlist has already been converted to a registry”
Each wishlist can become one registry. Use the View Registry link to open the existing one instead of converting again.
The Create Registry button is greyed out
Fill in Event Type, Event Date, and Your Name. The button enables once all three are filled. It also stays disabled while a cover image is still uploading, so wait for the upload to finish.
Frequently asked questions
Can I turn more than one wishlist into a registry?
Yes. Each wishlist becomes its own registry, with its own event details and public link. The only limit is one registry per wishlist.
Can I change the event details after converting?
Yes. Open your registry page while signed in and use the edit (pencil) icons to change the event details, message, location, cover image, and item quantities. The Gift Registries tab under your account is where you see stats and track who bought what.
Do guests need an account to buy a gift?
Guests can view the registry without an account, and they enter their name and email when buying a gift. Whether checkout itself requires an account depends on your store’s WooCommerce guest checkout setting.
What kind of cover image can I use?
A JPG, PNG, or WebP image up to 5 MB. It appears across the top of the public registry page.
Need help?
- Premium users: submit a support ticket and our team will help you out.
- Free users: post in the WordPress.org support forum.

