A customer asks you to set up their wedding or baby shower registry for them. With SaveTo Wishlist Registry, you can turn any customer’s wishlist into a gift registry from your WordPress admin. This guide shows you how to convert a wishlist, and how to open a registry that a wishlist already has.
Prerequisites
- SaveTo Wishlist Lite and SaveTo Wishlist Registry installed and active.
- An active Registry license. Without it, the Convert to Registry button doesn’t show. See How to manage your SaveTo Wishlist Registry license.
- A wishlist that belongs to a customer account.
Convert a customer’s wishlist
Open the Convert to Registry window
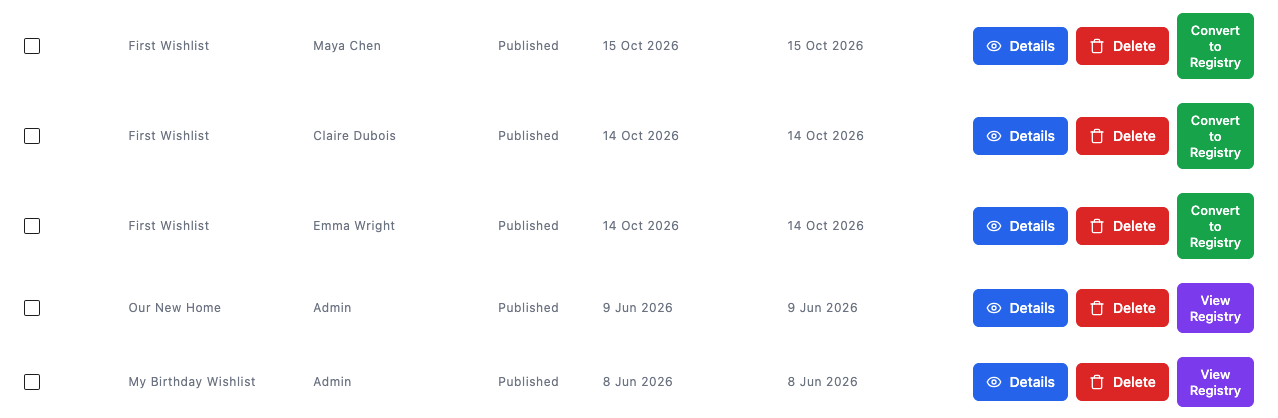
- Go to SaveTo Wishlist > All Wishlists.
- Find the wishlist you want to convert.
- Click Convert to Registry in its row.
 Fill in the event details
The Convert to Registry window opens. It shows the same subtitle customers see, “Turn your wishlist into a shareable registry.”, even when you open it for a customer.
- Choose the Event Type.
- Pick the Event Date. Choose today or a later date.
- Enter the customer’s name in Your Name.
- (Optional) Fill in Co-Registrant, Message to Guests, and Cover Image.
- Click Create Registry →.
Create Registry → stays greyed out until Event Type, Event Date, and Your Name are filled in. Your Name is the name guests see on the registry, so enter the customer’s name, not yours.
The new registry page opens in a new browser tab. Back on All Wishlists, the row now shows View Registry instead of Convert to Registry.
Open the registry for a converted wishlist
- Go to SaveTo Wishlist > All Wishlists.
- Click View Registry in the wishlist’s row.
The public registry page opens in a new tab. Because you’re a store admin, you see the owner’s edit controls on the page, so you can add or adjust items for the customer. See How to add and manage items in a gift registry.
How the admin conversion differs from a customer conversion
The customer owns the registry. The registry belongs to the wishlist’s owner, not to you. It shows in their My Account > Gift Registries page, and they can manage it like any registry they created themselves.
The steps are the same. The window uses the same fields as the one customers see. The wishlist items carry over to the registry, and the wishlist itself stays as it is. You can also convert an empty wishlist and add items later. For the customer side of this, see How to convert a wishlist into a gift registry.
The registry shows in your list. You can find every registry, including the ones you create for customers, under SaveTo Wishlist > Registries. See How to manage gift registries as a store admin.
Troubleshooting
The Convert to Registry button doesn’t show
Check that your Registry license is active under SaveTo Wishlist > License > Gift Registry. If the row shows View Registry, the wishlist already has a registry.
I see “This wishlist has already been converted to a registry.”
Each wishlist can have one registry. Click View Registry in its row to open the existing one.
I see “Wishlist not found.”
Check that the wishlist belongs to a customer account. The Convert to Registry button also shows on guest wishlists, but a wishlist that is not linked to an account can’t be converted. You also see this message if the wishlist was deleted.
I see “Event date cannot be in the past.”
Pick today or a later date in Event Date.
The registry page didn’t open in a new tab
Your browser may have blocked the new tab. The registry is still created. Click View Registry in the wishlist’s row to open it.
Frequently asked questions
Who owns a registry that I create from the admin?
The customer who owns the wishlist. The registry shows in their My Account, not in yours.
Can I edit the registry after I create it?
Yes. Click View Registry to open it. As a store admin, you see the edit controls on every registry.
What’s next
- How to manage gift registries as a store admin
- How to add and manage items in a gift registry
- How to convert a wishlist into a gift registry
- How to manage your SaveTo Wishlist Registry license
Need help?
If you have a question or run into any issues, we’re here to help.
- Premium users: Open a support ticket
- Free users: Visit our community forum