
 Recensito da
 Altri dieci plugin e temi ora funzionano con SaveTo Wishlist. Le nuove integrazioni di SaveTo Wishlist Pro v1.0.3 si concentrano sull'invio dei dati della tua wishlist a piattaforme esterne. Nel frattempo, le ultime integrazioni del plugin gratuito assicurano che i pulsanti della tua wishlist vengano visualizzati correttamente e che i tuoi dati vengano indirizzati ai tuoi strumenti di marketing. Questo post li raccoglie in un unico posto.
La maggior parte di queste integrazioni non richiede alcuna configurazione. Alcune necessitano di un'impostazione e le connessioni di SaveTo Wishlist Pro richiedono un URL da incollare. Nessuna di esse richiede di scrivere codice.
Le note di rilascio raramente dicono la parte più importante: cosa controllare per prima e dove finisce ogni connessione. Inizieremmo dal posizionamento dei pulsanti, perché è lì che i page builder gestiscono il tuo layout.
Tenendo conto di ciò, ecco una spiegazione in linguaggio semplice, inclusi i limiti!
Salta a:
Cosa è stato spedito e in quale release
Tutto ciò che segue è già attivo. Il plugin gratuito è alla versione 1.1.4 e SaveTo Wishlist Pro è alla versione 1.0.3. Aggiornando entrambi otterrai l'intero set.
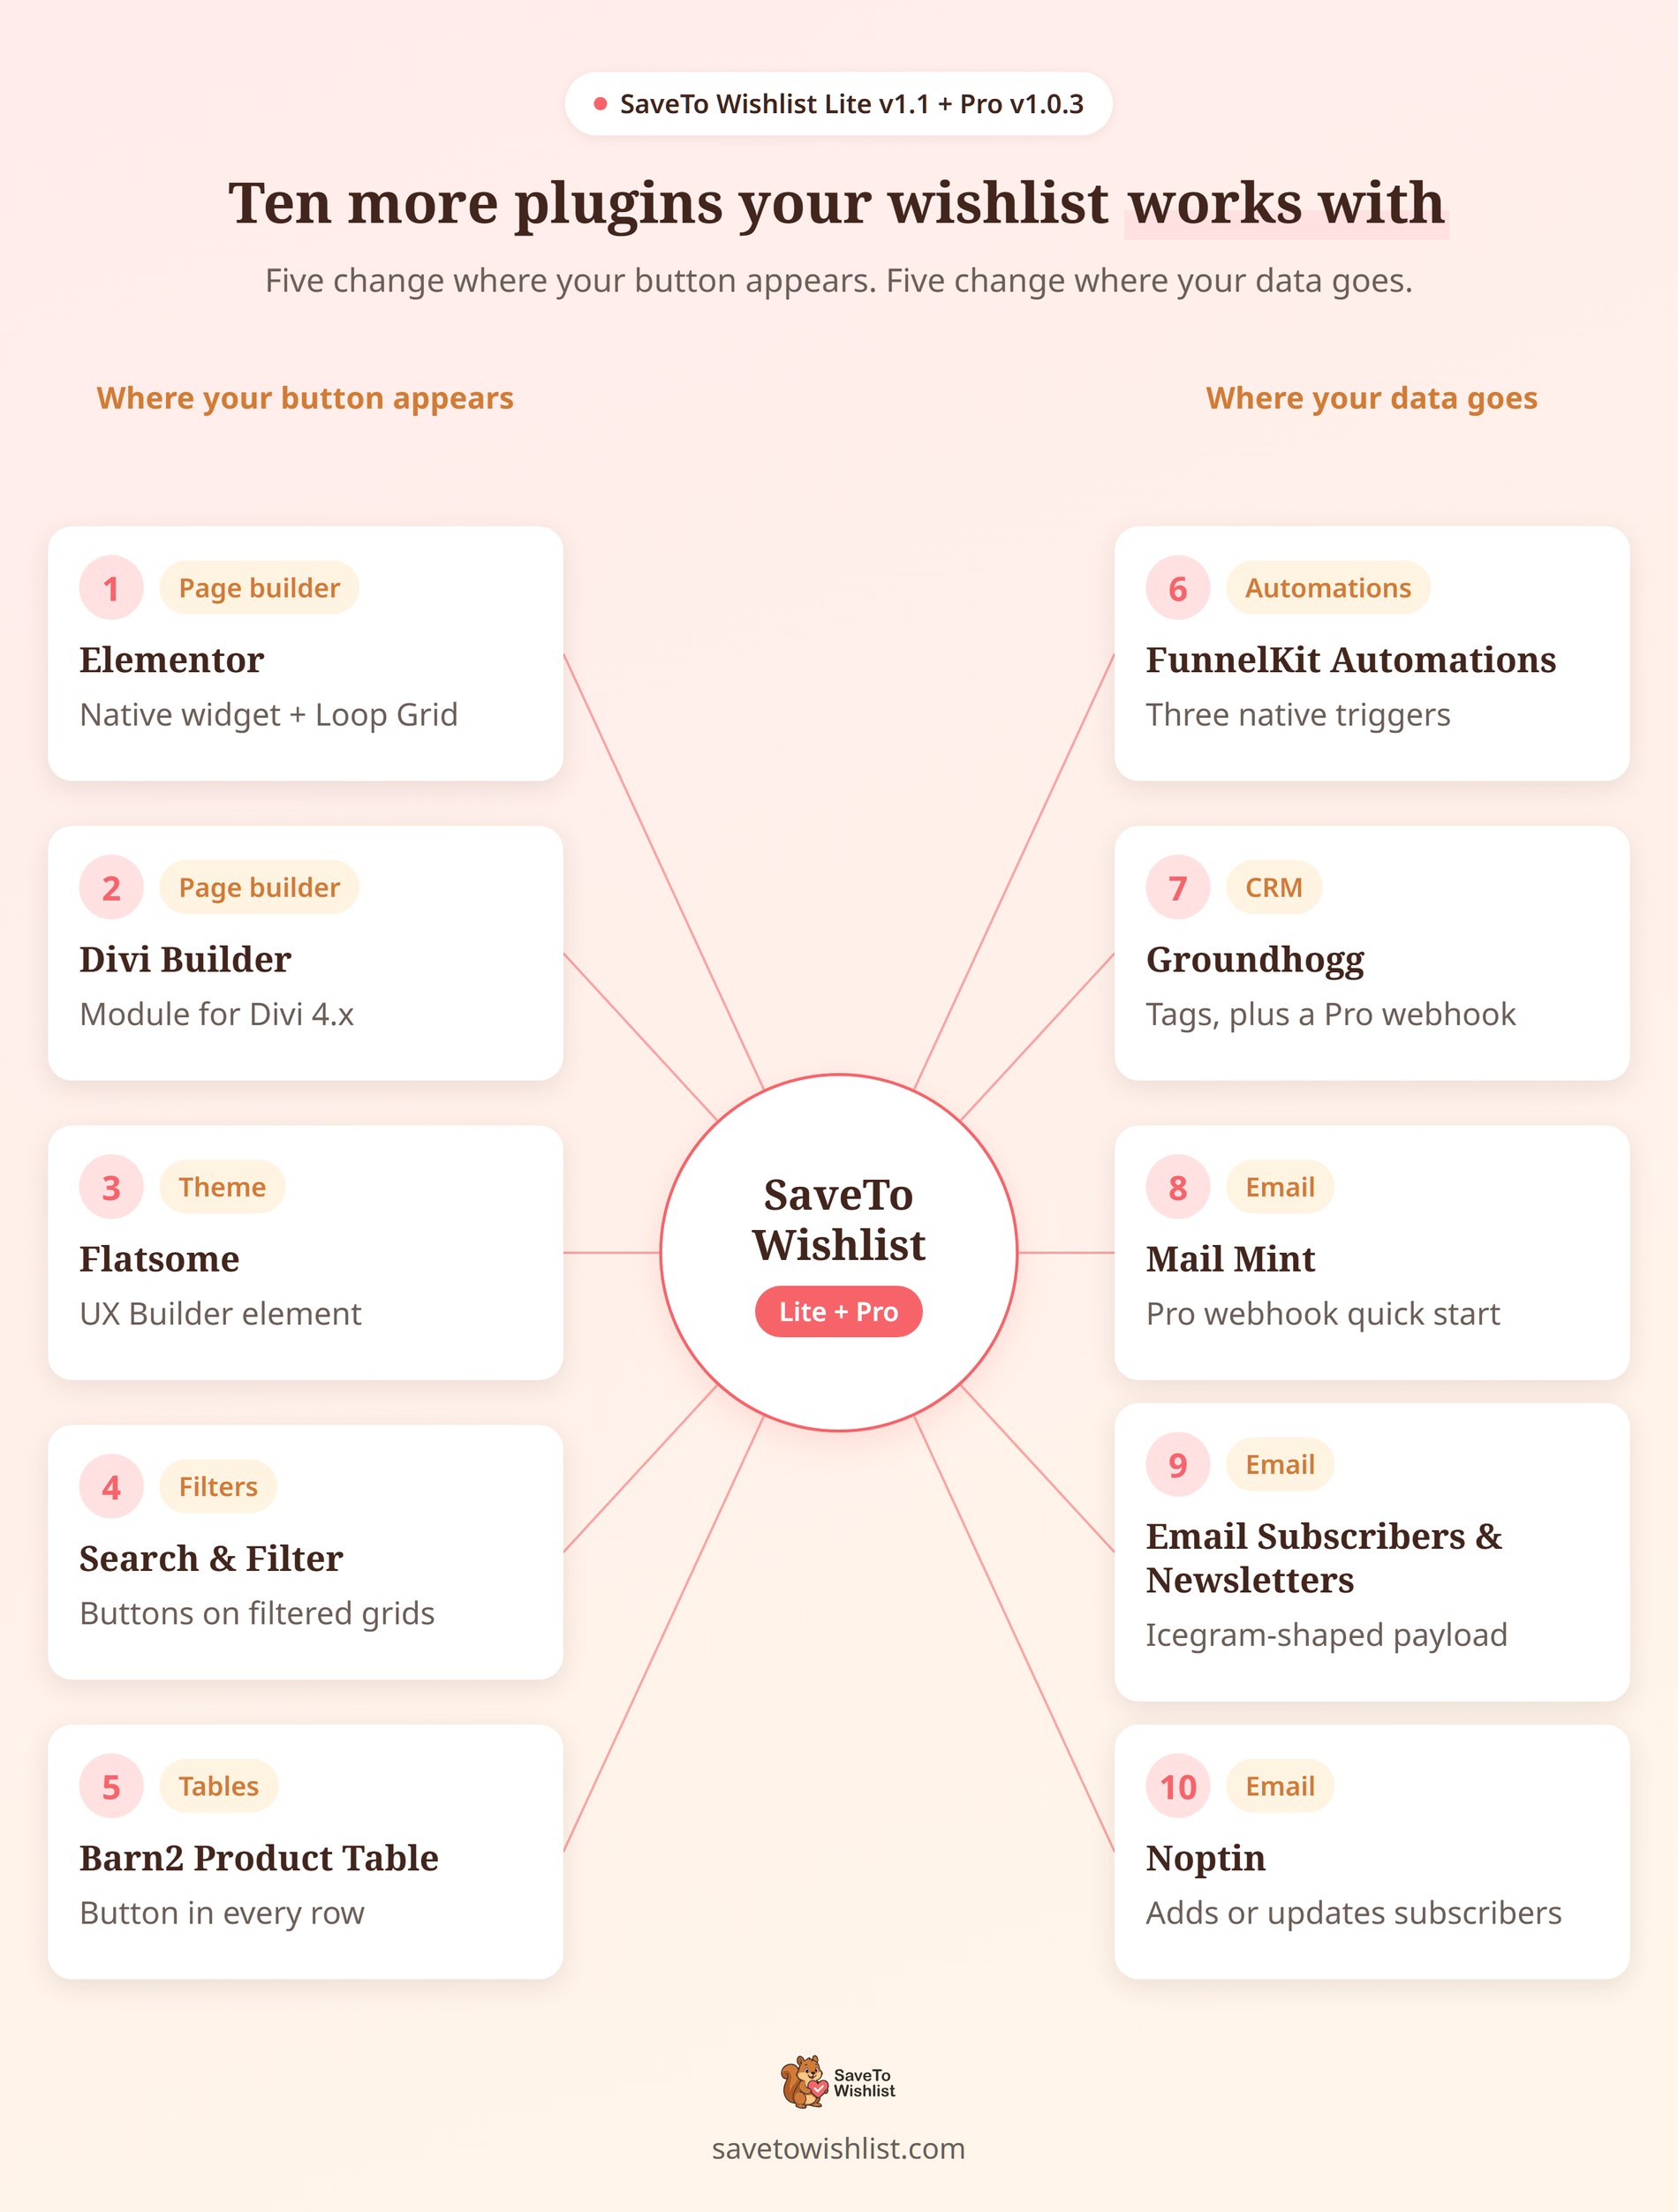
| Integrazione | Spedito in | Cosa ti serve |
|---|---|---|
| Widget Elementor | Gratuito 1.1.3 | Elementor, gratuito o Pro |
| Elementor Pro Loop Grid e Loop Carousel | Gratuito 1.1.2 | Elementor Pro |
| Modulo Divi Builder | Gratuito 1.1.3 | Divi 4.x |
| Elemento UX Builder di Flatsome | Gratuito 1.1.3 | Il tema Flatsome |
| Cerca e filtra | Gratuito 1.1.0 | Cerca e filtra |
| Tabella Prodotti WooCommerce di Barn2 | Gratuito 1.1.0 | Tabella prodotti WooCommerce |
| FunnelKit Automations | Gratuito 1.1.2 | Automazioni FunnelKit, Lite o Pro |
| Tag di Groundhogg | Gratuito 1.1.2 | Groundhogg |
| Guida rapida webhook di Groundhogg | Pro 1.0.3 | Licenza SaveTo Wishlist Pro |
| Guide rapide Mail Mint, Email Subscribers & Newsletters e Noptin | Pro 1.0.3 | Licenza SaveTo Wishlist Pro |
Il plugin gratuito aveva già i suoi bridge per Mail Mint, Email Subscribers & Newsletters e Noptin. Li abbiamo trattati nel precedente annuncio delle integrazioni. Quindi questo post tratta solo di ciò che c'è di nuovo per loro: le integrazioni e le guide rapide di SaveTo Wishlist Pro v1.0.3.
Dove appare il tuo pulsante Wishlist
Quattro di questi cinque esistono per risolvere una comune sfida di progettazione di WordPress. I pulsanti standard della wishlist si basano sugli hook di azione predefiniti di WooCommerce. Quando si utilizza un page builder avanzato per progettare layout personalizzati, tali hook predefiniti vengono naturalmente bypassati. Queste nuove integrazioni assicurano che i pulsanti della wishlist vengano visualizzati perfettamente, indipendentemente da quanto sia personalizzato il design della tua pagina.
1. Elementor e Elementor Pro: un widget Wishlist nativo
Due funzionalità separate vengono rilasciate sotto il nome Elementor, una per ogni versione. Insieme, garantiscono una perfetta compatibilità indipendentemente da come utilizzi Elementor per progettare i layout dei tuoi prodotti.
Come funziona
- Un Widget Nativo: Cerca nel pannello Elementor Save to Wishlist. Si trova sia nella categoria WooCommerce che in quella Generale. Ciò lo mantiene raggiungibile anche su Elementor gratuito, dove i widget di WooCommerce non sono disponibili.
- Supporto Loop Grid e Loop Carousel: Su Elementor Pro, il pulsante si posiziona automaticamente. Ciò copre i widget Loop Grid e Loop Carousel che utilizzano Aggiungi al carrello, senza widget e senza impostazioni.
- I colori sono l'unica sovrascrittura dello stile: il tipo di pulsante si trova nella scheda Contenuto. Allineamento e otto controlli colore si trovano nella scheda Stile. Dimensioni, spaziatura, larghezza del bordo e forma dell'icona provengono ancora dalle impostazioni globali.
- Due Superfici su Tre Richiedono Pro: Il widget funziona su una pagina prodotto singolo creata con Elementor gratuito. I modelli Theme Builder e i modelli di elementi del loop sono entrambi funzionalità di Elementor Pro, quindi l'utilizzo di tali superfici si basa sull'integrazione della wishlist di Elementor Pro.
🚀 Cosa abbiamo visto: Posiziona il widget su un modello di prodotto singolo o Theme Builder. Il plugin disabilita il proprio pulsante della pagina prodotto, quindi ne ottieni uno. Se posizioni un widget all'interno di un modello di elemento del loop personalizzato, potresti vedere sia il tuo pulsante personalizzato che il pulsante predefinito di WooCommerce. Per mantenere il tuo layout immacolato ed evitare duplicazioni, vai semplicemente su SaveTo Wishlist → Impostazioni e imposta il posizionamento del negozio su “Non mostrare”. Anche le schede correlate e upsell utilizzano il posizionamento del negozio, quindi aspettati un pulsante anche lì.
Impostazioni e configurazione
- Aggiorna il plugin gratuito alla versione 1.1.3 o successiva, quindi modifica un modello di prodotto in Elementor.
- Cerca nel pannello Salva nella Wishlist e trascinalo dove desideri il pulsante.
- Scegli un Tipo di pulsante nella scheda Contenuto, quindi imposta Allineamento e colori nella scheda Stile.
- Inserito in un elemento del loop? Vai su SaveTo Wishlist → Impostazioni e imposta il posizionamento nel negozio su Non mostrare.
Per garantire la massima compatibilità, i selettori di colore personalizzati del widget utilizzano valori esadecimali solidi. Se preferisci fare affidamento sui tuoi colori globali di Elementor, seleziona semplicemente la modalità Predefinito tema.
La nostra guida al pulsante wishlist di Elementor copre entrambe le funzionalità in dettaglio, e la pagina di integrazione della wishlist di Elementor ha il riassunto.
2. Divi Builder: un modulo Wishlist per layout Divi
Quando si utilizza il Theme Builder di Divi, i layout personalizzati sostituiscono naturalmente il corpo della pagina WordPress standard, il che normalmente impedisce l'esecuzione degli shortcode standard. Il nostro nuovo modulo nativo colma questa lacuna in modo da poter creare con Divi senza perdere la funzionalità della wishlist.
Come funziona
- Un Modulo Nativo: un modulo Salva nella Wishlist con un'icona a forma di cuore, che puoi inserire in qualsiasi layout Divi.
- Un Campo Opzionale: un ID Wishlist, che rispecchia il blocco Wishlist. Lascialo vuoto e il modulo mostrerà la wishlist che quel visitatore dovrebbe vedere.
- Theme Builder Incluso: il modulo funziona in una pagina Divi Builder e in un modello Theme Builder. Il plugin controlla i layout di corpo, intestazione e piè di pagina, quindi gli script vengono caricati ovunque tu lo inserisca.
- Un Percorso di Rendering: il modulo restituisce il rendering allo stesso shortcode. Il comportamento per ospiti, utenti connessi e condiviso tramite codice rimane identico ovunque.
Due rapidi dettagli che vale la pena conoscere: il modulo è costruito nativamente per Divi 4.x, utilizzando il suo sistema nativo di moduli PHP. Se il tuo negozio utilizza Divi 5, il sistema torna in modo sicuro al nostro shortcode standard per garantire che i tuoi pulsanti non si rompano mai. Tieni presente che se stai utilizzando un layout Divi personalizzato che sostituisce completamente il corpo della pagina, inserisci semplicemente il modulo direttamente in quel layout attivo.
Impostazioni e configurazione
- Aggiorna il plugin gratuito alla versione 1.1.3 o successiva.
- Modifica la tua pagina wishlist, o il modello Theme Builder che la serve, in Divi.
- Aggiungi il modulo Salva nella Wishlist dove dovrebbe apparire la wishlist.
- Lascia vuoto l'ID Wishlist a meno che tu non voglia collegare il modulo a una lista specifica.
Come nota utile, la scheda wishlist in Il mio account ignora naturalmente qualsiasi sovrascrittura del layout. Poiché quella scheda stampa direttamente lo shortcode invece di passare attraverso il corpo della pagina, viene sempre visualizzata perfettamente indipendentemente dalle tue scelte di modello.
3. Flatsome: un elemento Salva in Wishlist per UX Builder
Simile a Divi, l'UX Builder di Flatsome ottimizza le pagine convertendo il layout nei propri shortcode di righe e colonne personalizzati. Per garantire che la tua wishlist si integri perfettamente in queste pagine altamente personalizzate, abbiamo creato un elemento dedicato per UX Builder.
Come funziona
- Un Elemento UX Builder: Salva nella Wishlist appare nella categoria Contenuto del selettore di elementi.
- Due Opzioni: Un campo ID Wishlist e un'opzione Mostra solo la wishlist predefinita impostata su No per impostazione predefinita.
- Anteprima Sicura del Builder: All'interno di UX Builder vedi un segnaposto anziché una wishlist live. Renderizzarla sul canvas permetterebbe a un clic accidentale di scrivere sui tuoi articoli salvati.
- Registrato Contro lo Stesso Shortcode: L'elemento collega le opzioni del builder allo shortcode esistente anziché crearne uno secondo. Quindi non c'è un percorso di rendering separato che possa andare fuori strada.
🚀 Ciò che abbiamo visto: Flatsome può anche richiamare un layout indirettamente tramite un Blocco UX. Quel blocco potrebbe essere referenziato da un'impostazione del footer o da un layout di prodotto personalizzato. Per tempi di caricamento più rapidi e una distribuzione degli script più affidabile, posiziona sempre l'elemento Salva nella Wishlist direttamente sulla tua pagina principale anziché annidarlo all'interno di un Blocco UX referenziato. Se stai attualmente richiamando il tuo layout indirettamente tramite un Blocco UX, la transizione dell'elemento direttamente sulla pagina garantisce la piena compatibilità e una visualizzazione senza interruzioni.
Impostazioni e configurazione
- Aggiorna il plugin gratuito alla versione 1.1.3 o successiva.
- Apri la tua pagina wishlist nell'UX Builder.
- Aggiungi l'elemento Salva nella Wishlist dal gruppo Contenuto.
- Lascia entrambe le opzioni ai loro valori predefiniti a meno che tu non desideri una lista specifica, o solo quella predefinita.
- Salva, quindi carica la pagina come visitatore disconnesso e come cliente per confermare entrambi gli stati.
4. Search & Filter: pulsanti nelle griglie di prodotti filtrate
Questa integrazione garantisce una compatibilità senza interruzioni. Su una griglia di risultati di Search & Filter, il pulsante della wishlist ora viene visualizzato perfettamente accanto ai tuoi risultati filtrati.
Come funziona
- Il Timing della Query: Search & Filter applica il suo filtro per tipo di prodotto in un punto specifico della query di WordPress. Al momento in cui il plugin verifica se si tratta di un archivio di prodotti, gli hook di posizionamento standard del negozio sono già passati.
- L'Integrazione: La connessione promuove agevolmente quel valore di tipo prodotto uno stadio prima nella richiesta. WooCommerce quindi si occupa del template come al solito, esattamente come fa una semplice ricerca di prodotti, e i pulsanti appaiono.
- Focus Mirato: Interviene specificamente quando il filtro si risolve in prodotti. Un filtro che copre diversi tipi di post viene lasciato intatto, così come qualsiasi richiesta che già nomina un tipo di post.
- Niente da Attivare: L'integrazione si attiva quando Search & Filter è presente e non necessita di impostazioni.
Per chiarezza sulle prestazioni, la versione gratuita di Search & Filter utilizza caricamenti di pagina standard anziché AJAX front-end. Poiché la griglia è un normale caricamento di pagina, l'adattamento della sequenza di query gestisce tutto perfettamente senza bisogno di alcun ri-binding post-filtro. La pagina di integrazione della wishlist di Search & Filter contiene la versione breve.
Impostazioni e configurazione
Niente da configurare. Aggiorna il plugin gratuito alla versione 1.1.0 o successiva, quindi carica una griglia di prodotti filtrata e conferma che i tuoi pulsanti siano presenti. Se stilizzi i pulsanti per posizionamento, nota che questi utilizzano le impostazioni di posizionamento del tuo negozio, non quelle della pagina prodotto.
5. Barn2 Product Table: pulsanti all'interno della tabella
La WooCommerce Product Table di Barn2 trasforma il tuo catalogo in una tabella ordinabile e ricercabile. I negozi utilizzano spesso una tabella come questa come modulo d'ordine in blocco, in modo che i clienti possano inserire quantità per molti prodotti. Questa integrazione inserisce un pulsante della wishlist al suo interno, sopra o sotto il nome del prodotto.
Come funziona
- Posizionamento Lato Server: Il pulsante viene iniettato mentre la tabella costruisce ogni riga. Ecco perché sopravvive all'ordinamento, alla ricerca e alla paginazione della tabella stessa.
- Sopra o Sotto il Nome: Un'impostazione, predefinita su sotto.
- Il Tuo Stile Viene Ripreso: Le configurazioni predefinite, personalizzate e quelle predefinite del tema per il pulsante si applicano tutte al pulsante della tabella. Così come i tuoi comportamenti di reindirizzamento, popup e dissolvenza.
- Funzionano più Wishlist: Con più liste abilitate e il cliente loggato, il pulsante porta con sé il suo selettore Scegli lista:.
- Nessun Controllo Versione: Il rilevamento cerca il plugin stesso anziché un numero di versione. Un aggiornamento di Barn2 non disattiverà silenziosamente l'integrazione.
Impostazioni e configurazione
- Aggiorna il plugin gratuito alla versione 1.1.0 o successiva.
- Vai su SaveTo Wishlist → Impostazioni e trova la posizione del pulsante della tabella dei prodotti.
- Scegli sopra o sotto il nome del prodotto, quindi salva.
- Carica una pagina con il tuo shortcode della tabella dei prodotti e controlla sia la visualizzazione per gli utenti connessi che per gli ospiti.
Se disabiliti le liste dei desideri per gli ospiti, il pulsante della tabella segue quella regola come ogni altro posizionamento. Gli sviluppatori ottengono anche un filtro per il markup del pulsante. La nostra guida all'integrazione della lista dei desideri di WooCommerce Product Table illustra la configurazione completa, e la pagina di integrazione della tabella dei prodotti ha la panoramica.
Dove vanno i tuoi dati Wishlist
Le altre cinque connessioni inviano l'attività della lista dei desideri in un posto utile. Due di esse sono native e tre sono nuove integrazioni di SaveTo Wishlist Pro v1.0.3 che fungono da avvii rapidi per le Automazioni. Vale la pena sapere quali sono, perché si comportano in modo diverso.
Se webhook è un termine nuovo, significa che un'app invia dati direttamente all'URL di un'altra app. Qualunque cosa tu invii, l'email all'altra estremità può contenere un promemoria, una nota di rifornimento o un link di sconto.
Le integrazioni native si trovano nel plugin gratuito. Vengono eseguite sul tuo server tramite il PHP dell'altro plugin, quindi nessuna richiesta HTTP lascia il tuo sito. Inoltre, si attivano ad ogni aggiunta, rimozione e salvataggio della lista dei desideri.
Le integrazioni di SaveTo Wishlist Pro v1.0.3 che utilizzano gli avvii rapidi webhook funzionano in modo diverso. Sono preset per l'azione Chiama un webhook nelle Automazioni Pro. La scelta di una piattaforma compila il metodo, gli header e un payload webhook costruito dai dati della tua lista dei desideri. Quindi incolli l'URL che la piattaforma ti fornisce. Abbiamo mantenuto entrambi i percorsi, perché un tag e un webhook risolvono problemi diversi.
Ecco il flusso per uno qualsiasi degli avvii rapidi, poiché tutti e tre lo condividono:
- Vai su SaveTo Wishlist → Automazioni e fai clic su Aggiungi nuova automazione.
- Scegli un trigger, quindi imposta Azione su Chiama un webhook.
- Scegli la tua piattaforma dal menu a discesa Avvio rapido (facoltativo), che si trova sopra i campi webhook e per impostazione predefinita è Personalizzato.
- Incolla l'URL del webhook della tua piattaforma in URL webhook e salva.
Ogni payload mappa le stesse quattro variabili, che il tuo negozio sostituisce quando l'automazione viene eseguita: {customer_email}, {customer_name}, {wishlist_name} e {wishlist_url}. Inviando JSON direttamente a un URL webhook, i quick start non hanno mai bisogno di chiedere o memorizzare le tue chiavi API di terze parti. Inoltre, poiché gestisci la mappatura dei campi interamente sul lato ricevente, mantieni il controllo completo su come esattamente i dati dei tuoi clienti sono organizzati nel tuo CRM.
🚀 Cosa abbiamo visto: I proprietari di negozi scelgono Quando un prodotto della wishlist va in saldo. Il menu a discesa Quick Start appare dinamicamente per i trigger specifici del cliente (come l'aggiunta di un articolo). Per i trigger di massa (come un prodotto che va in saldo), rimane intenzionalmente nascosto per garantire che i tuoi webhook instradino sempre dati puliti e accurati senza segnaposto email irrisolti. Il menu a discesa appare solo sui tre trigger del cliente: una nuova wishlist creata, un articolo aggiunto o un articolo rimosso. Il cambio di trigger cancella anche una ricetta che avevi già scelto, quindi ricontrolla il payload dopo qualsiasi modifica.
6. FunnelKit Automations: tre trigger Wishlist nativi
FunnelKit Automations riceve il trattamento più approfondito dei cinque. Gli eventi della wishlist vengono registrati come trigger di prima classe nel suo builder, anziché arrivare tramite webhook.
Come funziona
- SaveTo Wishlist È la Sua Fonte: Apri la finestra Seleziona un Evento di FunnelKit. SaveTo Wishlist si trova nella barra laterale accanto a WooCommerce e WordPress, sotto un gruppo Wishlist.
- Tre eventi: Prodotto aggiunto alla Wishlist, Prodotto rimosso dalla Wishlist e Wishlist salvata.
- Due tag di unione: Nome Wishlist e URL Wishlist. Le tue email possono nominare la lista e collegarsi direttamente ad essa.
- Solo proprietari con accesso effettuato: per mantenere i dati del tuo CRM puliti e utilizzabili, questi eventi vengono attivati esclusivamente per gli utenti con accesso effettuato e aggirano in modo sicuro l'attività degli ospiti anonimi.
🚀 Cosa abbiamo visto: Tutti e tre gli eventi sono completamente disponibili su FunnelKit Automations Lite e non richiedono una licenza FunnelKit Pro (i veri articoli FunnelKit Pro mostrano un'icona a forma di corona nella loro interfaccia utente). Inoltre, FunnelKit visualizza “La mia Wishlist” come testo segnaposto nel builder. Per garantire che le email live non visualizzino uno spazio vuoto per le liste senza nome, imposta sempre un fallback direttamente sul tuo merge tag.
Impostazioni e configurazione
- Aggiorna il plugin gratuito alla versione 1.1.2 o successiva, con FunnelKit Automations attivo.
- In FunnelKit, crea un'automazione e fai clic per scegliere il suo evento.
- Scegli SaveTo Wishlist nella barra laterale, quindi uno dei tre eventi della wishlist.
- Crea le tue email, inserendo i tag di unione Nome Wishlist e URL Wishlist dove desideri, ognuno con un fallback.
La nostra guida alle wishlist di FunnelKit Automations copre quali campagne vale la pena creare. La pagina di integrazione della wishlist di FunnelKit Automations riassume gli eventi e i tag.
7. Groundhogg: tag nel plugin gratuito, webhook in Pro
Groundhogg è l'unica piattaforma in questo gruppo con una nuova connessione su entrambi i lati. Il plugin gratuito applica tag di contatto sul tuo server, e Pro aggiunge un avvio rapido webhook. Sono adatti a lavori diversi.
Come funziona
- Il Plugin Gratuito Usa i Tag: Mappa un tag per “aggiunto alla wishlist” e uno per “wishlist salvata”. Il plugin li applica e li rimuove sul contatto corrispondente. I trigger Tag Applied e Tag Removed di Groundhogg avviano i tuoi flussi da lì.
- Nessuna Chiamata Esterna: Tutto viene eseguito tramite il codice on-site di Groundhogg, quindi nulla lascia il tuo server.
- Solo Proprietario: I tag si applicano quando il proprietario della wishlist è la persona che agisce. Importazioni, la schermata delle wishlist dell'amministratore e un editor invitato che salva la lista di qualcun altro non taggano nessuno, per progettazione.
- Aggiorna Solo Contatti Esistenti: Per evitare disordine nel database, l'integrazione aggiorna solo i contatti Groundhogg esistenti. Ospiti anonimi ed email non riconosciute vengono ignorati in sicurezza.
- Pro Aggiunge un Webhook: La quick start di Groundhogg invia le quattro variabili della wishlist a un trigger Webhook Listener di Groundhogg. Accetta un POST e ti consente di mappare i campi in arrivo ai campi del contatto.
🚀 Cosa abbiamo visto: Groundhogg memorizza nella cache i tag per cinque minuti, quindi i tag appena creati non appariranno immediatamente nel nostro menu a discesa. Inoltre, i flussi di Groundhogg si attivano solo al cambio di stato *iniziale* di un tag. Se hai bisogno che un'automazione venga eseguita *ogni singola volta* che un cliente aggiunge un articolo, usa invece il metodo webhook Pro.
Impostazioni e configurazione
- Per la via gratuita, aggiorna alla versione 1.1.2 o successiva. Quindi vai su SaveTo Wishlist → Impostazioni → Integrazioni e scegli i tuoi tag Groundhogg.
- Crea il tuo flusso in Groundhogg con Flussi → Aggiungi Nuovo, e avvialo da un trigger Tag Applied.
- Per la via Pro, aggiungi un trigger Webhook Listener a un flusso e copia l'URL che genera.
- Costruisci l'automazione in Pro come descritto sopra, scegliendo Groundhogg come avvio rapido, quindi incolla quell'URL.
- Invia il trigger una volta, quindi mappa i campi in arrivo in Groundhogg. Il listener necessita di una richiesta prima di poterti mostrare cosa è arrivato.
Un rapido consiglio sulla terminologia: Groundhogg 4.0 ha aggiornato la sua interfaccia, cambiando "Funnels" in "Flows" e "Benchmarks" in "Triggers". Se ti imbatti nel termine "funnel benchmark" in configurazioni o guide legacy, significa semplicemente un trigger di flusso. La guida completa all'integrazione della wishlist di Groundhogg walkthrough utilizza i nomi attuali ovunque. Groundhogg documenta il lato ricevente nella sua guida Webhook Listener.
8. Mail Mint: una Quick Start Pro per le tue automazioni
Mail Mint è il plugin di email marketing e automazione del team WPFunnels, con oltre 5.000 installazioni attive. Il plugin gratuito sincronizza gli eventi della wishlist con Mail Mint come tag da 1.0.9. Come parte delle integrazioni di SaveTo Wishlist Pro v1.0.3, un nuovo avvio rapido webhook ti dà il controllo sull'attivatore e sul payload.
Come funziona
- Cosa Viene Inviato: Un POST JSON che trasporta
email,first_name,wishlist_nameewishlist_url. - Dove Atterra: Un webhook in arrivo di Mail Mint. Imposti le liste, i tag e lo stato del contatto sul webhook stesso. I contatti vengono archiviati correttamente prima che qualsiasi automazione venga eseguita.
- Perché Sceglierlo: Il bridge gratuito tagga ogni azione della wishlist. La quick start ti consente di scegliere un trigger e di definire esattamente cosa riceve Mail Mint.
Impostazioni e configurazione
- In Mail Mint, vai su Impostazioni Mail Mint → Webhook e fai clic su + Aggiungi Webhook.
- Assegna un nome, scegli le Liste, i Tag e lo Stato per i contatti che crea, quindi salva.
- Copia l'URL del Webhook che Mail Mint ti mostra.
- Costruisci l'automazione in Pro, scegli Mail Mint come avvio rapido, incolla l'URL e salva.
Mail Mint documenta il lato ricevente nella sua guida ai webhook in entrata. La nostra guida alle email della wishlist di Mail Mint copre le campagne degne di essere create. La pagina Integrazione Mail Mint descrive il percorso basato sui tag del plugin gratuito.
9. Email Subscribers & Newsletters: un payload pronto all'uso
Email Subscribers & Newsletters, venduto anche come Icegram Express, è la piattaforma più installata in questo gruppo. Ha oltre 50.000 installazioni attive e il suo avvio rapido riempie un payload a forma di Icegram.
Come funziona
- Cosa Viene Inviato: Un POST JSON con
email,name,wishlist_nameewishlist_url. - Una Differenza nel Payload: Il secondo campo è
nameanzichéfirst_name. Ciò corrisponde a come Email Subscribers & Newsletters lo etichetta nel proprio modulo di iscrizione. È l'unica ricetta che differisce. - Fornisci Tu il Ricevitore: Email Subscribers accetta dati in entrata tramite la loro API REST o il loro add-on webhook Pro. Una volta configurato il tuo endpoint ricevente in Icegram, incolla semplicemente quell'URL nel nostro Avvio Rapido per completare la connessione.
🚀 Cosa abbiamo visto: Poiché questa configurazione appare identica alle altre nel menu a discesa, è meglio verificare la tua specifica configurazione in anticipo. Conferma semplicemente il tuo URL dell'endpoint ricevente in Email Subscribers & Newsletters prima di costruire l'automazione attorno ad esso per garantire una connessione fluida e rapida. E se tutto ciò che desideri sono acquirenti della wishlist su una lista Icegram, il plugin gratuito lo fa già. Un interruttore, due menu a discesa, nessun webhook. Questo avvio rapido si guadagna il suo posto quando il payload deve raggiungere qualcos'altro.
Impostazioni e configurazione
- Decidi cosa riceverà il POST: un endpoint REST, il webhook add-on Pro o uno strumento di automazione intermedio.
- Per utilizzare le integrazioni di SaveTo Wishlist Pro v1.0.3, crea l'automazione in Pro e scegli Email Subscribers & Newsletters come avvio rapido.
- Incolla l'URL di ricezione, regola le chiavi del payload per farle corrispondere a ciò che l'endpoint si aspetta, e salva.
La nostra guida sulla sincronizzazione della wishlist di Email Subscribers & Newsletters copre l'integrazione gratuita in dettaglio. La pagina integrazione di Email Subscribers & Newsletters elenca cosa viene mappato.
10. Noptin: crea o aggiorna iscritti in base a un trigger
Noptin è un plugin leggero per newsletter con oltre 10.000 installazioni attive. Il suo avvio rapido invia a un webhook Noptin, che colleghi a una delle sue regole di automazione.
Come funziona
- Cosa Viene Inviato: Gli stessi quattro campi delle ricette Mail Mint e Groundhogg, come POST JSON.
- Dove Atterra: Una regola di automazione basata sul trigger Receive Webhook. Noptin genera l'URL e puoi aggiungere una chiave di verifica.
- Cosa Può Fare: La decisione spetta all'azione della regola. Crea o aggiorna un iscritto, taggalo, aggiorna un campo o invia un'email.
- Le Rimozioni Diventano Possibili: L'integrazione Noptin del plugin gratuito aggiunge sempre e solo tag. Con il webhook, un trigger item-removed può puntare a una regola che rimuove i tag. Le regole di Noptin includono un'azione di rimozione tag, che è il motivo pratico per cui sceglierlo.
Impostazioni e configurazione
- In Noptin, vai su Noptin → Regole di automazione e crea una regola utilizzando il trigger Ricevi Webhook.
- Scegli l'azione desiderata e mappa i campi in entrata.
- Copia l'URL del webhook generato da Noptin e imposta una chiave di verifica se lo desideri.
- Crea l'automazione in Pro, scegli Noptin come avvio rapido, incolla l'URL e salva.
Noptin elenca ogni trigger nel suo riferimento alle regole di automazione. La nostra guida al tagging della wishlist Noptin illustra la strategia di tagging. La pagina integrazione Noptin copre il comportamento del plugin gratuito.
Pronto a collegare le tue Wishlist?
Dieci integrazioni sono tante, quindi ecco la versione breve. Se usi un page builder per creare layout personalizzati, le prime cinque integrazioni assicurano che i tuoi pulsanti della wishlist vengano visualizzati magnificamente. Quattro di esse non richiedono alcuna configurazione oltre a trascinare semplicemente un elemento sulla pagina. Se desideri che l'attività della wishlist raggiunga il tuo strumento di posta elettronica, il plugin gratuito copre i casi comuni, mentre le integrazioni di SaveTo Wishlist Pro v1.0.3 aggiungono il controllo a livello di trigger.
Una wishlist è uno dei segnali più chiari di intenzione d'acquisto che il tuo negozio raccoglie. Mettere il pulsante di fronte alle persone è metà del lavoro. Agire su ciò che salvano è l'altra metà.
Ti sei perso qualche dettaglio? Torna subito a uno di questi:
- Elementor e Elementor Pro: un widget wishlist nativo
- Divi Builder: un modulo wishlist per layout Divi
- Flatsome: un elemento Salva nella Wishlist per UX Builder
- Search & Filter: pulsanti nelle griglie di prodotti filtrati
- Barn2 Product Table: pulsanti all'interno della tabella
- FunnelKit Automations: tre trigger wishlist nativi
- Groundhogg: tag nel plugin gratuito, webhook in Pro
- Mail Mint: un avvio rapido Pro per le tue automazioni
- Email Subscribers & Newsletters: un payload pronto all'uso
- Noptin: crea o aggiorna iscritti su un trigger
Entrambi i plugin sono già aggiornati, quindi non c'è nulla da aspettare. Prendi SaveTo Wishlist Lite se stai partendo da zero. Passa a SaveTo Wishlist Pro per il costruttore di Automations e tutte le nuove integrazioni di SaveTo Wishlist Pro v1.0.3.
Preferiresti leggere prima il quadro generale? La nostra guida completa alle wishlist di WooCommerce è un buon punto di partenza. Lo stesso vale per le nostre guide alle wishlist e ai tassi di conversione e alla segmentazione dei clienti!