
 Reviewed by
 Most WooCommerce stores treat every shopper the same. Same emails, same offers, same homepage, whether someone is a first-time browser or a repeat buyer. That one-size-fits-all approach quietly leaves money on the table.
Baymard Institute puts cart abandonment at about 70.22%, averaged across 50 separate studies. The same page cites research finding that 42% of US online shoppers have abandoned a cart because they were just browsing. Those browsers are telling you what they want, and wishlist personalization is how you listen.
When you use the data behind saved products, you can group customers by real intent. You can send offers that match what they actually saved, then follow up at the right moment. Here’s how to turn wishlist data into personalized marketing that fits each shopper.
Table of Contents
- What Is Wishlist Personalization?
- Why Wishlist Data Beats Guesswork
- Where Your Wishlist Data Actually Lives
- How To Use Customer Segments From Wishlist Data
- Personalized Offers That Use Wishlist Signals
- Setting Up Automated Follow-Ups
- How To Tell If Wishlist Personalization Is Working
- Where Wishlist Personalization Has Limits
- Frequently Asked Questions: Wishlist Personalization
- Putting Wishlist Personalization To Work
What Is Wishlist Personalization?

Wishlist personalization is the practice of using saved-product data to tailor your marketing to each shopper’s real interests. Instead of guessing what someone might want, you read what they’ve already told you by saving it to a list.
There are two sides to personalizing a store. On-site personalization changes what a shopper sees while they browse, like the products shown on a page. Data-driven personalization, the focus here, uses wishlist data to shape the marketing that reaches shoppers after they leave. That covers the segments they fall into, the offers they get, and the follow-up emails timed to what they saved.
For the on-page side in depth, see our guide to on-site personalization with wishlists.
A wishlist is one of the cleanest intent signals in ecommerce. A product view can be idle curiosity, but a save is deliberate. SaveTo Wishlist stores that activity, and SaveTo Wishlist Pro turns it into data you can actually segment and act on.
Why Wishlist Data Beats Guesswork
Wishlist data beats guesswork because it captures intent directly, not by inference. A saved product is a shopper telling you what they want in their own words, with no modeling required.
Most personalization tactics stitch together weak signals: pages viewed, time on site, a category clicked. A wishlist skips the guessing. When someone saves three coffee grinders and a bag of beans, you don’t need an algorithm to know they’re shopping for a home setup.
Remember that 42% of US online shoppers have abandoned a cart simply because they were just browsing. Wishlists give those not-ready browsers a place to park intent instead of dropping off with nothing recorded.
One thing we commonly see: the products customers save most are not always the products you promote most. That gap is where personalization earns its keep. Visser Labs covers how to turn store data into better marketing decisions.
🔍️ What we’ve seen: Stores that get the most from wishlist personalization treat a save as the start of a conversation, not a bookmark. They check their saved-product reports regularly, watch which categories climb, and send one well-timed follow-up instead of a blast.
Where Your Wishlist Data Actually Lives
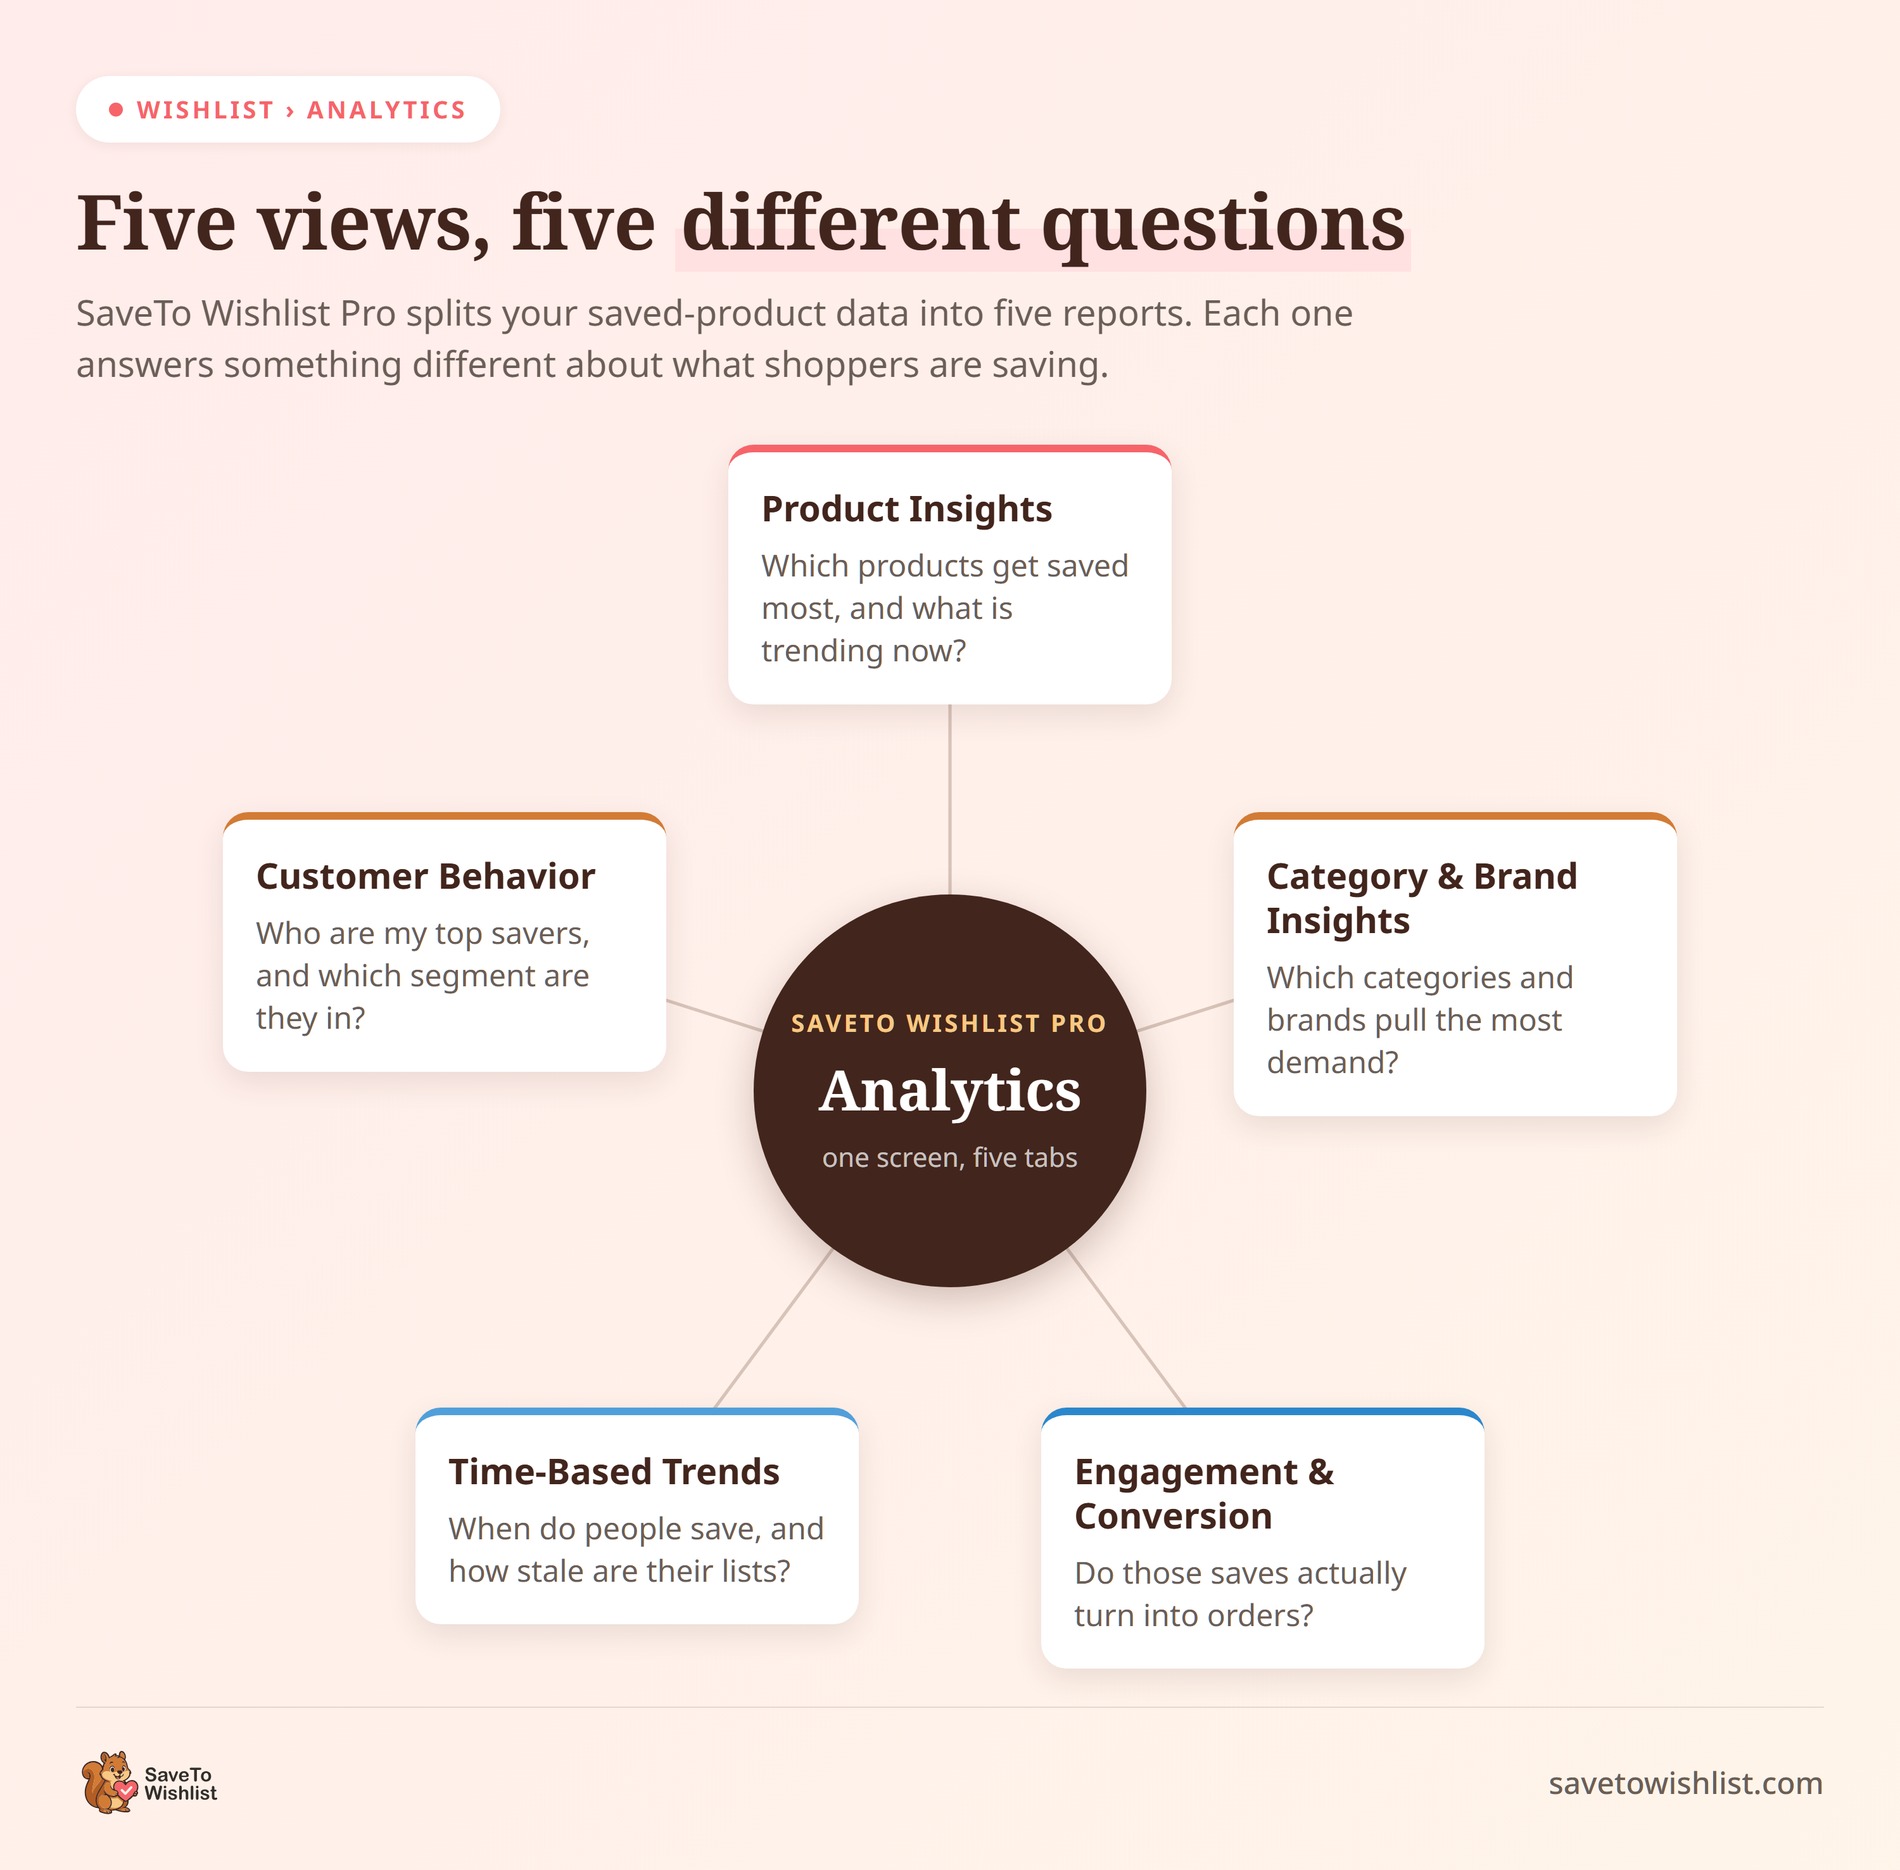
Before you can personalize anything, you need to know where the data sits. In SaveTo Wishlist Pro, it’s under Wishlist → Analytics in your WordPress admin, split into five views that each answer a different question.
- Product Insights: which individual products get saved most, which are trending over the last 7 or 30 days, and which were added most recently
- Category & Brand Insights: the same picture one level up, showing total saves and average saves per product by category and brand
- Engagement & Conversion Insights: how often saves turn into purchases, including a High Wishlist / Low Sales view that flags demand you aren’t converting
- Time-Based Trends: seasonal patterns, peak saving hours and days, and how old your saved items are getting
- Customer Behavior: your top wishlisters, their conversion rates and spend, and the built-in customer segments covered in the next section
Most store owners open Product Insights first, which makes sense. The one worth more of your time is Engagement & Conversion Insights, because the gap between what people save and what they buy is exactly the gap personalization is meant to close.
The free SaveTo Wishlist plugin shows a preview of these screens so you can see the layout, but the reporting runs on your own store data once Pro is active.
Visser Labs has a wider guide to reading your WooCommerce reports if you want the full picture.
How To Use Customer Segments From Wishlist Data
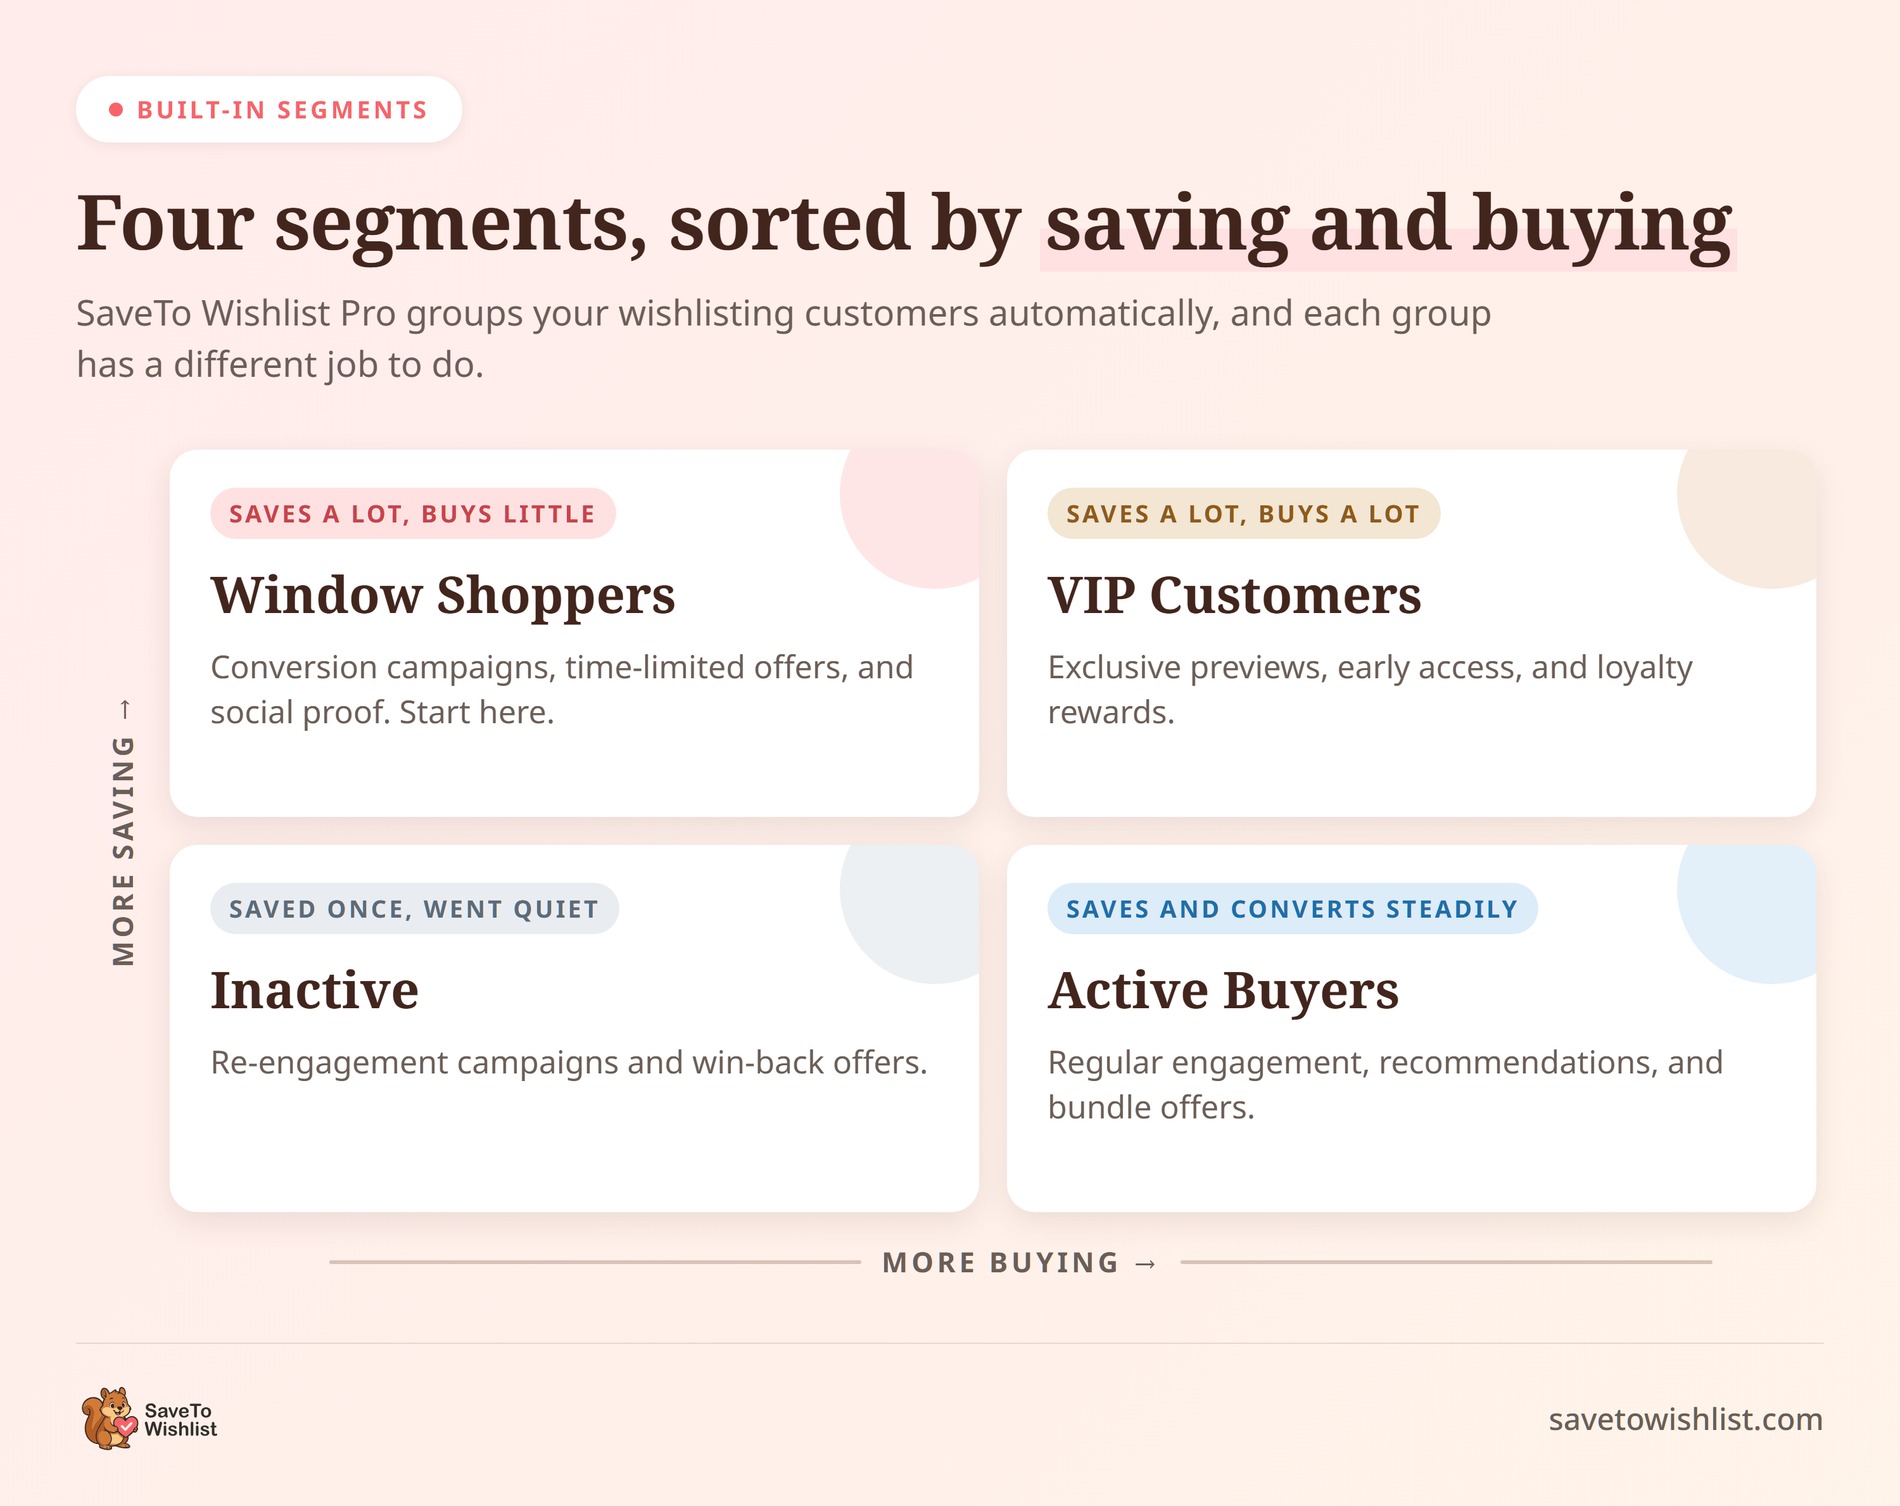
Go to SaveTo Wishlist → Analytics, then Customer Behavior → Customer Segments. SaveTo Wishlist Pro automatically groups wishlisting customers based on wishlist activity and purchase behavior.
- VIP Customers: These customers have high wishlist activity and spending. Consider offering them exclusive previews, early access, personalized service, or loyalty rewards.
- Active Buyers: These shoppers engage consistently with your store. Consider sending regular updates, product recommendations, or bundle offers.
- Window Shoppers: These shoppers show interest in products but make few purchases. Consider using time-limited offers, customer reviews, and other social proof to encourage purchases.
- Inactive Users: These customers haven’t shown recent wishlist activity. Consider using re-engagement campaigns, win-back offers, or feedback surveys to reconnect with them.
The same screen tiers your individual top wishlisters as platinum, gold, silver, or bronze using their wishlist count and total spend, so you can spot VIP candidates without building a scoring model yourself. Those thresholds are filterable if your average order value means the defaults don’t fit.
Window Shoppers is usually the segment worth attacking first. They’ve shown intent and haven’t bought, which is a much shorter distance to close than winning back someone who left months ago.
Building your own segments
The built-in groups are behavioural, not topical, so they won’t tell you who’s shopping for camping gear. For that, use Advanced Filter & Export to pull wishlist data and cut it your own way.
- Category savers: everyone who saved from a single category, like outdoor gear or skincare
- Seasonal savers: lists that spike around a holiday or event, surfaced by Time-Based Trends
- Repeat savers: shoppers who saved the same item across separate sessions
- Dormant savers: shoppers who saved weeks ago and never came back
Once you have a segment, you need it where your marketing lives. Export the data into your CRM or email platform so each group gets its own treatment. We cover that handoff in our guide to using wishlist data in your WooCommerce CRM.
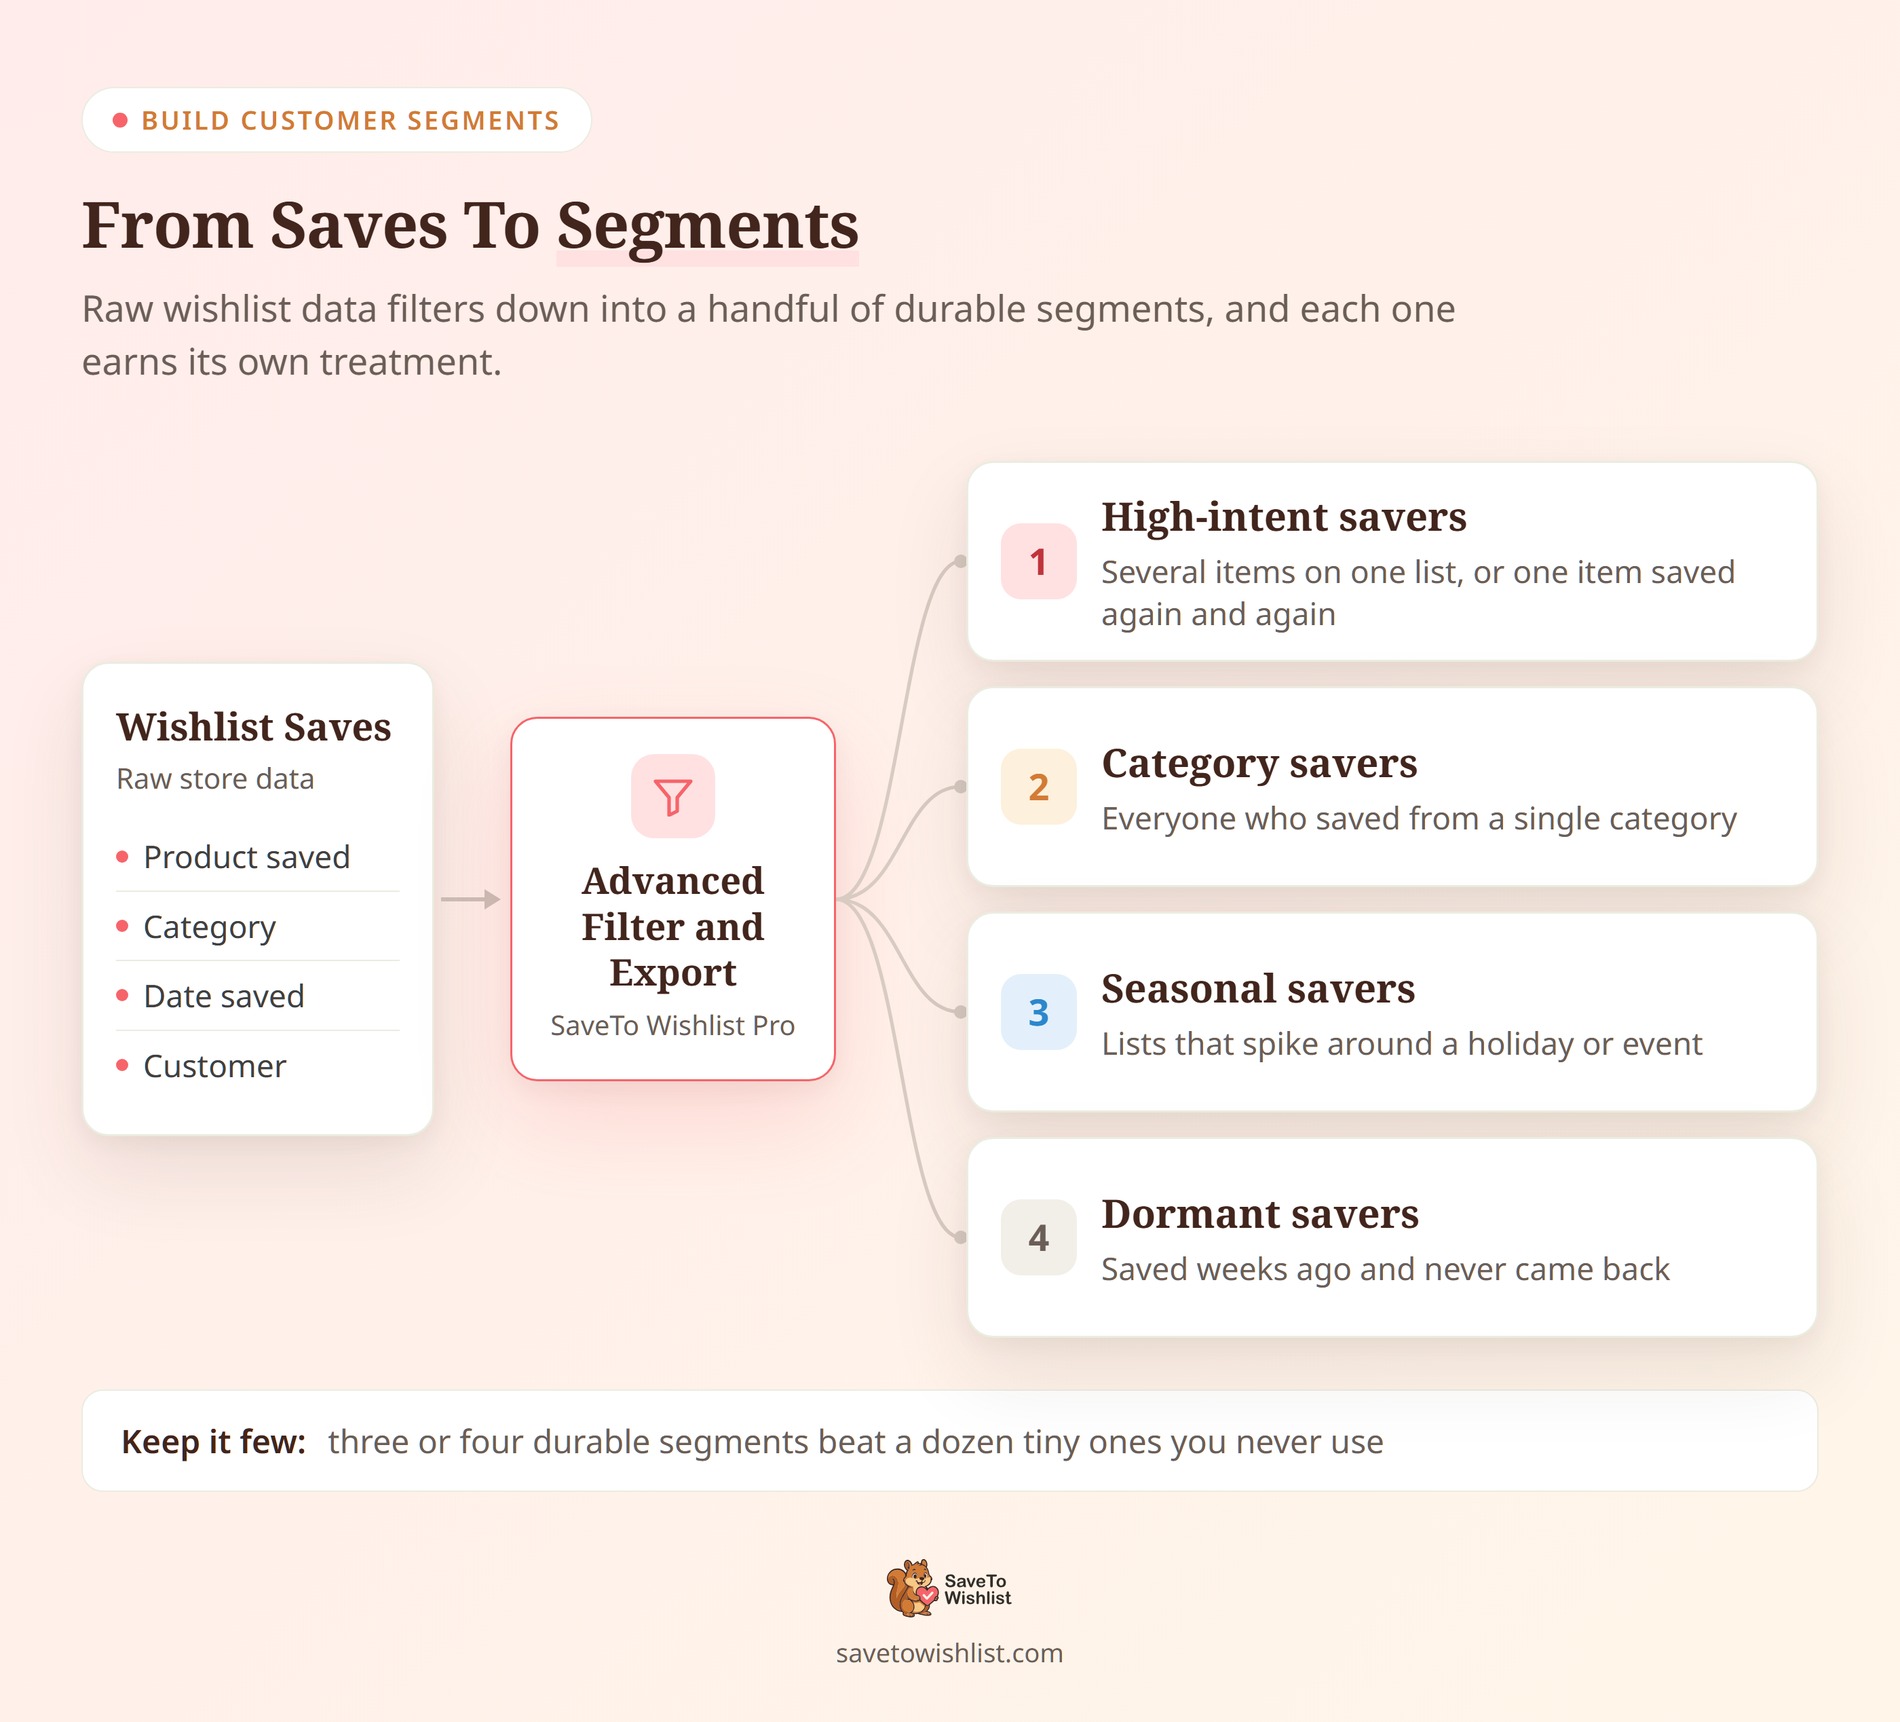
One caution: keep segments broad enough to be worth the effort. In our experience, three or four durable segments beat a dozen tiny ones you never get around to using.
Personalized Offers That Use Wishlist Signals
Personalized offers work best when a wishlist event is the trigger, so the message lands when the shopper already cares. SaveTo Wishlist Pro can act on saves, sale prices, and restocks automatically.
Three offers map cleanly to wishlist signals:
- Price-drop nudges: when a saved product goes on sale, an automation tells the shopper who wanted it, with the old and new price in the email
- Back-in-stock alerts: when a saved item returns, these alerts bring the shopper back the moment they can buy
- Gentle discounts for high-intent savers: a small, targeted offer to people who saved but haven’t bought
Worth knowing on the first one: the trigger fires when a product goes on sale, meaning a sale price is set in WooCommerce. Quietly editing the regular price downward won’t fire it, so run your discounts as actual sale prices if you want savers notified.
SaveTo Wishlist doesn’t send SMS or plug into Klaviyo directly. What it does is fire a webhook on those wishlist triggers. You write the JSON payload yourself from a list of available variable tags, so it can carry the customer’s name, email, wishlist name, and wishlist URL. Route that webhook through Zapier or Make, and you can hand the offer to whatever tool you already run. That includes Klaviyo or an SMS service like Twilio.
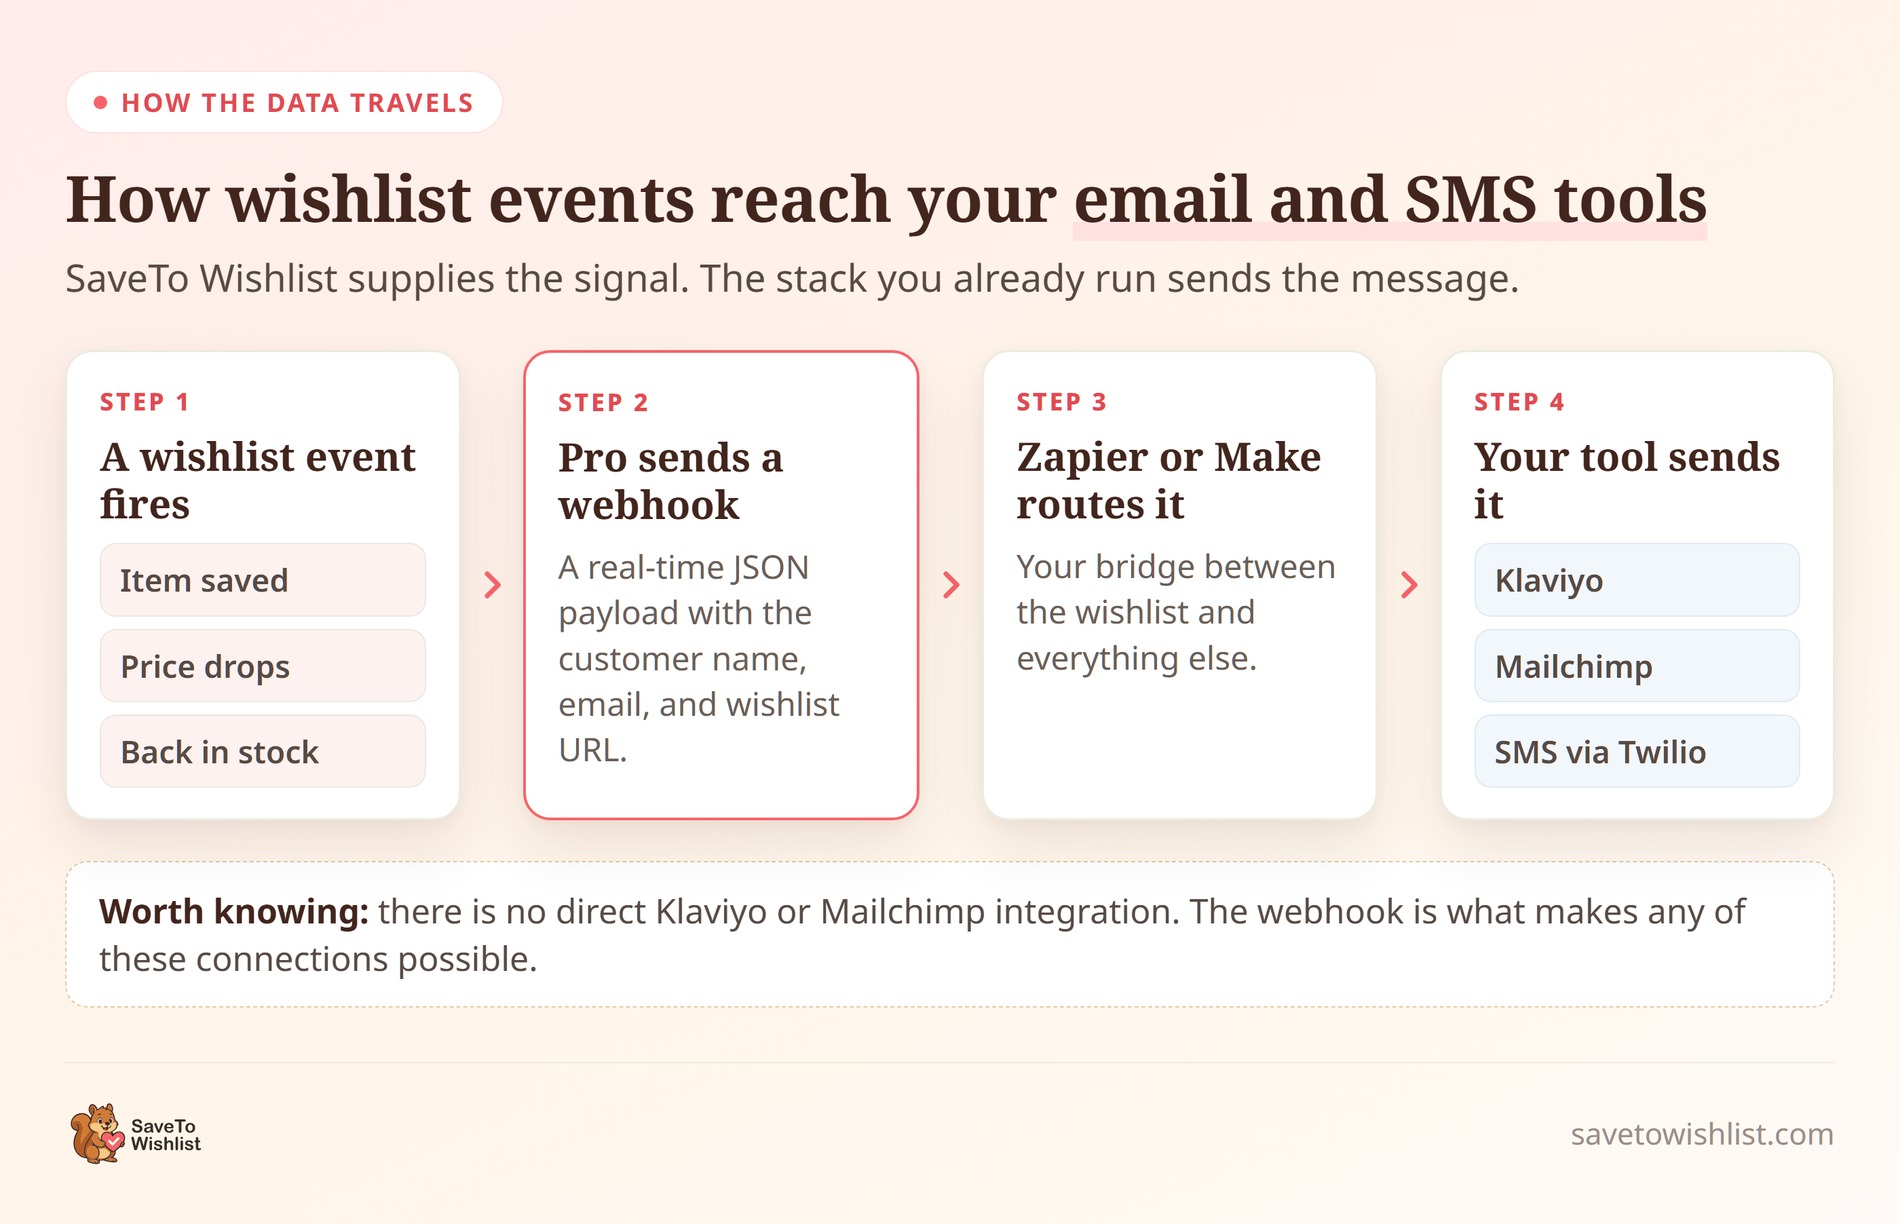
The wishlist supplies the signal and the data, and your existing stack sends the message. An offer on something a shopper saved isn’t an interruption. It reads more like a reminder they were half-hoping for.
Setting Up Automated Follow-Ups
Automated follow-ups keep personalization running without manual work by tying an action to each wishlist trigger. Under Wishlist → Automations, SaveTo Wishlist Pro connects a trigger to an action, and any trigger can drive any action.
There are five triggers to build on:
- A new wishlist is created for a user
- An item is added to a wishlist
- An item is removed from a wishlist
- A wishlist product goes on sale
- An out-of-stock wishlist product comes back in stock
The three actions are: send an email notification, call a webhook, or update a customer user meta field. Chain those and you have follow-ups that fire on real behavior instead of a fixed calendar. AdTribes has a broader guide to automating everyday store tasks.
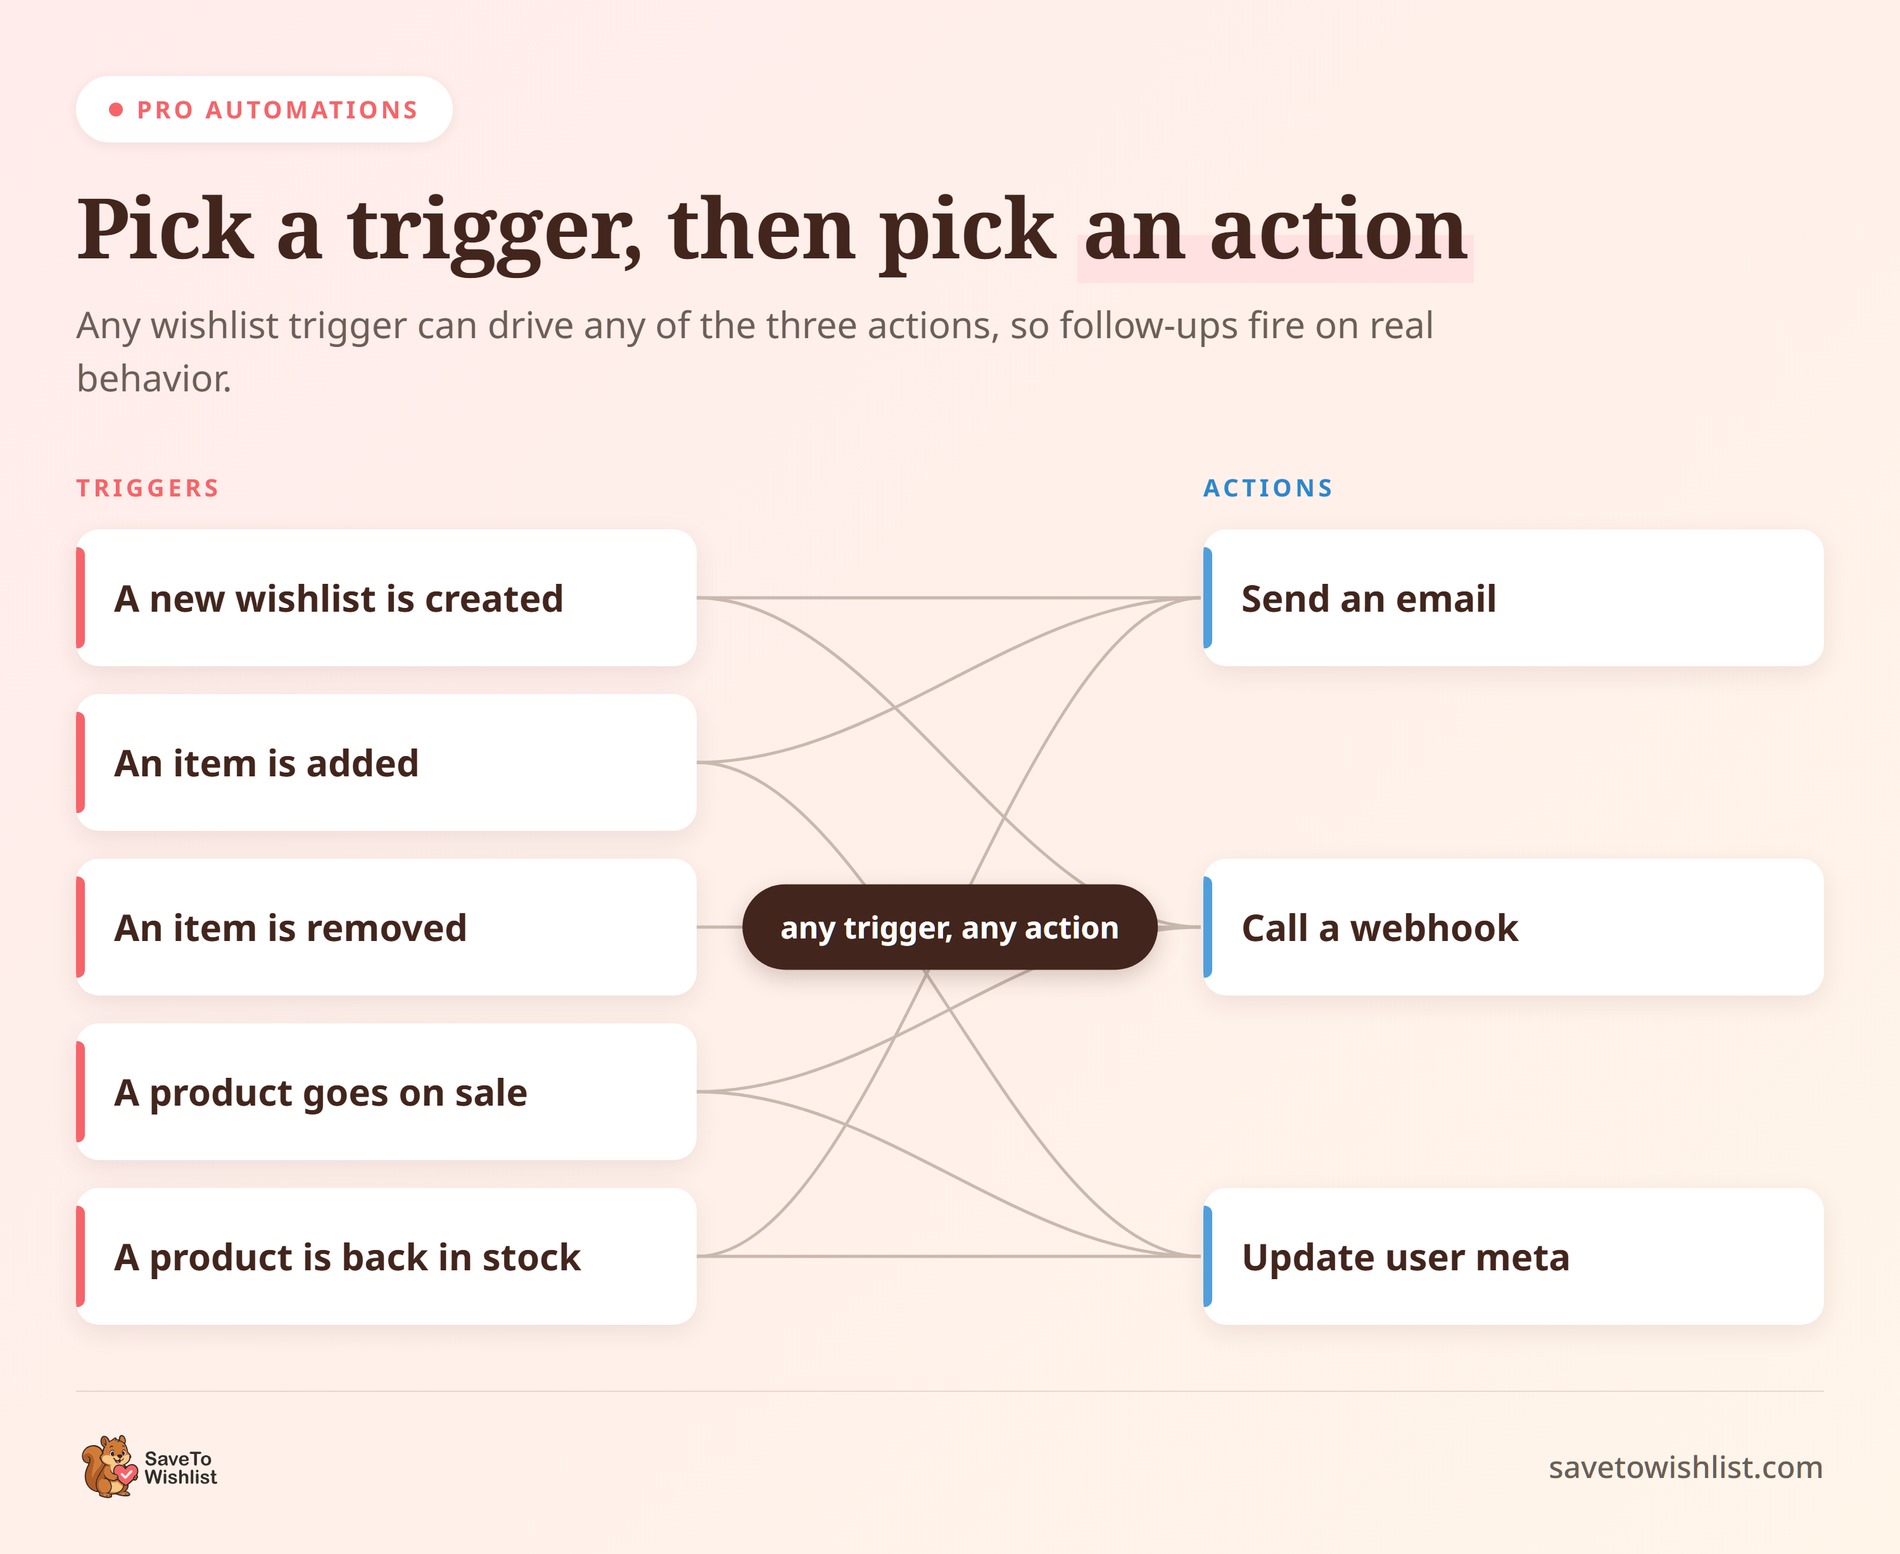
The removal trigger is the one most stores skip, and it’s quietly useful. A shopper deleting a saved item is a small signal that interest has cooled, which is a good reason to stop pushing that product before your emails start feeling stale.
A useful pattern here is less about the email and more about the user meta. Have an automation update a meta field tagging the shopper’s top saved category each time they add an item. Over a few weeks that field becomes a quiet, reliable segment you can target later, with no exports needed.
For follow-ups that leave your store, the webhook action bridges to your other tools, the same way personalized offers reach your email platform. Push wishlist data into your CRM, and your sequences can reference exactly what each shopper saved.
How To Tell If Wishlist Personalization Is Working
Judge wishlist personalization on whether saves turn into orders, not on how many emails you sent. Engagement & Conversion Insights is built around that question, and it’s the screen to check before and after any campaign.
A few numbers are worth watching consistently:
- Purchase rate: the share of wishlisting customers who go on to buy, and the single clearest measure of whether your follow-ups land
- High Wishlist / Low Sales: products with plenty of saves and few orders, which is your campaign shortlist rather than a problem to fix
- Top Converters: the products that reliably move from list to cart, worth pushing harder in recommendations
- Share rate: how often lists get shared, which tells you whether referral or gifting angles are worth building on
- Average items per wishlist: a rough read on how engaged your savers are over time
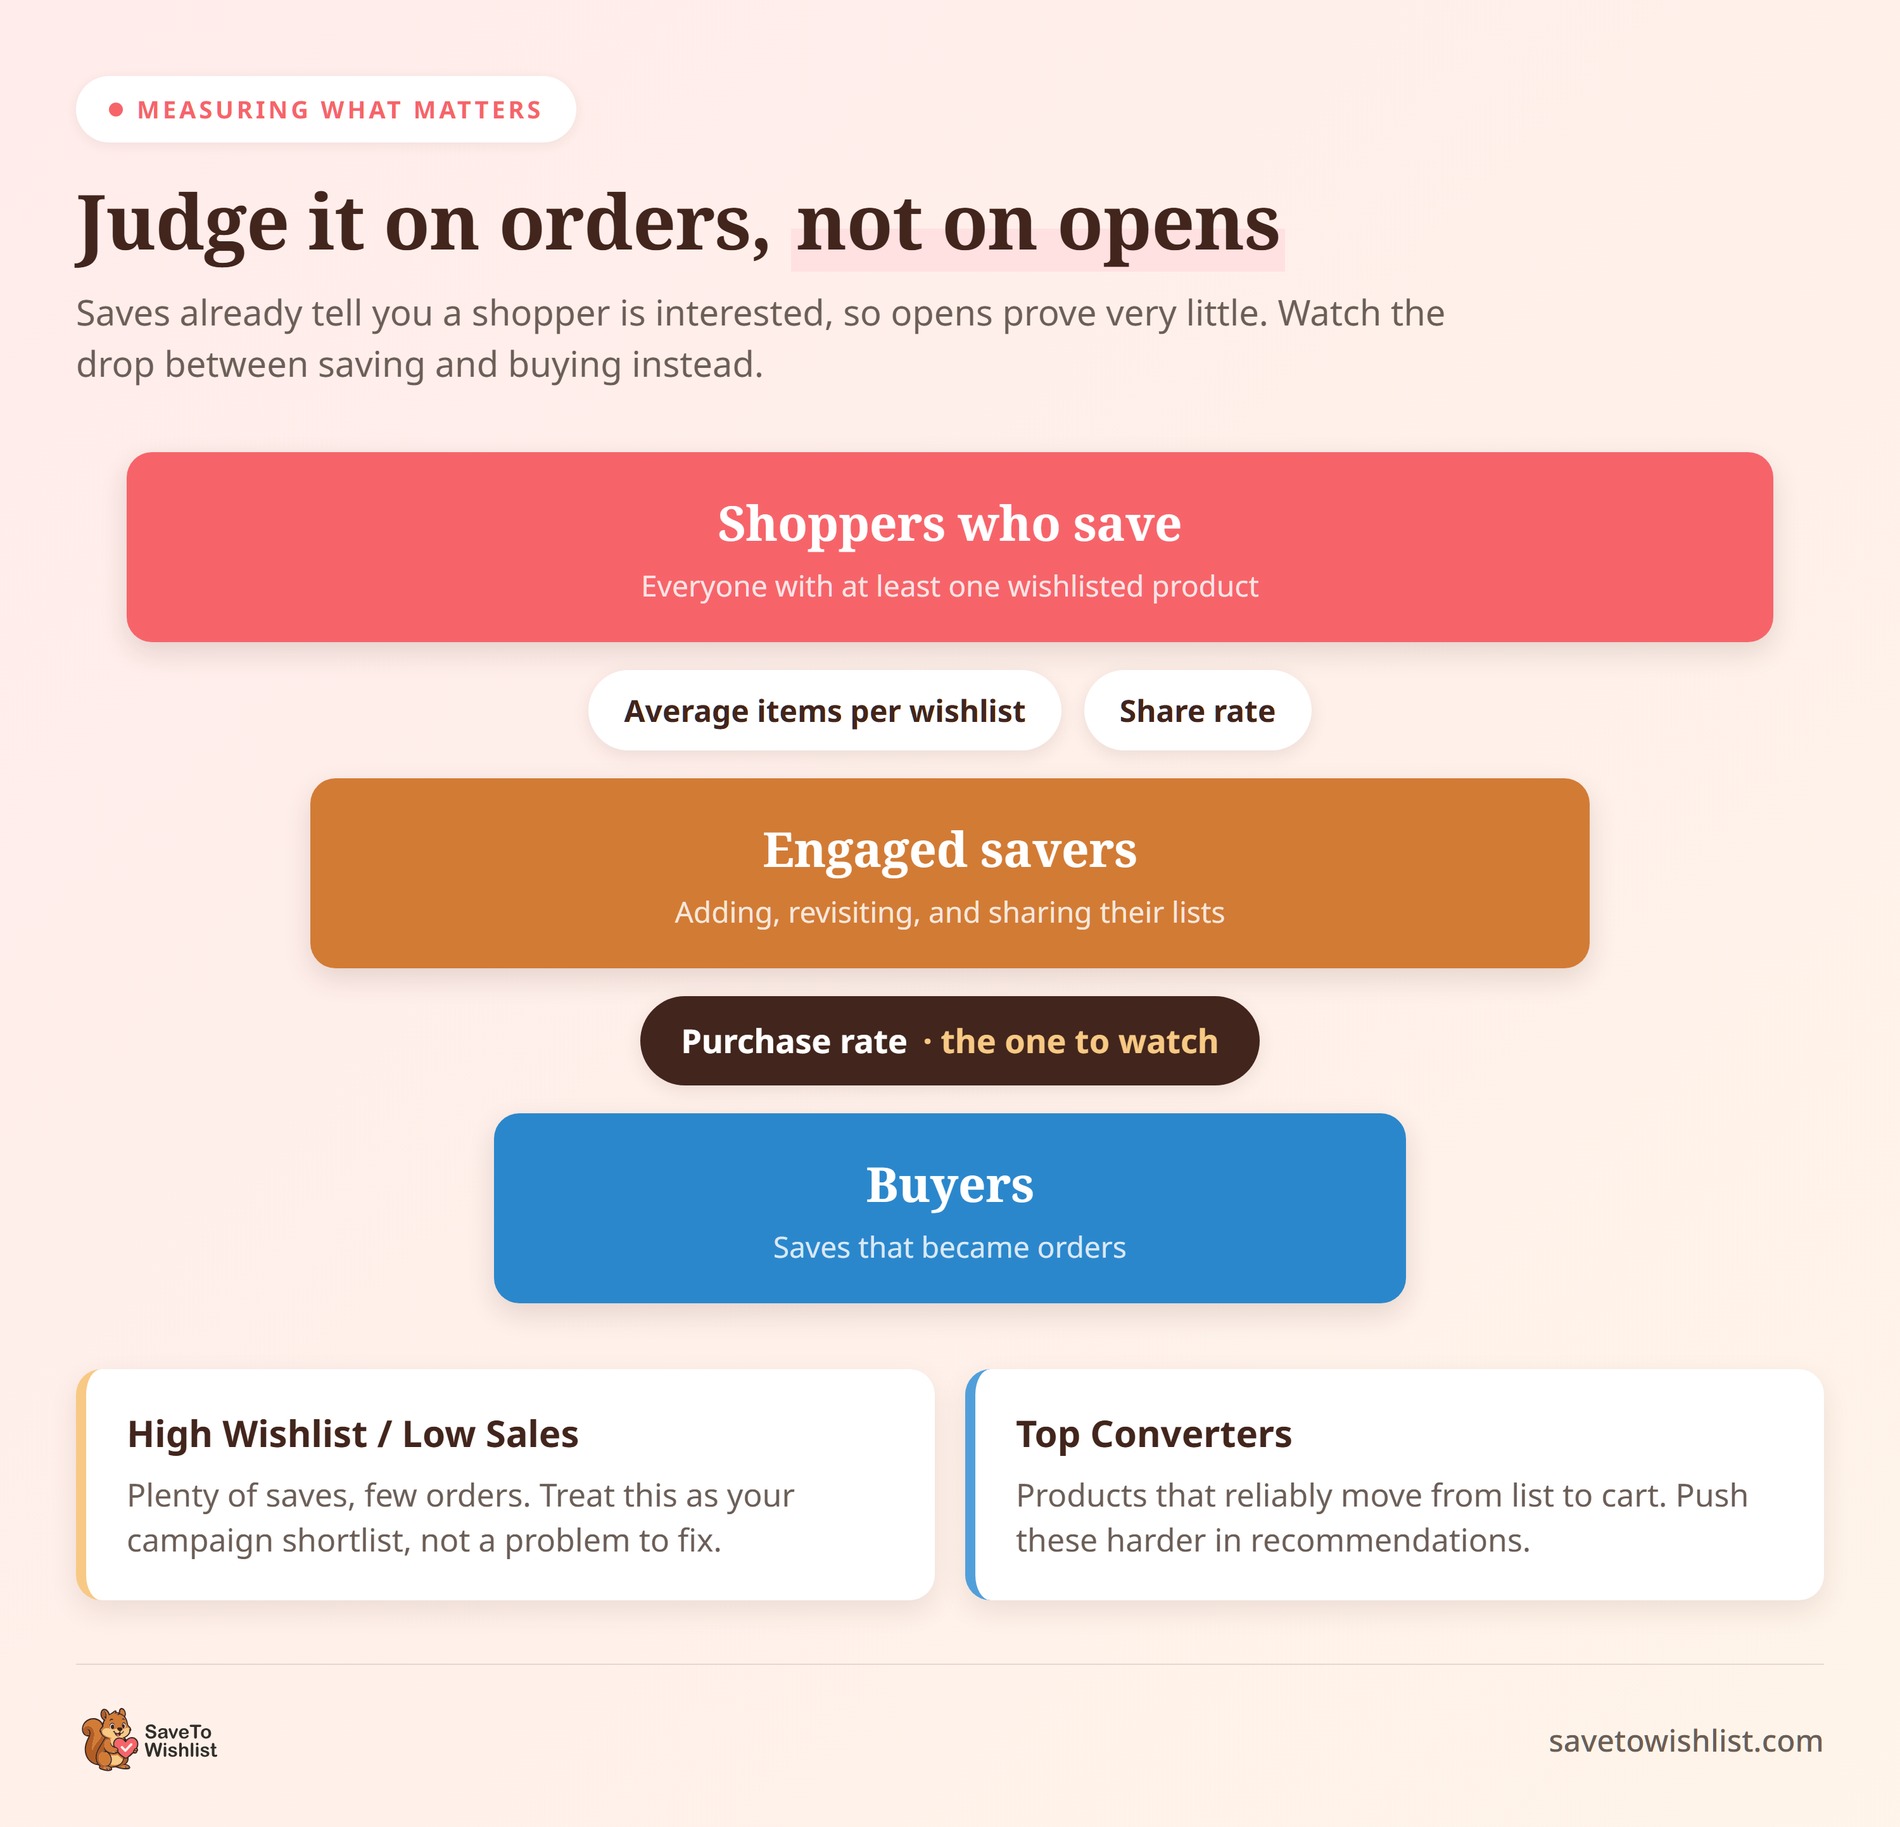
🔍️ What we’ve seen: A mistake we run into often is judging a wishlist campaign on open rates. Saves already tell you the shopper is interested, so opens are close to guaranteed and tell you very little. Take a reading of purchase rate before you launch, then again a few weeks later, and compare those instead.
Give each change a few weeks before you judge it. Wishlist buying cycles are longer than cart cycles by definition, since a save is often the shopper saying “not yet” rather than “no”.
Where Wishlist Personalization Has Limits
Wishlist personalization runs on customer records, so it works best once shoppers are logged in. It’s worth knowing the boundaries before you plan a campaign around it.
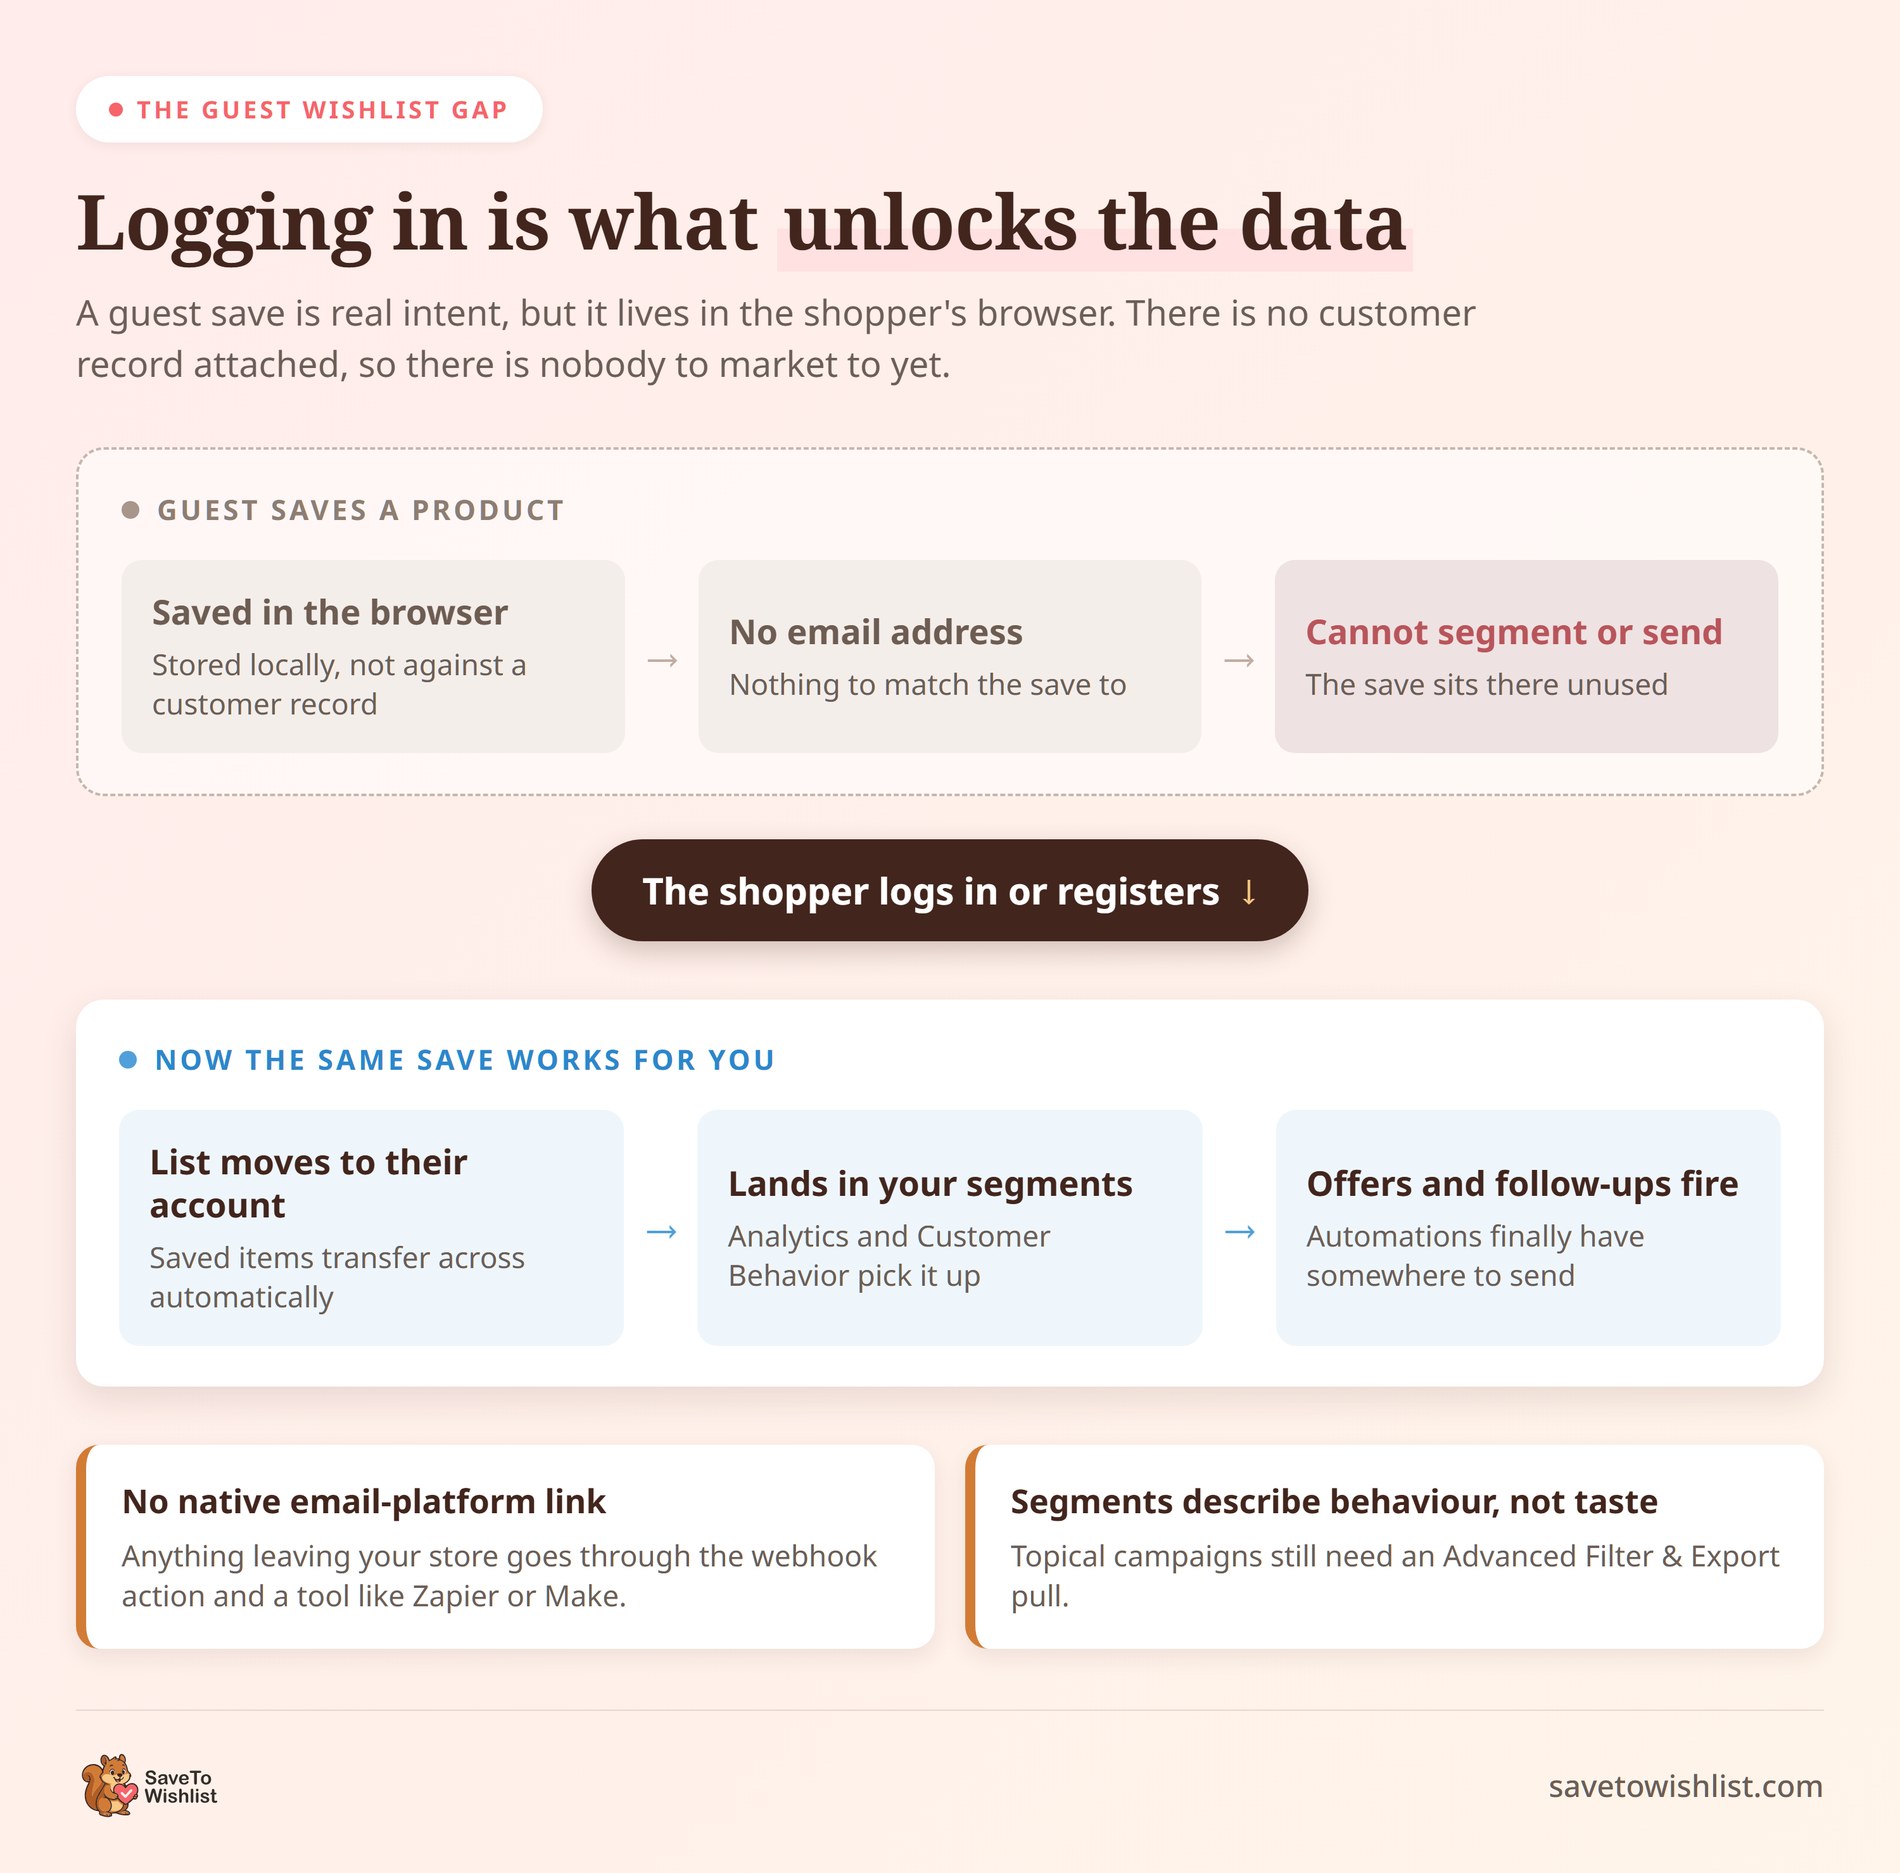
Guest saves are the big one. When a visitor saves a product without an account, SaveTo Wishlist keeps that list in their browser rather than against a customer record, so there’s no email address to segment or send to. The list moves across into their account the moment they register or log in, which is why prompting guests to create an account is doing double duty: better experience for them, usable data for you.
Two more worth planning around:
- There’s no native connection to email platforms, so anything leaving your store goes through the webhook action and a tool like Zapier or Make
- The built-in segments describe behaviour rather than taste, so topical campaigns still need an export
None of this stops the approach working. It just means the honest version of wishlist personalization is “market to your logged-in savers really well”, not “market to everyone who ever clicked a heart icon”.
Frequently Asked Questions: Wishlist Personalization
What is the difference between wishlist personalization and on-site personalization?
Wishlist personalization means using saved-product data to shape your marketing: segments, offers, and follow-up emails. On-site personalization changes what a shopper sees while browsing, like the products on a page. They work well together, but this guide focuses on the data-driven marketing side.
Do I need SaveTo Wishlist Pro to personalize with wishlist data?
The free SaveTo Wishlist plugin captures saves, guest wishlists, and shareable lists. To segment, analyze, and automate on that data, you need SaveTo Wishlist Pro. Pro adds Advanced Analytics, Advanced Filter & Export, Automations, and webhooks. Those are the tools that turn raw saves into personalized marketing.
Can I connect wishlist data to Klaviyo or Mailchimp?
Not directly. SaveTo Wishlist doesn’t have a native Klaviyo or Mailchimp integration. Instead, Pro fires a webhook on wishlist events, and you build the JSON payload yourself from the available variable tags for customer and wishlist details. Send that webhook through Zapier or Make, and you can pass the data into Klaviyo, Mailchimp, or almost any marketing tool you already use.
How do I segment customers by what they save?
SaveTo Wishlist Pro already groups your wishlisters into VIP Customers, Active Buyers, Window Shoppers, and Inactive under Analytics → Customer Behavior. For segments based on what people saved rather than how they behave, use Advanced Filter & Export to pull the data and group shoppers by pattern, then export each group to your CRM or email platform.
Can I personalize for guests who save without an account?
Not by email, because a guest wishlist is stored in the shopper’s browser rather than against a customer record, so there’s no address to send to. The saved items transfer into their account as soon as they log in or register. That makes prompting guests to create an account the step that unlocks everything else on this page.
Will personalized wishlist offers annoy customers?
Rarely, if the offer matches what they saved. A message about a saved product reads as a helpful reminder, not spam. Many abandonments come from browsers who aren’t ready yet. A timely nudge on a saved item often arrives right when they’re finally ready to buy.
Putting Wishlist Personalization To Work
Wishlist personalization isn’t a single feature you switch on. It’s a loop: capture what shoppers save, group them, offer what fits, follow up when the timing is right, then check whether saves actually turned into orders. Done well, your marketing starts to feel like it was written for each shopper, because it was.
Here’s where to start:
- Trust the save over the guess, because a wishlist records intent your other signals only estimate
- Open your five analytics views and find out what’s actually being saved
- Check your built-in segments and pick Window Shoppers as your first target
- Match one offer to a wishlist signal instead of blasting your whole list
- Automate a single follow-up before you try to build five
- Record your purchase rate now so you have something to compare against later
- Prompt guests to create an account, since that’s the step that turns a save into data you can use
The data is already in your store the moment shoppers start saving. Get SaveTo Wishlist Pro to turn it into segments, offers, and automated follow-ups you can run on autopilot. If you’re ready to personalize with real intent instead of guesswork, see what Pro unlocks and put your wishlist data to work!